GEAppliances GSD7750 GSD7780 Part No. 165D4788P141 Pub. No. 49..
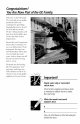
Congratulations! YouAre Now Partof theGEFamily. Welcome/o tim GE f_tmily. We're proud of our quality products and we are commitmd to providing dependable se_,ice. You'll see it in fl_iseasyqo-use Owner' s M mmal and you'll hem il in tim fiiendly voices of our customer se_,ice departmenl. Best of all, you'll expe_Jence fl_ese values each time you use your dishwasher. That's important, because your new dishwasher will be part of your family for ma W years.
Safety information ....... 4- 7 GE& You, A ServicePartnership. Ask any GE appliance owner and they will tell you we stand behind our products with unmatched quality service. However, did you know that most questions result from simple problems that you can easily fix yourseff injust a few minutes? This Owner's Manual can tefl you how. Operating Instructions Readthis Manual Inside you will find ma W helpfhl hints on how to use and maintain your dishwasher properly..
IMPORTANTSAFETYINFORMATION. READALLINSTRUCTIONS BEFOREUSING. WARNING! Foryour safety, the information in this manual must be followed to minimize the risk of fire, explosion, electric shock, or to prevent property damage, personal injury, or loss of life. WATER HEATER SAFETY Under certain conditions hydrogen gas may be produced in a water heater that has not been used for two weeks or more. Hydrogen gas can be explosive under these circumstances.
Use your dishwasher only for its intended purpose as described in this Owner's Manual. PROPER iNSTALLATION ANDMAINTENANCE This dishwasher must be properly installed and located in accordance with the Installation Instructions before it is used. If you did not receive an Installation Instructions sheet with your dishwasher, you can receive one by calling us toll-free at the GEAnswer Center_'800.626.2000.
IMPORTANTSAFETYINFORMATION. READALLINSTRUCTIONS BEFOREUSING. WARNING! DONOL.. Do not tamper with controls. } Do not abuse, sit on, or stand on the door or dish rack of the dishwasher, Do not discmd a dishwasher _qd_out first removing the door of the washing compartmenl. Do noÁ store or use combustible mamrials, gasoline or other tlammable vapors and liquids in fl_e vicinily of this or aW other appliance. Do not allow children to play inside, on or _th this appliance or any discarded appliance.
WHENUSINGYOURDISHWASHER 1Jse only powder or liquid dele_genls or welling agenls recommended tbr use in a dishwasher. D_cate sharp ilems so that they are not likely to damage the door seal. Do not touch the heating element during or immediately atier use. iiiiiiiiiiiii_iil Do not operate your dishwasher unless all enclosure in place. Dmd sharp knives _th the handles up It reduce the _Jsk of cut-type il_jmJes.
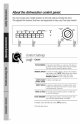
About the dishwasher centre/panel You can Iocate your model number on the tub walljust inside the door. Throughout this manual, features and appearance may vary from your model. I START START DELAY (HRS) CYCLES I I I ENERGY I I I OPTIONS I STATUS I ControlSettings cycle, POTSCRUBBERForheavilysoiled dishes or cookwarewith dried-on or baked-onsoils. Everydaydishes may be included. This cyclewill not removeburned-onfoods. NORMALWASH Forloadsof everydaydishes,glassesandcookware with mediumsoils.
...... E, gy@tJo, TFMP BOOST Providesextra heat for best performance.It is used best with heavily-soileddishes. HEATEDDRY Turnsthe drying heateron for fast drying. This cycle will extend the time to yourwash cycle. ENERGYSAVER Turnsall ENERGYOPTION.Soft. Slowly turn the Dial to the STARYposition. Don't mm it past the $TARTposition, or you could accidenlally miss a _{nse. There is a time del W between stml-up and water till so you will not hem any wash action right awW.
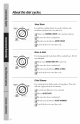
About the dial cycles. Short Wash For quickly washing loads of eveuday dishes with medium soils lhal have not dried on. {{ Select the NORMAL WaSHq, cle and any options. _t_ WARM£R (PRE_ .EATEDQRV} sure the door is unlatched. RINSE & HOL D ii_Slowly turn the Dial to SHORTWASH. i{i{ Rinse & Hold STARTDELA_ ,S, .... / (HRS) "_ SHORT For rinsing partial loads that will be washed later. Do not use detergent. 2 Make sure HEATEDDRY OFFisselected. _Be :} RINSE&HOLD sme the door is unlatched.
Start Delay % START DELAY (HRS) START '). "_ SHORT The STARTDELAYwill allow you lo delay tlae stall time of any cycle no! on the Dial automaIically lk_ sme tim door tbr up Io 6 hours. is unlatched, OFF__ASH PLATE WA (pRESS H_Tm DR _lect RINSE !i iiii'_ & HOLD fi_e wash tycle and option !_Slowlv mm the Dial to desired light Will come on. ffLalch the door you wanL time, The CYCLE ON to stml the (vole. Cycle Sequence POTSCRUBBER 9.9gal. 63min.
Usingthe dishwasher. Checkthe Water Temperature The entering waler must be at least 120°F. and not more than 150 oF., for effective cleaning and to prevent dish damage. Check the water temperalure _th a can@ or meat thermometer. Turn on the hot water fimcet nearest the dishwasher, place the thermometer in a glass and let the water run continuously into tl_e glass until tl_e temperature slops _Jsing. Ac!just your wamr healer, ifneeded.
ProperUseof Detergent Use only detergent specifically made for use in dishwashers. Keep your detergent ilesh and d U. Don't put powder detergent into the dispenser until you're ready to wash dishes. The amount of detergent to use depends on whether your water is hardor soft. With hard water, you need extra detergent. With soft water, you need less detergent. Promct your dishes and dishwasher by contacting your wamr depmlment and asking how hard your water is. Twelve or more grains is exuemely hard water.
Loading the dishwasher racks. For best d/shwashing results, fo//ow these loading gu/de/ines. Features and appearance of racks and silverware baskets may vary from your model. UpperRack The upper rack is tbr glasses, cups and saucers. (]ups and glasses fit best along the sides. This is also a secure place tbr dishwashe>sate plastics. A cup shelf (on some models) may be placed in lhe up or down position to add flexibility. The upper rack is good fbr all kinds of odd-shaped utensils.
Lower Rack When Ioading theiower rack, donottoaU largpta ters or traysin thefrontrightCornerTheymaypreventdetergent fromcirculatingduringthe washcycle, The lower rack is best used fbr plates, saucers, and cool
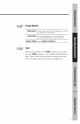
Changingcolorpanels. If.you are redecorating, .you can change .your dishwasher's front panel to match or blend withyour new colors by flipping it over. Each side of each panel is a different color. Youmay also paint a panel with a color of.your own choice. WARNING! Wear gloves when handling door panels. Failure to do so can cause serious cuts. Do not operate dishwasher while changing panels. Changing the Door Panel Take oul Uim screws on either side of the dishwasher door. Remove the side uim.
F--%_.-Top IT°.p _Mountir!g i !i__iii Changing the Bottom Panel I :} Remove the bottom panel attachment ii top mounting screws. screws. {{{_Take out tile top Uim screws and remove tile top { { |iilll. BottomPanelAttachmentScrews !{1 _Slide tile color panel (s) up and oul and pul the color vou want in hont. 1,7 Replace the top uim and {{dReplace screws. tile entire assembly by reversing tile steps.
Caring for the dishwasher. Toclean the control panel use a lightly dampened cloth then dry thoroughly. Toclean the exterior use a good appliance polish wax. Never use sharp objects, scouring pads or harsh cleaners on any part of the dishwasher. Protect against freezing |fyour dishwasher is left in an unheated tile winter, aska sel_qcetechnician to: :/_ Cut fuses 3umocoverscrews offelettlital oi tlJp power circuit to tile place dining dishwasher. Remove breaker.
Before you call for service... Troubleshooting Tips Review the charts on the following pages first and you may not need to call for service. Possible Dishwasfier won't run Noise Causes What To De Fuse is blown, or the circuit breaker tripped Replace fhse or reset circuit breaker. Remove a W other appliances tiom the circuit. Some of the sounds you'll hear are normal Soft tbod disposal shredding action. Drain valve opening pump water out.
Before you call for service... Troubleshooting Tips Possible Causes What To De Water standing m the bottom of the tub This is normal A small amount of clean water mound the outlet on tim mb bottom at the back of the tub keeps tim water seal lubficamd. Waterwon't pump outofthe tub Drain is clogged If you have an air gap, clean it. Check to see if your kitchen sink is draining well. If not, you may need a plumber. If the dishwasher drains into a disposer, run disposer clear.
Possible Causes Stainedtubinterior Dishes don'tdry Dishesandflatware notclean Detergent with colorant was used What To Do Some detergents contain colorant (pigment or dyes) that _41ldiscolor the tub interior wi/h exmnded use. Check lhe dem_gent cup for signs of aW discoloralion. If cup is discolored, change to detelgent _4thout any colorant. Low inlet water temperature Make sure inlet water temperature is correct. Rinse agent dispenser is empty Check the rinse agent dispenser.
Before you call for service... Troubleshooting Tips Possible Causes Spotsandfilming onglassesand flatware Extremely hard water Low inlet water temperature Overloading dishwasher Improper the loading Old or damp detergent powder Rinse agent dispenser empty Too tittle detergent Cloudiness on glassware Black or gray marks on dishes 22 Combination of soft water and too much detergent What To Do To remove stubborn spots from glassware: I Remove all metal utensils flom the dishwasher.
Possible Causes Yellow or brownfilm on tub Tea or coffee stains What To Do Remove the stain by hand, using a solution of 1/2 cup bleach and 3 cups wm_n water. _i{{iiiii{i'i;{iiiii/iiiii{ wmmN¢ Betbre cleaning intelior, wait at least 20 minutes alier a wcle fbr the heating element to cool do,_. Failure to do so can result in bums. An overall yellow or brown film can be caused by iron deposits in water !ilili/iiiiii A special filter in the water supply line is the only way to correct this problem.
Notes $
_iiiiiiii!i_iiiiiiiiliiiiiiii !ilililiiiiii 25
Notes
GEDishwasher Warranty All warranty service provided by our Factory Service Centers, or an authorized Customer Care_ technician. For service, call 800-GE-CARES. GE Will Replace, At No Charge To You: One Year Anypart of the dishwasher which fidls due to a defect in mamfials or workmanship. During this full one-year warranty, GE will also provide, free of charge, all labor and in-home service to replace the defective pmt.
Service TelephoneNumbers. GEAnswer Center_ 800.626.2000 The GE Answer Center ® is open 24 hours a day 7 days a week. In-Home RepaFServiceeOO-GE-CARES (800-432-2737) Expert GE repai_ sepd(e is only a phone (all away. SpecialNeedsService8oo.626.zooo TDD 800-TDD-GEAC (800-833-4322) GE offers, flee of(harge, a brochure to assist in planning a banie> tiee kitchen tbr pe_sons with limited mobility.