
Installation guide


contmued
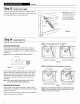
lStep 13 Connect water supply
Connect water supply line to 90° elbow installed in Step 6.
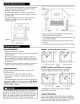
Bracket Impertanr: When opening and
closing the door, the door
blot Water
Supply Line
Open and close the door. Checkto be sure door spring does
not rub against fill hose or water supply line.
spring should not touch the fill
hose. If it does, bend water
valve bracket slightly to
provide clearance between
the spring and the fill hose,
Figure Q
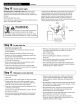
[Step 14co..ectdrain line
Follow all local codes and ordinances.
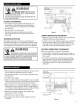
Method 1-Air gap with waste tee or disposer
___ r_ __ N
DRAIN LINE PREPARATION
The molded end is designed to fit 5/8",3/4"or 1" diameter
connections to the air gap, waste tee or disposer. Cut on
premarked line as required for your installation as illustrated
in Figure R.
Note: DONOT CUTCORRUGATEDPORTIONOFHOSE.
Cutting Lines
Figure R Donot (;utcorrugated
portionof hose
If the location requires a longer drain hose, add up to 42" of
length to the factory installed hose. Use5/8" or 7/8"inside
diameter hose and a short section of copper water pipe of
appropriate length and diameter to connect the two hose
ends. Secure connection with appropriate clamps (not
supplied).
Nete: TOTALDRAIN HOSELENGTHMUST NOT EXCEED
10FEETFORPROPERDRAIN OPERATION.
DRAIN LINE INSTALLATION
Connect drain line to air gap, waste tee or disposer using
either Method 1or Method 2 as previously determined. Refer
to Figure S or Figure T.
Secure connection using appropriate clamps (not supplied).
Make sure drain hose is not kinked.
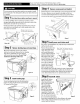
Waste tee installation Disposer Installation
FigureS
Method 2-High drain loopwith waste tee or disposer
Fasten to underside Fasten to underside
.__ ofcountertop _ _ of countertop
Waste tee installation Disposer Installation
FigureT
Nete: BE SURETO REMOVEDRAIN PLUGFROM DISPOSER
BEFOREATTACHINGDRAIN LINE. DISHWASHERWILL NOT
DRAIN IFPLUG IS LEFTIN PLACE.