
Installation guide
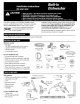


If you need help with any of the following steps, call the
GEAnswer Center':R_Consumer Information Service, 800.626.2000
Do not remove the wood base until you are ready to install
the dishwasher. The dishwasher will tip over when the door
is opened.
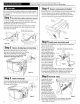
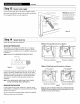
Step1checkdoorbalancebeforewoodbaseis removed
Locate the 2 Phillips head countertop mounting screws
wrapped with yellow tape and stuck to the top or side of the
dishwasher. Set aside for use in Step 12.
Check door balance by opening and closing door. If neces-
saw latch door and adjust one or both springs before the
wood base is removed.
Moving spring hookto rear
hole increases spring tension.
MOreTension
Figure GG
nsertSprhrg
ThroughInsideof Frame
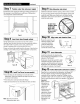
[Step2 Remove levelinglegs and wood base: I
Move thedishwasherclosetothecabinet
andlayiton itsback.Remove thefourleveling
legswithan adjustablewrench.Remove
and discard the wood base. Do not"Kick"
wood base off,damagewill occur.
FigureG
lStep3 Install leveling legs J
Screw leveling legs back into the dishwasher
frame. The legs should extend approximately
3/4"away from the frame.
Figure H
Step4 Remove access panel and toekick
Removethe two screws below the access panel and set aside
for reuse. Remove access panel by backing out the two
screws located between the door and access panel. These
screws are secured to access panel with plastic retainers.
BackOut
2 Screws
Remove2
Screws
Figure I
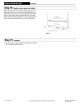
[Step5 Install power cord (when used)
For power cord installation only. Skip this step if dishwasher
will be directly wired.
Remove the junction box
cover and install strain
relief. The power cord
and connections must
comply with the National
Electrical Code, Section
422and/or local codes
and ordinances. The cord
must be no longer than
6 ft. from the junction
box to the receptacle.
Locate the three dish-
washer wires (white,
black and green) with
Note: Check That Harness Leads Are
Threaded Thru Small Hole in Bracket
\ White
\ Neutral
=l__ Live
the stripped ends. Using UL Listed wire nuts of appropriate
size, connect incoming white to white, black to black, and
incoming ground to green wire. Replace the junction box
cover. Checkthatwires are not pinched under cover.
Step 6 ,nStai, e,how
Install the 90° elbow
fitting to the water
valve using thread seal
tape on the threads.
The water valve
requires 3/8" NPT
fitting with external
threads. The opposite
end should fit water Thread
supply line. Position the Seal
end ofthe elbowto face Tape
the rear of the dishwasher.
Do not bend the dishwasher Figure K
frame when installing the 90° elbow fitting to the water
valve as this could cause the door spring to come in
contact with the fill hose.