REFRIGERATORS Side by Side SAFETY INFORMATION OWNER’S MANUAL & INSTALLATION INSTRUCTIONS .....3 USING THE REFRIGERATOR Controls . . . . . . . . . . . . . . . . . . . . . . . . . . 5 ClimateKeeper2TM . . . . . . . . . . . . . . . . . . 7 TurboCoolTM. . . . . . . . . . . . . . . . . . . . . . . 7 ExpressChillTM . . . . . . . . . . . . . . . . . . . . . 8 Water Filter - MWF . . . . . . . . . . . . . . . . 9 Water Filter - XWFE . . . . . . . . . . . . . . 10 Shelves and Bins. . . . . . . . . . . . . . . .
THANK YOU FOR MAKING GE APPLIANCES A PART OF YOUR HOME. Whether you grew up with GE Appliances, or this is your first, we’re happy to have you in the family. We take pride in the craftsmanship, innovation and design that goes into every GE Appliances product, and we think you will too. Among other things, registration of your appliance ensures that we can deliver important product information and warranty details when you need them. Register your GE appliance now online.
READ ALL INSTRUCTIONS BEFORE USING THE APPLIANCE WARNING To reduce the risk of fire, explosion, electric shock, or injury when using your refrigerator, follow these basic safety precautions: Ŷ 7 KLV UHIULJHUDWRU PXVW EH SURSHUO\ LQVWDOOHG DQG ORFDWHG LQ DFFRUGDQFH ZLWK WKH ,QVWDOODWLRQ ,QVWUXFWLRQV EHIRUH LW LV XVHG Ŷ 8QSOXJ WKH UHIULJHUDWRU EHIRUH PDNLQJ UHSDLUV RU cleaning. NOTE: Power to the refrigerator cannot be disconnected by any setting on the control panel.
SAFETY INFORMATION IMPORTANT SAFETY INFORMATION READ ALL INSTRUCTIONS BEFORE USING THE APPLIANCE CONNECTING ELECTRICITY WARNING ELECTRICAL SHOCK HAZARD Plug into a grounded 3-prong outlet 'R QRW UHPRYH WKH JURXQG SURQJ 'R QRW XVH DQ DGDSWHU 'R QRW XVH DQ H[WHQVLRQ FRUG )DLOXUH WR IROORZ WKHVH LQVWUXFWLRQV FDQ UHVXOW LQ GHDWK ILUH RU HOHFWULFDO VKRFN Do not, under any circumstances, cut or remove the third (ground) prong from the power cord.
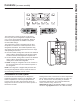
(on some models) Not all features are on all models. Your controls may be similar to the following: OR The temperature controls are preset in the factory DW ) & IRU WKH UHIULJHUDWRU FRPSDUWPHQW DQG ) & IRU WKH IUHH]HU FRPSDUWPHQW $OORZ KRXUV IRU WKH WHPSHUDWXUH WR VWDELOL]H WR WKH SUHVHW recommended settings. The temperature controls can display both the SET temperature as well as the actual temperature in the UHIULJHUDWRU DQG IUHH]HU 7KH DFWXDO WHPSHUDWXUH PD\ vary slightly f
USING THE REFRIGERATOR: Controls Controls (on some models) The temperature controls are preset in the factory at 37°F (2.8°C) for the refrigerator compartment and 0°F (-17.8°C) IRU WKH IUHH]HU FRPSDUWPHQW $OORZ KRXUV IRU WKH WHPSHUDWXUH WR VWDELOL]H WR the preset recommended settings. Filter Status The temperature controls can display both the SET temperature as well as the actual temperature in the refrigerator DQG IUHH]HU 7KH DFWXDO WHPSHUDWXUH PD\ YDU\ VOLJKWO\ IURP WKH 6(7 WHPSHUDWXUH EDVHG R
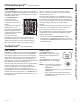
How it Works The ClimateKeeper2™ is the industry’s most advanced refrigeration system, delivering optimum temperature and humidity performance to keep food garden fresh longer DQG UHGXFH IUHH]HU EXUQ The ClimateKeeper2™ system features two evaporators—one for the refrigerator and one for the IUHH]HU This provides two separate cooling systems, and separates the airflow between WKH IUHVK IRRG DQG IUHH]HU compartments during normal cooling operations.
USING THE REFRIGERATOR: ExpressChill™ ExpressChill™ (on some models) How it Works The ExpressChill™ feature is a system of dampers, a fan and a temperature thermistor. The pan is tightly sealed to prevent the pan’s temperature from causing temperature fluctuations in the rest of the refrigerator. The controls for this pan are located in the top of the refrigerator or on the dispenser with the temperature controls. How to Use 1. Empty the pan. Place the Chill Tray in the pan.
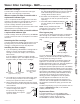
Water filter cartridge The water filter cartridge is located in the back upper right corner of the refrigerator compartment. When to replace the filter on models with a replacement indicator light There is a replacement indicator light for the water filter cartridge on the dispenser. This light will turn orange to tell you that you need to replace the filter soon.
USING THE REFRIGERATOR: :DWHU )LOWHU &DUWULGJH ;:)( Water Filter Cartridge - XWFE (On some models) Water Filter Cartridge Filter Bypass Plug The water filter cartridge holder is located in the back upper-right corner of the fresh food refrigerator compartment. 6HOHFW PRGHOV XVH UDGLR IUHTXHQF\ LGHQWLILFDWLRQ 5),' WR GHWHFW OHDNV DQG PRQLWRU ILOWHU VWDWXV 7KH 5),' WHFKQRORJ\ LV FHUWLILHG E\ WKH )&& To reduce the risk of property damage due to water leakage, you MUST use the filter bypass plug whe
Not all features are on all models. Refrigerator Door Bins and Freezer Door Tilt-Out Bins Large Bins 7KH ODUJHU UHIULJHUDWRU GRRU ELQV DQG IUHH]HU WLOW RXW GRRU bins are adjustable. To remove: Lift the front of the bin straight up, then lift up and out. To replace or relocate: Engage the back side of the bin in the molded supports of the door. Then push down on the front of the bin. Bin will lock in place. Snugger Refrigerator bin Small Bins To remove: Lift the front of the bin straight up then out.
USING THE REFRIGERATOR: Shelves and Bins Shelves and Bins Not all features are on all models. Freezer Baskets (on some models) Door Wine/Beverage Rack (on some models) To remove, slide out to the stop position, lift the front past the stop position, and slide out. Make sure you push the baskets all the way back in before you close the door. This rack holds up to 5 cans, one bottle of wine or one 2-liter bottle of soda. The rack hangs from the sides of the dairy bin. To remove: (PSW\ WKH ZLQH EHYHU
Refrigerator Doors (on some models) The refrigerator doors may feel different than the ones \RX DUH XVHG WR 7KH VSHFLDO GRRU RSHQLQJ FORVLQJ feature makes sure the doors close all the way and are securely sealed. When opening and closing the door you will notice a stop SRVLWLRQ ,I WKH GRRU LV RSHQHG SDVW WKLV VWRS SRLQW WKH door will remain open to allow you to load and unload food more easily. When the door is only partially open, it will automatically close.
Fruit and Vegetable Crispers Convertible Deli Pan (on some models) Excess water that may accumulate in the bottom of the drawers should be wiped dry. On some models, the bottom drawer has full extension slides that allow full access to the drawer. The convertible deli pan has its own cold air duct to DOORZ D VWUHDP RI FROG DLU IURP WKH IUHH]HU FRPSDUWPHQW or refrigerator compartment to flow to the pan. The variable temperature control regulates the air flow IURP WKH &OLPDWH .
Not all features are on all models. Automatic Icemaker The icemaker will produce seven cubes per cycle— ,FHPDNHU ,FHPDNHU Power Switch approximately 100–130 cubes in a 24-hour period, GHSHQGLQJ RQ IUHH]HU FRPSDUWPHQW WHPSHUDWXUH URRP temperature, number of door openings and other use conditions.
USING THE REFRIGERATOR: $XWRPDWLF ,FHPDNHU Automatic Icemaker Accessing Ice and Reaching the Power Switch on Dispenser Models There are two types of ice storage bins on dispenser models. One has a shelf above the bin, the other does not. Special note for models with tilt-out ice bin: Ŷ 7KHVH PRGHOV KDYH D WLOW RXW LFH ELQ 7KH ELQ FDQ EH tilted out as shown in the illustrations, and it will hold itself up while you take ice out or turn the icemaker power switch on and off.
Using the Dispenser 6HOHFW &8%(' ,&( , &586+(' ,&( or WATER . Press the glass gently against the top of the dispenser cradle. The spill shelf is not selfdraining. To reduce water spotting, the shelf and its grille should be cleaned regularly. ,I QR ZDWHU LV GLVSHQVHG Spill Shelf when the refrigerator is first installed, there may be air in the water line system. Press the dispenser arm for at least two minutes to remove trapped air from the water line and to fill the water system.
CARE AND CLEANING Care and Cleaning Cleaning the Outside The dispenser drip area, (on some models) beneath the grille, should be wiped dry. Water left in this area may leave deposits. Remove the deposits by adding undiluted vinegar to the well. Soak until the deposits disappear or become loose enough to rinse away. The dispenser cradle (on some models). Before cleaning, lock the dispenser by pressing and holding the LOCK pad for 3 seconds.
Behind the Refrigerator Be careful when moving the refrigerator away from the wall. All types of floor coverings can be damaged, particularly cushioned coverings and those with embossed surfaces. Pull the refrigerator straight out and return it to position by pushing it straight in. Moving the refrigerator in a side direction may result in damage to the floor covering or refrigerator. When pushing the refrigerator back, make sure you don’t roll over the power cord or icemaker supply line (on some models).
CARE AND CLEANING Care and Cleaning Replacing the Light Bulbs (Cont.) WARNING Before replacing a burned-out light bulb, the refrigerator should be unplugged in order to avoid contact with a live wire filament. (A burned-out light bulb may break when being replaced.) 7XUQLQJ WKH FRQWURO WR WKH 2)) SRVLWLRQ GRHV QRW UHPRYH SRZHU WR WKH OLJKW FLUFXLW Refrigerator Compartment—Lower Light This light is located above the top drawer. 1. Unplug the refrigerator. 2. Lift the light shield up and pull it out. 3.
Refrigerator Models 22, 23, 25, 26, 27 & 29 Questions? Call 800.GE.CARES (800.432.2737) or visit our Website at: GEAppliances.com In Canada, call 1.800.561.3344 or visit our Website at: GEAppliances.ca BEFORE YOU BEGIN Read these instructions completely and carefully. • IMPORTANT — Save these instructions for local inspector’s use • IMPORTANT — Observe all governing codes and ordinances. • Note to Installer – Be sure to leave these instructions with the Consumer. • Note to Consumer – .
INSTALLATION INSTRUCTIONS Installation Instructions MOVING THE REFRIGERATOR CAUTION Lifting Hazard. Single person lift can cause injury. Use assistance when handling, moving or lifting the refrigerator doors. NOTE: When moving door, to prevent damage to door and electronics carefully place the door in a proper location. 2 REMOVE THE BASE GRILLE Remove the grille by removing the two Phillips head screws.
MOVING THE REFRIGERATOR (Cont.) 4 DISCONNECT THE POWER COUPLING (on some models) If the refrigerator has a water dispenser, there is a power line (harness) from the cabinet LQWR WKH ERWWRP KLQJH RQ WKH IUHH]HU GRRU WKDW must be disconnected. To disconnect, pull apart at the coupling.
INSTALLATION INSTRUCTIONS Installation Instructions MOVING THE REFRIGERATOR (Cont.) 7 REMOVE THE FREEZER DOOR WARNING )ROORZ DOO VWHSV IRU UHPRYLQJ DQG UHLQVWDOOLQJ WKH GRRU )DLOXUH WR IROORZ WKHVH instructions, leaving off parts, or overtightening screws, can lead to the door falling off and result in injury and property damage. A 5HPRYH WKH IUHH]HU GRRU WRS KLQJH FRYHU LI HTXLSSHG E\ HLWKHU VTXHH]LQJ LW DQG SXOOLQJ LW up or by prying it off with a plastic putty knife.
MOVING THE REFRIGERATOR (Cont.) 8 REMOVE THE REFRIGERATOR DOOR (Cont.) ' Lift the refrigerator door up and off the bottom hinge. ,I WKH UHIULJHUDWRU KDV D UHIUHVKPHQW FHQWHU RQH person should slowly lift the door up and off the bottom hinge and the second person should carefully guide the electrical lines (harnesses) through the bottom hinge.
INSTALLATION INSTRUCTIONS Installation Instructions INSTALLING THE REFRIGERATOR REFRIGERATOR LOCATION DIMENSIONS AND SPECIFICATIONS • 'R QRW LQVWDOO WKH UHIULJHUDWRU ZKHUH WKH WHPSHUDWXUH ZLOO JR EHORZ ) & EHFDXVH it will not run often enough to maintain proper temperatures. • 'R QRW LQVWDOO WKH UHIULJHUDWRU ZKHUH WKH WHPSHUDWXUH ZLOO JR DERYH ) & EHFDXVH it will not perform properly. • 'R QRW LQVWDOO WKH UHIULJHUDWRU LQ D ORFDWLRQ H[SRVHG WR water (rain, etc.) or direct sunlight.
INSTALLING THE REFRIGERATOR (Cont.) 1 CONNECTING THE REFRIGERATOR TO THE HOUSE WATER LINE C )DVWHQ WKH WXELQJ LQWR WKH FODPS SURYLGHG WR hold it in position. You may need to pry open the clamp.
INSTALLATION INSTRUCTIONS Installation Instructions INSTALLING THE REFRIGERATOR (Cont.) 4 PUT THE REFRIGERATOR IN 5 LEVEL THE REFRIGERATOR PLACE (cont.) Move the refrigerator to its final location. To adjust the rollers on 23’/25’ CustomStyle™ models: 5 LEVEL THE REFRIGERATOR Turn the front roller adjusting screws clockwise to raise Roller adjusting screws the refrigerator, counterclockwise to lower LW 8VH D ´ KH[ ZUHQFK ZLWK H[WHQVLRQ or an adjustable wrench.
INSTALLING THE REFRIGERATOR (Cont.) 7 REPLACE THE BASE GRILLE Replace the grille by installing the two Phillips head screws. 9 START THE ICEMAKER Set the icemaker power switch to the I (on) position. The icemaker will not begin to operate XQWLO LW UHDFKHV LWV RSHUDWLQJ WHPSHUDWXUH RI ) ± & RU EHORZ ,W ZLOO WKHQ EHJLQ RSHUDWLRQ DXWRPDWLFDOO\ ,W ZLOO WDNH ± GD\V WR ILOO WKH LFH bin.
INSTALLATION INSTRUCTIONS Installation Instructions INSTALLING THE WATER LINE (icemaker & dispenser models) BEFORE YOU BEGIN WHAT YOU WILL NEED 5HFRPPHQGHG FRSSHU ZDWHU VXSSO\ NLWV DUH :; ; :; ; RU :; ; GHSHQGLQJ RQ WKH DPRXQW RI tubing you need. Approved plastic water supply lines are Universal Water Line Refrigerator Tubing :; ; :; ; DQG :; ; When connecting your refrigerator to a Reverse Osmosis Water System, the only approved LQVWDOODWLRQ LV ZLWK D *( $SSOLDQFHV 59.
INSTALLING THE WATER LINE (Cont.) WHAT YOU WILL NEED (Cont.) NOTE: The only GE Appliances approved plastic tubing is that supplied in Universal Water Line 5HIULJHUDWRU 7XELQJ NLWV 'R QRW XVH DQ\ RWKHU SODVWLF water supply line because the line is under pressure at all times. Certain types of plastic will crack or rupture with age and cause water damage to your home.
INSTALLATION INSTRUCTIONS Installation Instructions INSTALLING THE WATER LINE (Cont.) 4 FASTEN THE SHUTOFF VALVE )DVWHQ WKH VKXWRII YDOYH WR WKH FROG ZDWHU SLSH with the pipe clamp. Pipe Clamp Saddle-Type Shutoff Valve Vertical Cold Water Pipe NOTE: Commonwealth of Massachusetts Plumbing Codes 248CMR shall be adhered to. Saddle valves are illegal and use is not permitted in Massachusetts. Consult with your licensed plumber.
Newer refrigerators sound different from older refrigerators. Modern refrigerators have more features and use newer technology. Do you hear what I hear? These conditions are normal. HUMMM... WHOOSH... Ŷ T he new high efficiency compressor may run faster and longer than your old refrigerator and you may hear a high-pitched hum or pulsating sound while it is operating. Ŷ Sometimes the refrigerator runs for an extended period, especially when the doors are opened IUHTXHQWO\ 7KLV PHDQV WKDW WKH )URVW *XDUG
TROUBLESHOOTING TIPS Troubleshooting Tips... Before you call for service Save time and money! Review the charts on the following pages first and you may not need to call for service. Problem Possible Causes What To Do Filter Status Indicator LED turns amber Filter reaching expired state Filter expired Press the Filter Status pad to show remaining filter life. Press the Filter Status pad to show remaining filter life. ,I WKH GLVSOD\ VKRZV WKH ILOWHU QHHGV WR EH replaced.
Problem Possible Causes What To Do Automatic icemaker does not work Icemaker switch is in the 2)) position. Slide the switch to the ON position. Water supply turned off or not connected. 6HH ,QVWDOOLQJ WKH ZDWHU OLQH Freezer compartment too warm. Wait 24 hours for the refrigerator to completely cool down. Piled up cubes in the storage bin cause icemaker to shut off. Level cubes by hand. Ice cubes stuck in icemaker. Turn off the icemaker, remove cubes and turn the icemaker back on.
TROUBLESHOOTING TIPS Troubleshooting Tips... Before you call for service Problem Possible Causes What To Do No water or ice cube production Supply line or shutoff valve is clogged. Call a plumber. Water filter clogged. Replace filter cartridge or remove filter and install plug. Dispenser is LOCKED. 3UHVV DQG KROG WKH /2&. &21752/6 SDG IRU seconds. Filter is not properly installed.
GEAppliances.com For US Customers, DOO ZDUUDQW\ VHUYLFH LV SURYLGHG E\ RXU )DFWRU\ 6HUYLFH &HQWHUV RU DQ DXWKRUL]HG &XVWRPHU &DUH® technician. To schedule service online, visit us at GEAppliances.com, or call GE Appliances at 800.GE.CARES (800.432.2737). Please have your serial number and your model number available when calling for service. In Canada, call 800.561.3344. Servicing your refrigerator may require the use of the onboard data port for diagnostics.
LIMITED WARRANTY Water Filter Cartridge MWF Limited Warranty Contact us at geapplianceparts.com, or call 800.GE.CARES. For the period of GE Appliances will replace Thirty Days )URP WKH GDWH of the original purchase Any part of the water filter cartridge which fails due to a defect in materials or workmanship during this limited thirty-day warranty.* What GE Appliances will not cover: Ŷ Ŷ Ŷ Ŷ Ŷ Ŷ Service trips to your home to teach you how to use the product.
Contact us at geapplianceparts.com, or call 800.GE.CARES. For the period of GE Appliances will replace Thirty Days )URP WKH GDWH of the original purchase Any part of the water filter cartridge which fails due to a defect in materials or workmanship during this limited thirty-day warranty.* What GE Appliances will not cover: Ŷ Ŷ Ŷ Ŷ Ŷ Ŷ Service trips to your home to teach you how to use the product.
Performance Data Sheet SmartWater™ Filtration System—GE Appliances MWF Cartridge The concentration of the indicated substances in water entering the system was reduced to a concentration less than or equal to the SHUPLVVLEOH OLPLW IRU ZDWHU OHDYLQJ WKH V\VWHP DV VSHFLILHG LQ 16) $16, 6WDQGDUG DQG 6WDQGDUG 6\VWHP WHVWHG DQG FHUWLILHG E\ 16) ,QWHUQDWLRQDO DJDLQVW 16) $16, 6WDQGDUG DQG 6WDQGDUG IRU WKH UHGXFWLRQ RI VXEVWDQFHV OLVWHG EHORZ Capacity 300 Gallons (1,135 Liters).
Performance Data Sheet Model: GE Appliances XWFE Ŷ 6\VWHP FHUWLILHG E\ ,$302 5 7 DJDLQVW 16) $16, 6WDQGDUGV DQG 3 IRU WKH UHGXFWLRQ RI FODLPV VSHFLILHG RQ WKH SHUIRUPDQFH GDWD VKHHW DQG at iapmort.org. Ŷ $FWXDO SHUIRUPDQFH PD\ YDU\ ZLWK ORFDO ZDWHU FRQGLWLRQV Substance Tested for Reduction ,QIOXHQW FKDOOHQJH Maximum permissible concentration product water PJ / FRQFHQWUDWLRQ PJ / Avg % Reduction Chlorine Taste and Odor PJ / 1 $ > 99 Chloramine Taste and Odor PJ /
APPLIANCE COMMUNICATION Appliance Communication (on some models) REGULATORY INFORMATION FCC/IC Compliance Statement: 7KLV GHYLFH FRPSOLHV ZLWK 3DUW RI WKH )&& 5XOHV 7KLV GHYLFH FRQWDLQV OLFHQVH H[HPSW WUDQVPLWWHU V UHFHLYHU V WKDW FRPSO\ ZLWK ,QQRYDWLRQ 6FLHQFH DQG (FRQRPLF 'HYHORSPHQW &DQDGD¶V OLFHQVH H[HPSW 566 V 2SHUDWLRQ LV subject to the following two conditions: 1. This device may not cause harmful interference. 2.
Notes 49-1000471 Rev.
CONSUMER SUPPORT Consumer Support GE Appliances Website Have a question or need assistance with your appliance? Try the GE Appliances Website 24 hours a day, any day of the year! You can also shop for more great GE Appliances products and take advantage of all our on-line support services designed for \RXU FRQYHQLHQFH ,Q WKH 86 GEAppliances.com ,Q &DQDGD GEAppliances.
Cote à Cote RÉFRIGÉRATEUR INFORMATION DE SÉCURITÉ IMPORTANTES . . . . . . . . . . . . . . . . . . .3 UTILISATION DU RÉFRIGÉRATEUR Caractéristiques . . . . . . . . . . . . . . . . . . . . . .5 ClimateKeeper2TM . . . . . . . . . . . . . . . . . . . . .7 TurboCoolTM. . . . . . . . . . . . . . . . . . . . . . . . . .7 ExpressChillTM . . . . . . . . . . . . . . . . . . . . . . . .8 Le filtre à eau - MWF . . . . . . . . . . . . . . . . . .9 Le filtre à eau - XWFE . . . . . . . . . . . . . . . .
NOUS VOUS REMERCIONS D’ACCUEILLIR GE APPLIANCES CHEZ VOUS Que vous ayez grandi avec GE Appliances ou qu’il s’agisse de votre première acquisition, nous sommes heureux de vous accueillir dans notre famille. Nous sommes fiers du savoir-faire, de l’innovation et de l’esthétique qui composent chaque appareil GE Appliances, et nous pensons que vous le serez aussi.
LISEZ TOUTES LES DIRECTIVES AVANT D'UTILISER L'APPAREIL Pour réduire le risque d’incendie, d’explosion, de choc électrique ou de blessures lorsque vous utilisez votre réfrigérateur, veuillez suivre ces consignes de sécurité : &H UpIULJpUDWHXU GRLW rWUH FRUUHFWHPHQW LQVWDOOp Ŷ /HV HQIDQWV HW OHV SHUVRQQHV GRQW OHV FDSDFLWpV VRQW UpGXLWHV conformément aux instructions d'installation avant toute sur le plan physique, sensoriel ou mental, ou qui manquent utilisation.
INFORMATION DE SÉCURITÉ INFORMATION DE SÉCURITÉ IMPORTANTES LISEZ TOUTES LES DIRECTIVES AVANT D'UTILISER L'APPAREIL BRANCHEMENTS ÉLECTRIQUES AVERTISSEMENT RISQUE DE CHOC ÉLECTRIQUE Branchez l’appareil dans une prise triple avec terre. Ne retirez pas la broche de terre. N’utilisez pas d’adaptateur. N’utilisez pas un cordon de rallonge. Le non-respect de ces instructions peut entraîner des risques d’incendies, des chocs électriques ou la mort.
(sur certains modèles) Toutes les options ne sont pas disponibles sur tous les modèles. Les commandes de votre appareil peuvent se présenter 25 Les commandes de températures sont préréglées en usine à 3°C (37°F) pour le compartiment réfrigérateur et à -18°C (0°F) pour le compartiment congélateur. Veuillez attendre 24 heures pour que la température se stabilise au préréglage recommandé.
UTILISATION DU RÉFRIGÉRATEUR : Commandes Fonctions (sur certains modèles) La temperature est pré-réglée à l’usine au numéro 3°C (37°F) pour le compartiment réfrigérateur et –18°C (0°F) pour le compartiment congélateur. Attendez 24 heures que la température se stabilise aux temperatures recommandées pré-réglées.
Fonctionnement Le système ClimateKeeper2™ est le système de réfrigération le plus avancé qui soit permettant l’obtention de conditions de température et d’humidité optimales dans le réfrigérateur. Le système ClimateKeeper2™ est équipé de deux évaporateurs — un pour le réfrigérateur et un pour le congélateur. ouvertes sans perte d’humidité excessive.
UTILISATION DU RÉFRIGÉRATEUR : ExpressChill™ ExpressChill™ (sur certains modèles) Fonctionnement Le fonction ExpressChill™ comporte un système de registres, un ventilateur et une thermistance. Le bac est scellé hermétiquement afin d’empêcher les variations de température dans le reste du réfrigérateur. Les commandes pour ce bac sont situées sur le haut du réfrigérateur ou au niveau du distributeur avec les commandes de température. Mode d’emploi 1. Videz le bac.
Cartouche du filtre à eau La cartouche du filtre à eau se trouve dans le coin droit arrière supérieur du compartiment réfrigérateur, juste au-dessous des commandes de température. À quel moment remplacer le filtre sur les modèles avec indicateur lumineux de remplacement Une lumière indique la nécessité de remplacer la cartouche du filtre à eau sur le distributeur. Cette lumière devient orange pour vous avertir de remplacer bientôt le filtre.
UTILISATION DU RÉFRIGÉRATEUR : Filtre d’eau à cartouche - XWFE Filtre d’eau à cartouche - XWFE (sur certains modèles) Filtre d’eau à cartouche Bouchon de dérivation du filtre Le support du filtre d’eau à cartouche est situé dans le coin supérieur arrière droit du compartiment réfrigérateur. Pour réduire le risque de dommage à la propriété en raison de fuites d’eau, vous DEVEZ utiliser un bouchon de dérivation du filtre lorsqu’une cartouche filtrante de rechange n’est pas disponible.
Toutes les caractéristiques ne sont pas disponibles sur tous les modèles. Bacs de porte de réfrigérateur et bacs basculants de porte de congélateur. Grands bacs Vous pouvez régler les plus grands bacs de porte de réfrigérateur et les bacs basculants de porte de congélateur. L’ergot Enlèvement: Soulevez l’avant du bac droit vers le haut, puis soulevez et enlevez. Remise en place ou relocalisation: Engagez l’arrière du bac dans les soutiens moulés de la porte. Puis poussez vers le bas l’avant du bac.
UTILISATION DU RÉFRIGÉRATEUR : Clayettes et bacs Clayettes et bacs Toutes les caractéristiques ne sont pas disponibles sur tous les modèles. Paniers du congélateur (sur certains modèles) Support à bouteilles de vin/boissons Pour retirer, faites-la glisser jusqu’à la position d’arrêt, soulevez l’avant au delà de la position d’arrêt et faites sortir en glissant. (sur certains modèles) Prenez soin de pousser les panniers jusqu’au fond pour refermer la porte.
Les portes du réfrigérateur (sur certains modèles) Les portes de votre réfrigérateur ne sont pas tout à fait comme celles dont vous avez l’habitude. Un système spécial d’ouverture/ fermeture assure que les portes ferment complètement et hermétiquement. Lorsque vous ouvrez et fermez les portes, vous remarquerez qu’elles sont munies d’une position d’arrêt.
Bacs à fruits et légumes Bac à charcuterie convertible Essuyez l’eau qui peut s’accumuler dans le fond des bacs. (sur certains modèles) Sur certains modèles, ,le bac inférieur est un tiroir à extension complète pour permettre un accès aux aliments sur toute la profondeur du bac. Le bac à charcuterie convertible est équipé de son propre conduit d’air froid pour permettre un flux d’air froid du compartiment de réfrigération ou de congélation vers le bac à charcuterie.
Toutes les options ne sont pas disponibles sur tous les modèles. Machine à glaçons automatique Machine à glaçons La machine à glaçons produira 7 glaçons par cycle—soit environ 100–130 glaçons toutes les 24 heures—selon la température du congélateur, la température ambiante, la fréquence d’ouverture des portes et d’autres conditions d’utilisation.
UTILISATION DU RÉFRIGÉRATEUR : Machine à glaçons automatique Machine à glaçons automatique Accès à la glace et à l’interrupteur sur les modèles avec distributeur Il existe deux types de tiroirs à glace sur les modèles avec distributeur. Un type est doté d’une clayette au-dessus du tiroir, l’autre type n’en a pas.
(sur certains modèles) Pour utiliser le distributeur Sélectionnez CUBED ICE Lumière du distributeur JODoRQV &586+(' ,&( (glace concassée) ou (eau). :$7(5 Cette touche allume et éteint la lumière du distributeur. Vous allumez également la lumière en appuyant sur le bras de distribution. Si cette ampoule brûle, vous devez la remplacer par une ampoule d’au maximum 6 watts 12V. Appuyez doucement le verre contre le haut du bras de distribution.
ENTRETIEN ET NETTOYAGE Entretien et nettoyage Nettoyage de l’extérieur La zone de trop-plein du distributeur, sous la grille, doit être soigneusement essuyée. L’eau laissée dans cette zone peut laisser des marques. Eliminez ces dépôts en ajoutant du vinaigre non dilué au conteneur. Laissez tremper jusqu’à ce que les dépôts disparaissent ou soient suffisamment lâches pour être éliminés par rinçage.
Derrière le réfrigérateur Prenez un soin particulier lorsque vous éloignez le réfrigérateur du mur. Tous les types de revêtements de sol peuvent être endommagés, particulièrement ceux qui sont coussinés ou dont la surface est gaufrée. Lorsque vous remettez le réfrigérateur en place en le poussant, veillez à ne pas le faire rouler sur le cordon d’alimentation ou sur la conduite d’eau de la machine à glaçons.
ENTRETIEN ET NETTOYAGE Entretien et nettoyage Remplacement des ampoules (Suite) AVERTISSEMENT Avant de remplacer une ampoule grillée, le réfrigérateur doit être débranché afin d’éviter le contact avec un filament sous tension. (Une ampoule grillée peut se briser lors de son remplacement.) Le courant du circuit de la lampe n’est pas interrompu même en tournant le bouton de la commande de température vers la position OFF (arrêt).
Réfrigérateur Modèles 22, 23, 25, 26, 27 & 29 Des Questions ? Appelez 800.GE.CARES (800.432.2737) ou consultez notre site internet : GEAppliances.com Au Canada, appelez le 1.800.561.3344 ou consultez notre site internet : geappliances.ca AVANT DE COMMENCER Lisez ces instructions entièrement et attentivement. • IMPORTANT — Conservez ces instructions pour l’inspecteur électrique local. • IMPORTANT — 5HVSHFWH] WRXV OHV codes et règlements en vigueur.
INSTRUCTIONS D’INSTALLATION Instructions d’installation DÉMÉNAGEMENT DU RÉFRIGÉRATEUR ATTENTION Soulèvement de poids lourd. 2 ENLEVEZ LA GRILLE DE BASE Enlevez la grille en retirant les deux vis à tête cruciforme. Une seule personne risque de se blesser à soulever un tel poids. Faites-vous aider lors de la manipulation, le déplacement et le soulèvement des portes de réfrigérateur. REMARQUE : Lors du déplacement, déposez la porte à un endroit sûr qui n’abîmera ni la porte ni son électronique.
DÉMÉNAGEMENT DU RÉFRIGÉRATEUR (Suite) 4 DÉBRANCHEZ LE RACCORD D’ALIMENTATION ÉLECTRIQUE (sur certains modèles) Si le compartiment réfrigération est doté d’un rafraîchisseur d’eau, alors il faut débrancher la conduite électrique (faisceau) qui part de la carosserie et s’insère dans la charnière inférieure de la porte du compartiment congélation. Pour débrancher, tirez de chaque côté du raccord.
INSTRUCTIONS D’INSTALLATION Instructions d’installation DÉMÉNAGEMENT DU RÉFRIGÉRATEUR (Suite) 7 ENLEVEZ LA PORTE DU COMPARTIMENT CONGÉLATION 8 AVERTISSEMENT Suivez toutes les étapes pour enlever et réinstaller la porte. La porte risque de tomber en plus de causer des blessures ou des dommages si vous ne respectez pas ces instructions, oubliez des pièces ou effectuez un serrage excessif des vis.
DÉMÉNAGEMENT DU RÉFRIGÉRATEUR (Suite) 8 ENLEVEZ LAPORTEDU COMPARTIMENT RÉFRIGÉRATION (suite) D Soulevez la porte du compartiment réfrigération pour la dégager de la charnière inférieure. Si le compartiment réfrigération est doté d’un centre de rafraîchissement, une personne doit soulever lentement la porte pour la dégager de la charnière inférieure, pendant qu’une deuxième personne guide minutieusement les conduites électriques (faisceaux) à travers la charnière inférieure.
INSTRUCTIONS D’INSTALLATION Instructions d’installation INSTALLATION DU RÉFRIGÉRATEUR EMPLACEMENT DU RÉFRIGÉRATEUR DIMENSIONS ET SPÉCIFICATIONS (pour les modèles « CustomStyle™ » de 23’) • N’installez jamais votre réfrigérateur dans XQ HPSODFHPHQW R OD WHPSpUDWXUH DPELDQWH sera inférieure à 16° C (60° F). Il ne se mettra pas en marche suffisamment souvent pour maintenir des températures convenables.
DÉMÉNAGEMENT DU RÉFRIGÉRATEUR (Suite) 1 BRANCHEMENT DU RÉFRIGÉRATEUR À LA CONDUITE D’EAU DE LA MAISON (modèles avec machine à glaçons et distributeur) Une alimentation d’eau froide est requise pour faire fonctionner la machine à glaçons et le distributeur. Vous devrez en fournir une si elle n’existe pas. Voir la section Installation de la conduite d’eau. NOTES: • Avant de brancher la conduite au réfrigérateur, assurez-vous que le cordon d’alimentation électrique n’est pas branché à la prise murale.
INSTRUCTIONS D’INSTALLATION Instructions d’installation INSTALLATION DU RÉFRIGÉRATEUR 4 PLACEZ LE RÉFRIGÉRATEUR DANS SON EMPLACEMENT DE NIVEAU (suite) Transportez le réfrigérateur jusqu’à sa destination. Pour ajuster les roulettes sur les modèles CustomStyle™ de 23’ / 25’ : 5 METTEZ LE RÉFRIGÉRATEUR DE NIVEAU On peut mettre le réfrigérateur de niveau en réglant les roulettes situées près des charnières inférieures.
INSTALLATION DU RÉFRIGÉRATEUR (Suite) 7 REPLACEZ LA GRILLE DE BASE 5HSODFH] OD JULOOH GH EDVH HQ LQVWDOODQW OHV GHX[ YLV j tête cruciforme (Phillips). 9 METTEZ EN MARCHE LA MACHINE À GLAÇONS Mettez le commutateur de la machine à glaçons en position ON (marche). La machine à glaçons ne se met en marche que lorsqu’elle atteint une température de fonctionnement de –9° C (15° F) ou moins. Elle commence immédiatement à fonctionner. Il faudra 2 à 3 jours pour remplir le bac à glaçons.
INSTRUCTIONS D’INSTALLATION Instructions d’installation INSTALLATION DE LA CONDUITE D’EAU (modèles avec machine à glaçons et distributeur) AVANT DE COMMENCER CE DONT VOUS AUREZ BESOIN Nous recommandons les trousses d’alimentation d’eau en cuivre WX8X2, WX8X3, WX8X4, selon le montant de conduite dont vous avez besoin. Nous approuvons les conduites d’eau en matière plastique les trousses de tuyau d’eau universel pour réfrigérateur (WX08X10006, WX08X10015 et WX08X10025).
INSTALLATION DE LA CONDUITE D’EAU (Suite) CE DONT VOUS AUREZ BESOIN (Suite) REMARQUE : Les seuls tuyaux en matière plastique approuvés par GE Appliances sont ceux qui font fournis dans les trousses de tuyau de conduite d’eau universel pour réfrigérateur. N’utilisez jamais un autre tuyau en matière plastique, car le tuyau d’alimentation d’eau est tout le temps sous pression.
INSTRUCTIONS D’INSTALLATION Instructions d’installation INSTALLATION DE LA CONDUITE D’EAU (Suite) 4 FIXEZ LE ROBINET D’ARRÊT 7 Fixez le robinet d’arrêt à la conduite d’eau froide à l’aide du collier de serrage. BRANCHEZ LE TUYAU AU ROBINET Placez un écrou de compression et une bague (manchon) à l’extrémité du tuyau et branchez-les au robinet d’arrêt. Collier de serrage Assurez-vous que le tuyau soit bien inséré dans le robinet. Serrez fort l’écrou de compression.
Bruits normaux de fonctionnement CONSEILS DE DÉPANNAGE : Bruits normaux de fonctionnement Newer refrigerators sound different from older refrigerators. Modern refrigerators have more features and use newer technology. Entendez-vous ce que j’entends ? Ces bruits sont normaux. HUMMM... OUIR ! WHOOSH...
CONSEILS DE DÉPANNAGE Conseils de dépannage... Avant de faire un appel de service &RQVHLOV GH GpSDQQDJH ± eFRQRPLVH] GX WHPSV HW GH O¶DUJHQW &RQVXOWH] G¶DERUG OHV WDEOHDX[ TXL VXLYHQW HW YRXV SRXUUH] peut-être éviter de faire appel à un technicien. Problème Causes possibles Que faire Le témoin de l’état du filtre passe au ambre Le filtre approche son état d’expiration. L’état d’expiration du filtre est atteint. Appuyez sur la touche Filter Status pour afficher la durée de vie restante.
Problème Causes possibles Que faire La machine à glaçons ne fonctionne pas L’interrupteur de la machine à glaçons est à la position OFF (arrêt). 5pJOH] O¶LQWHUUXSWHXU j OD SRVLWLRQ 21 PDUFKH L’alimentation en eau est coupée ou n’est pas raccordée. Consultez Installation de la conduite d’eau. Le compartiment congélateur est trop chaud. Attendez 24 heures pour que la température du réfrigérateur se stabilise. Un amas de glaçons dans le bac provoque l’arrêt de la machine à glaçons.
CONSEILS DE DÉPANNAGE Conseils de dépannage... Avant de faire un appel de service Problème Causes possibles Que faire La machine à glaçons ne distribue ni eau ni glaçons La conduite d’eau ou le robinet d’arrêt est bouché. Appelez un plombier. Le filtre à eau est bouché. 5HPSODFH] OD FDUWRXFKH GX ILOWUH DYHF XQH QRXYHOOH cartouche ou installez le bouchon du filtre. Distributeur est VERROUILLÉ. Appuyez et maintenez enfoncée la touche LOCK (verrouillage) pendant 3 secondes.
Electromenagersge.ca Toutes les réparations en vertu de la garantie sont fournis par nos Centre de Service d’Usine ou par un technicien autorisé Customer Care®. Pour prévoir une réparation, consultez notre site electromenagersge.ca/fr/soutien/demande-de-service ou appelez le 800.661.1616. Veuillez avoir votre numéro de série et votre numéro de modèle à portée de main lorsque vous appelez pour obtenir un service.
GARANTIE LIMITÉE Cartouche de filtre à eau Garantie limitée MWF Communiquez avec nous sur Electromenagersge.ca/fr/produits/filtres-et-accessoires,or ou appelez le 800.561.3344 Pendant la période de garantie de : Nous remplacerons gratuitement : Trente jours A compter de la date d'achat initial Toute pièce de la cartouche filtrante qui s’avère défectueuse en raison d’un défaut de matériau ou de fabrication pendant cette période de garantie de trente jours.
Communiquez avec nous sur Electromenagersge.ca/fr/produits/filtres-et-accessoires,or ou appelez le 800.561.3344 Pendant la période de garantie de : Nous remplacerons gratuitement : Trente jours A compter de la date d'achat initial Toute pièce de la cartouche filtrante qui s’avère défectueuse en raison d’un défaut de matériau ou de fabrication pendant cette période de garantie de trente jours.* Ce qui n’est pas couvert : Ŷ Les déplacements à votre domicile pour vous expliquer l’utilisation de ce produit.
Fiche technique de performance Système de filtration SmartWaterMC - Cartouche MWF La concentration des substances indiquées dans l’eau alimentant le système a été réduite à une concentration inférieure ou égale à la limite autorisée pour l’eau de sortie du système, comme exigé par les normes 42 et 53 de la NSF/ANSI*. Ce système a été mis à l’essai et certifié pour la réduction des substances indiquées ci-dessous par la NSF International et est conforme aux normes 42 et 53 de la NSF/ANSI.
Fiche technique de performance Modèle : GE Appliances XWFE Ŷ 6\VWqPH FHUWLILp SDU O¶,$302 5 7 HQ YHUWX GHV QRUPHV HW 3 GH OD 16) $16, UHODWLYHV j OD UpGXFWLRQ GHV DOOpJDWLRQV VSpFLILpHV sur la fiche technique de rendement et le site iapmort.org. Ŷ /H UHQGHPHQW UpHO SHXW YDULHU VHORQ OHV FRQGLWLRQV ORFDOHV GH O¶HDX Substance testé e pour réduction Goût et odeur chlore Concentration d’essai de l’influent (mg/L) 2.0 mg/L +/- 10% Goût et odeur chloramine 3.
COMMUNICATIONS DES ÉLECTROMÉNAGERS 42 Communications des électroménagers (sur certains modèles) RENSEIGNEMENTS RÉGLEMENTAIRES Déclaration de conformité de la FCC/IC : Cet appareil est conforme aux prescriptions de la partie 15 des règles de la FCC.
Notes 49-1000471 Rev.
SOUTIEN AU CONSOMMATEUR Soutien au consommateur Site Web de GE Appliances Vous avez une question ou vous avez besoin d’aide pour votre appareil électroménager? Visitez le site Web de GE Appliances KHXUHV SDU MRXU WRXV OHV MRXUV GH O¶DQQpH 9RXV SRXYH] DXVVL \ WURXYHU G¶DXWUHV IRUPLGDEOHV SURGXLWV *( $SSOLDQFHV HW WLUHU DYDQWDJH GH WRXV QRV VHUYLFHV G¶DVVLVWDQFH HQ OLJQH $X[ eWDWV 8QLV GEAppliances.com Au Canada : ElectromenagersGE.
REFRIGERADORES Lado a lado INFORMACIÓN DE SEGURIDAD . . . . . . . . . . . . . . . 3 MANUAL DEL PROPIETARIO E INSTRUCCIONES DE INSTALACIÓN OPERACIÓN DEL REFRIGERADOR Controles . . . . . . . . . . . . . . . . . . . . . . . . . 5 ClimateKeeper2TM . . . . . . . . . . . . . . . . . . 7 TurboCoolTM. . . . . . . . . . . . . . . . . . . . . . . 7 ExpressChillTM . . . . . . . . . . . . . . . . . . . . . 8 El filtro de agua - MWF . . . . . . . . . . . . . 9 El filtro de agua - XWFE . . . . . . . . . . .
GRACIAS POR HACER QUE GE APPLIANCES SEA PARTE DE SU HOGAR. Ya sea que haya crecido usando GE Appliances, o que ésta es su primera vez, nos complace tenerlo en la familia. Sentimos orgullo por el nivel de arte, innovación y diseño de cada uno de los electrodomésticos de GE Appliances, y creemos que usted también. Entre otras cosas, el registro de su electrodoméstico asegura que podamos entregarle información importante del producto y detalles de la garantía cuando los necesite.
LEA TODAS LAS INSTRUCCIONES ANTES DE USAR ADVERTENCIA A fin de reducir el riesgo de incendio, explosión, descargas eléctricas o lesiones al usar su refrigerador, siga estas precauciones básicas de seguridad: Ŷ ( VWH UHIULJHUDGRU VH GHEHUi LQVWDODU \ XELFDU adecuadamente de acuerdo con las Instrucciones de Instalación antes de ser usado. Ŷ 'HVHQFKXIH HO UHIULJHUDGRU DQWHV GH KDFHU UHSDUDFLRQHV R hacer una limpieza.
INFORMACIÓN DE SEGURIDAD INFORMACIÓN IMPORTANTE DE SEGURIDAD LEA TODAS LAS INSTRUCCIONES ANTES DE USAR CONEXIÓN DE LA ELECTRICIDAD ADVERTENCIA RIESGO DE DESCARGA ELÉCTRICA Enchufe en un tomacorriente con conexión a tierra de 3 cables. 1R HOLPLQH HO FDEOH GH FRQH[LyQ D WLHUUD 1R XVH XQ DGDSWDGRU 1R XVH H[WHQVLyQ HOpFWULFD Si no se siguen estas instrucciones se podrá producir a muerte, incendios o descargas eléctricas.
HQ DOJXQRV PRGHORV 1R WRGDV ODV IXQFLRQHV FRUUHVSRQGHQ D WRGRV ORV PRGHORV (V SRVLEOH TXH VXV FRQWUROHV VHDQ VLPLODUHV D ORV VLJXLHQWHV OR Los controles de temperatura fueron configurados previamente HQ OD IiEULFD HQ ) & SDUD HO FRPSDUWLPLHQWR GHO UHIULJHUDGRU \ HQ ) & SDUD HO FRPSDUWLPLHQWR del freezer.
OPERACIÓN DEL REFRIGERADOR: Controles Controles HQ DOJXQRV PRGHORV Filter Status Los controles de temperatura fueron configurados previamente en la fábrica en 37°F (2.8°C) para el compartimiento del refrigerador y en 0°F (-17.8°C) para el compartimiento del freezer.
HQ DOJXQRV PRGHORV Cómo Funciona El ClimateKeeper2™ es el sistema de refrigeración más avanzado de la industria, brindando un funcionamiento óptimo de la temperatura y humedad, a fin de mantener la comida fresca durante más tiempo y de reducir quemaduras por congelación. El sistema ClimateKeeper2 cuenta con dos evaporadores; uno para el refrigerador y uno para el freezer.
OPERACIÓN DEL REFRIGERADOR: ExpressChill™ ExpressChill™ HQ DOJXQRV PRGHORV Cómo Funciona La función ExpressChill™ es un sistema para humedecer, un ventilador y un termistor. El recipiente de comida está fuertemente sellado para evitar que éste produzcan fluctuaciones de temperatura en el resto del refrigerador. Los controles de este recipiente se encuentran ubicados en la parte superior del refrigerador o en el dispensador con los controles de temperatura.
Cartucho del filtro de agua El cartucho del filtro de agua está ubicado en la esquina superior derecha trasera del compartimento del refrigerador. Cuándo reemplazar el filtro en los modelos con luz indicadora de recambio En el dispensador hay una luz de indicación de recambio del cartucho del filtro del agua. Esta luz se volverá anaranjada para advertirle que necesita reemplazar el filtro pronto.
OPERACIÓN DEL REFRIGERADOR: $FHUFD GHO FDUWXFKR GHO ILOWUR GH DJXD ;:)( 10 Acerca del cartucho del filtro de agua XWFE HQ DOJXQRV PRGHORV Cartucho del filtro de agua 7DSyQ GH E\SDVV GHO ¿OWUR El cartucho del filtro de agua está ubicado en el extremo superior trasero derecho del compartimiento de comida fresca del refrigerador. A fin de reducir el riesgo de daños sobre la propiedad debido a SpUGLGDV GH DJXD XVWHG '(%(5È XVDU HO WDSyQ GHO E\SDVV GHO filtro cuando no se disponga de un reemplazo del car
1R WRGRV ORV PRGHORV WLHQHQ WRGDV ODV FDUDFWHUtVWLFDV Recipientes de puerta del refrigerador y recipientes inclinables de puerta de congelador Recipientes grandes Los recipientes de la puerta del refrigerador y los recipientes inclinables de puerta de congelador más grandes son ajustables. Para extraerlos: Levante la parte frontal del recipiente hacia arriba, luego levántelo y sáquelo. Para reemplazarlos o reubicarlos: Ajuste la parte trasera del recipiente en los soportes moldeados de la puerta.
OPERACIÓN DEL REFRIGERADOR: Entrepaños y recipientes Entrepaños y recipientes 1R WRGRV ORV PRGHORV WLHQHQ WRGDV ODV FDUDFWHUtVWLFDV Cestas de congelador (en algunos modelos) Estante de vino/bebidas en la puerta Para remover, deslícelo hasta la posición tope, levante el frente más allá de la posición de tope, y deslícelo hacia afuera. (VWH HVWDQWH VRVWLHQH KDVWD ODWDV XQD ERWHOOD GH YLQR R XQD ERWHOOD litros) de refresco.
Puertas del refrigerador HQ DOJXQRV PRGHORV (V SRVLEOH TXH 8G QRWH XQD GLIHUHQFLD HQWUH HO PDQHMR GH ODV puertas de su antiguo y nuevo refrigerador. La característica especial de abertura y cierre de las puertas asegura que estas cierren por completo y permanezcan selladas firmemente. &XDQGR 8G DEUH R FLHUUH ODV SXHUWDV QRWDUi XQD SRVLFLyQ de tope de parada.
Cajones de Frutas y Verduras El exceso de agua que se puede acumular en la parte inferior de los cajones se deberá limpiar. En algunos modelos,el cajón inferior se puede deslizar hasta alcanzar una extensión completa que permite un acceso completo al cajón.
1R WRGRV ORV PRGHORV WLHQHQ WRGDV ODV FDUDFWHUtVWLFDV Máquina para hacer hielo automática +LHOR /D PiTXLQD GH KLHOR SURGXFLUi VLHWH FXERV SRU FLFOR DSUR[LPDGDPHQWH FXERV HQ XQ SHUtRGR GH KRUDV dependiendo de la temperatura del congelador, la emperatura ambiente, el número de aperturas de puertas y las condiciones de otro uso.
OPERACIÓN DEL REFRIGERADOR: Máquina de hielo automática Máquina de hielo automática Acceso al hielo y el logro de el interruptor de alimentación en los modelos dispensador Hay dos tipos de estanterías de almacenamiento de hielo en los modelos con dispensador. 8QR WLHQH XQ HVWDQWH encima de el depósito, el otro no. Nota especial para los modelos con depósito de hielo de inclinación de salida: Ŷ (VWRV PRGHORV WLHQHQ XQ GHSyVLWR GH KLHOR GH LQFOLQDFLyQ hacia fuera.
HQ DOJXQRV PRGHORV Para usar el dispensador Dispenser Light (Luz del dispensador) 6HOHFFLRQH &8%(' ,&( FXERV GH KLHOR &586+(' ,&( KLHOR WULWXUDGR or WATER DJXD Presione el vaso suavemente contra el brazo del dispensador. El recogedor no se vacía solo. Para evitar las manchas de agua, el recogedor y la parrilla se deberán limpiar regularmente. Si no hay distribución de agua Spill Shelf cuando el refrigerador está primeramente instalado, hay posibilidad de aire en el sistema de la línea de agua.
CUIDADO Y LIMPIEZA Cuidado y limpieza Limpiar el exterior El pozo del dispensador, por debajo de la parrilla, se debe mantener limpio y seco. El agua que se queda en el pozo puede dejar depósitos. Quite los depósitos agregando vinagre sin diluir al pozo. Remoje hasta que desaparezcan los depósitos o hasta que se desprendan lo suficiente para quitarlos. El brazo del dispensador. Antes de limpiar, oprima y GHWHQJD OD WHFOD /2&. %ORTXHR GXUDQWH VHJXQGRV 6H OLPSLD FRQ XQD VROXFLyQ GH DJXD WLELD \ ELFDUE
Atrás del refrigerador Se deberá tener cuidado al retirar el refrigerador de la pared. Todos los tipos de recubrimiento de pisos se pueden dañar, sobre todo los recubrimientos acojinados y los que tienen superficies repujadas. Al empujar el refrigerador a su lugar, asegúrese de no pasar sobre el cable eléctrico ni sobre la línea de alimentación del GLVSRVLWLYR SDUD KDFHU KLHORV HQ DOJXQRV PRGHORV -DOH HO UHIULJHUDGRU HQ IRUPD UHFWD \ HPSXMH QXHYDPHQWH SDUD devolverlo a su posición.
CUIDADO Y LIMPIEZA Cuidado y limpieza Reemplazo de bombillas (Cont.) ADVERTENCIA Antes de reemplazar una lámpara quemada, el refrigerador deberá ser desenchufado a fin de HYLWDU HO FRQWDFWR FRQ HO ILODPHQWR GH XQ FDEOH FRQ FRUULHQWH ([LVWH ULHVJR GH TXH XQD OiPSDUD TXHPDGD VH URPSD GXUDQWH VX reemplazo). *LUDU HO FRQWURO D OD SRVLFLyQ 2)) QR GHVFRQHFWD OD FRUULHQWH GHO FLUFXLWR GH OD OX] Compartimento del refrigerador—Luz inferior Esta luz está situada por encima de la gaveta superior.
Refrigerador Modelos 22, 23, 25, 26, 27 & 29 ¿Preguntas? Llame a 800.GE.CARES (800.432.2737) o Visite nuestro sitio web en: GEAppliances.com En Canadá, llame al 1.800.561.3344 o Visite nuestro Sitio Web en: geappliances.ca ANTES DE COMENZAR Lea estas instrucciones completamente y cuidadosamente.. • IMPORTANTE — Conserve estas instrucciones para uso del inspector local. • IMPORTANTE — Cumpla con todos los códigos y ordenanzas gubernamentales.
INSTRUCCIONES PARA LA INSTALACIÓN Instrucciones para la instalación CÓMO MOVER EL REFRIGERADOR PRECAUCIÓN Riesgo al levantar la 2 puerta. Si es levantada por una sola persona, podrían ocasionarse lesiones. Solicite ayuda al sostener, mover o levantar las puertas del refrigerador. NOTA: Al retirar la puerta, a fin de evitar daños sobre la misma y la parte electrónica, coloque con cuidado la puerta en una ubicación adecuada.
CÓMO MOVER EL REFRIGERADOR &RQW 4 DESCONECTE EL ACOPLAMIENTO ENERGÉTICO HQ DOJXQRV PRGHORV Si el refrigerador tiene un dispensador de agua, entonces hay una línea de suministro HOpFWULFR DODPEUDGR TXH YD GHVGH HO JDELQHWH hacia la bisagra del fondo de la puerta que debe ser desconectado. Para desconectar, separe el acoplador. %LVDJUD GHO fondo del refrigerador DESCONECTE LOS CONECTADORES ELÉCTRICOS HQ DOJXQRV PRGHORV Si el refrigerador tiene un centro para refrescar, HQWRQFHV KD\ FRQHFWDGRUHV HO
INSTRUCCIONES PARA LA INSTALACIÓN Instrucciones para la instalación CÓMO MOVER EL REFRIGERADOR &RQW REMUEVA LA PUERTA DEL CONGELADOR ADVERTENCIA A Siga todos los pasos para retirar y volver a instalar la puerta. Si no se siguen estas instrucciones, dejando piezas sin uso o ajustando tornillos en exceso, esto podrá hacer que la puerta se caiga y producir lesiones y daños sobre la propiedad.
CÓMO MOVER EL REFRIGERADOR &RQW REMUEVA LA PUERTA DEL REFRIGERADOR &RQW ' Levante la puerta del refrigerador y libérela de bisagra del fondo. Si el refrigerador tiene un centro para refrescar, una persona levanta lentamente la puerta del congelador y la libera de la bisagra del fondo, mientras una segunda persona, con cuidado, guia la línea de agua \ OD OtQHD HQHUJpWLFD DODPEUDGRV D WUDYpV GH OD bisagra del fondo.
INSTRUCCIONES PARA LA INSTALACIÓN Instrucciones para la instalación CÓMO INSTALAR EL REFRIGERADOR LOCALIZACIÓN DEL REFRIGERADOR DIMENSIONES Y ESPECIFICACIONES 1R FRORTXH HO UHIULJHUDGRU GRQGH OD WHPSHUDWXUD HVWp SRU GHEDMR GH ) & SRUTXH QR RSHUDUi con la suficiente frecuencia como para mantener las temperaturas apropiadas. (de 23 ‘CustomStyle modelos ™) 1R LQVWDOH HO UHIULJHUDGRU GRQGH OD WHPSHUDWXUD HVWp SRU HQFLPD GH ) & SRUTXH QR IXQFLRQDUi apropiadamente.
CÓMO INSTALAR EL REFRIGERADOR &RQW 1 CÓMO CONECTAR EL REFRIGERADOR A LA LÍNEA DE AGUA DE LA CASA HQ ORV PRGHORV FRQ PiTXLQD GH hielos y dispensador) A % Se requiere un suministro de agua fría para la operación de la máquina de hielos y el dispensador. Si no existe un suministro de agua fría, usted necesitará hacer una. Ver la sección Cómo instalar una línea de agua fría.
INSTRUCCIONES PARA LA INSTALACIÓN Instrucciones para la instalación CÓMO INSTALAR EL REFRIGERADOR (Cont.) 4 COLOQUE EL REFRIGERADOR EN SU LUGAR Mueva el refrigerador a su destino final. CÓMO NIVELAR EL REFRIGERADOR FRQW Para ajustar las ruedas en 23 ‘/ 25’ CustomStyle modelos ™ : CÓMO NIVELAR EL REFRIGERADOR Gire el rodillo delantero tornillos de ajuste hacia la derecha para aumentar la Rodillo de los tornillos el refrigerador, a la de ajuste izquierda para bajarlo.
CÓMO INSTALAR EL REFRIGERADOR &RQW REEMPLACE LA PARRILLA DE LA BASE Reemplace la parrilla de la base instalando los dos tornillos de cabeza Phillips. 9 INICIE LA MÁQUINA DE HIELOS LMH HO LQWHUUXSWRU GH OD PiTXLQD GH KLHORV HQ OD ) SRVLFLyQ 21 HQFHQGLGR /D PiTXLQD GH KLHORV no empezará a operar hasta que alcance su WHPSHUDWXUD GH RSHUDFLyQ GH ) ± & R PHQRU Luego, empezará a operar automáticamente. Será necesario de 2 a 3 días para que se llene el cubo de hielo.
INSTRUCCIONES PARA LA INSTALACIÓN Instrucciones para la instalación CÓMO INSTALAR LA LÍNEA DE AGUA HQ PRGHORV FRQ PiTXLQD GH KLHORV \ GLVSHQVDGRU ANTES DE COMENZAR Los kits de cobre recomendados para el suministro de DJXD VRQ :; ; :; ; R :; ; GHSHQGLHQGR GH la cantidad de tubería necesaria. Las tuberías plásticas aprobadas para el suministro de agua son las del Kit GH 7XEHUtDV GH $JXD 8QLYHUVDOHV SDUD 5HIULJHUDGRU GH *( $SSOLDQFHV :; ; :; ; \ :; ; Cuando se encuentre conectado
CÓMO INSTALAR LA LÍNEA DE AGUA &RQW LO QUE USTED NECESITARÁ &RQW NOTA: La única tubería plástica aprobada por GE Appliances es la que proporcionamos con los Kits de 7XEHUtDV GH $JXD 8QLYHUVDOHV SDUD 5HIULJHUDGRU 1R XVH ninguna otra tubería plástica para el suministro porque la línea estará bajo presión en todo momento. Ciertos tipos de tuberías plásticas se romperán y al pasar el tiempo desarrollarán grietas y el agua podría causar daños a la casa.
INSTRUCCIONES PARA LA INSTALACIÓN Instrucciones para la instalación CÓMO INSTALAR LA LÍNEA DE AGUA &RQW 4 APRIETE LA VÁLVULA DE CIERRE Apriete la válvula de cierre a la tubería de agua fría con una abrazadera de tubo. CÓMO CONECTAR LA TUBERÍA A LA VÁLVULA Coloque la tuerca de compresión y el casquillo para tubería de cobre en el extremo de la tubería y conéctela con la válvula cierre. Abrazadera de tubo Cerciórese de que la tubería está insertada completamente en la válvula.
Los refrigeradores más nuevos producen sonidos diferentes a los modelos más antiguos. Los refrigeradores modernos tienen más funciones y usan tecnología más reciente. ¿Usted escucha lo que yo escucho? Estos sonidos son HUMMM... ¡WHIR! WHOOSH... Ŷ ( O QXHYR FRPSUHVRU GH DOWD HILFLHQFLD SXHGH IXQFLRQDU más rápido y durar más que el de su refrigerador anterior y puede escuchar un zumbido de tono alto o un sonido pulsante mientras opera.
CONSEJOS PARA LA SOLUCIÓN DE PROBLEMAS Consejos para la Solución de Problemas... Antes de solicitar el servicio técnico ¡Ahorre tiempo y dinero! Primero revise los cuadros que aparecen en las siguientes páginas y es posible que no necesite solicitar reparaciones. Problema Qué hacer Presione la tecla Filter Status (VWDGR GHO )LOWUR SDUD PRVWUDU la vida útil restante del filtro.
Problema Causas Posibles Qué hacer Dispositivo automático para hacer hielo no funciona El interruptor de la máquina de hielos se encuentra en la posición apagado. Mueva el brazo indicador a la posición encendido, o mueva el interruptor está encendido, deslizable a la posición encendido. El agua está cerrada o no está conectada. Vea Instalar la línea de agua. El compartimiento del congelador es muy cálido. Espere 24 horas para que se enfríe el refrigerador.
CONSEJOS PARA LA SOLUCIÓN DE PROBLEMAS Consejos para la Solución de Problemas... Antes de solicitar el servicio técnico Problema Causas Posibles Qué hacer No sale agua y el dispositivo para hacer hielo no funciona Está tapada la línea de agua o la llave de paso. Llame a un plomero. Filtro de agua tapado. Reemplace el cartucho del filtro o remueve el filtro y instale el tapón. El dispensador está BLOQUEADO (LOCKED) 3UHVLRQH OD WHFOD /2&. EORTXHR \ PDQWpQJDOD presionada durante tres segundos.
GEAppliances.com 7RGR HO VHUYLFLR GH JDUDQWtD HV SURYLVWR SRU QXHVWURV &HQWURV GH 6HUYLFLR GH )DEULFDFLyQ R XQ WpFQLFR DXWRUL]DGR GH 6HUYLFLR DO &OLHQWH &XVWRPHU &DUH 3DUD SURJUDPDU XQD YLVLWD GHO VHUYLFLR WpFQLFR YLVtWHQRV HQ GEAppliances.com R FRPXQtTXHVH DO *( &$5(6 &XDQGR OODPH SDUD VROLFLWDU HO VHUYLFLR WHQJD ORV Q~PHURV GH VHULH \ PRGHOR GLVSRQLEOHV Para realizar el servicio técnico de su refrigerador se podrá requerir el uso de datos del puerto de abordaje para su diagn
GARANTÍA LIMITADA Garantía Limitada del Cartucho del Filtro de Agua MWF Comuníquese con nosotros en geapplianceparts.com R OODPH DO *( &$5(6 Por el Período de: Reemplazaremos, Sin Costo: Treinta Días 'HVGH la fecha de compra original. Cualquier parte del cartucho del filtro de agua que falle debido a un defecto en los materiales o la fabricación durante esta garantía limitada de treinta días.
Comuníquese con nosotros en geapplianceparts.com R OODPH DO *( &$5(6 Por el Período de: Reemplazaremos, Sin Costo: Treinta Días 'HVGH la fecha de compra original. Cualquier parte del cartucho del filtro de agua que falle debido a un defecto en los materiales o la fabricación durante esta garantía limitada de treinta días.* Qué No Está Cubierto: • Viajes del técnico del servicio a su hogar para enseñarle sobre cómo usar el producto. • Instalación inadecuada.
)LFKD 7pFQLFD GH )XQFLRQDPLHQWR 6LVWHPD GH )LOWUDFLyQ 6PDUW:DWHU²&DUWXFKR *( $SSOLDQFHV 0:) La concentración de las sustancias indicadas en el agua que ingresa al sistema fue reducida a la concentración menor que o igual al límite SHUPLVLEOH SDUD HO DJXD TXH GHMD HO VLVWHPD FRPR VH HVSHFLILFD HQ 16) $16, (VWiQGDU \ (VWiQGDU 6LVWHPD HYDOXDGR \ FHUWLILFDGR SRU 16) ,QWHUQDWLRQDO FRQWUD 16) $16, (VWiQGDU \ (VWiQGDU SDUD OD UHGXFFLyQ GH ODV VXVWDQFLDV TXH ILJXUDQ D FRQWLQXDFLyQ Capacidad de 300
Ficha Técnica de Funcionamiento del Modelo: GE Appliances XWFE Ŷ 6LVWHPD FHUWLILFDGR SRU ,$302 5 7 FRQWUD ORV (VWiQGDUHV \ 3 GH 16) $16, SDUD OD UHGXFFLyQ GH GHPDQGDV HVSHFLILFDGDV HQ OD ILFKD técnica de rendimiento y en iapmort.org.
COMUNICACIÓN DEL ELECTRODOMÉSTICO 42 Comunicación del Electrodoméstico HQ DOJXQRV PRGHORV INFORMACIÓN REGULATORIA Declaración de Cumplimiento con FCC/IC: (VWH GLVSRVLWLYR FXPSOH FRQ OD 3DUWH GH OD 1RUPDWLYD GH OD )&& (VWH GLVSRVLWLYR FXHQWD FRQ XQ WUDQVPLVRU HV UHFHSWRU HV H[HQWRV GH OLFHQFLD TXH FXPSOHQ FRQ OD ,QQRYDFLyQ &LHQFLD \ 'HVDUUROOR (FRQyPLFR H[HQWR GH OLFHQFLD HQ &DQDGi 566 V Su funcionamiento está sujeto a las dos condiciones siguientes: 1.
Notas 49-1000471 Rev.
SOPORTE PARA EL CONSUMIDOR Soporte para el Consumidor Sitio Web de GE Appliances ¢'HVHD UHDOL]DU XQD FRQVXOWD R QHFHVLWD D\XGD FRQ VX HOHFWURGRPpVWLFR" £,QWHQWH D WUDYpV GHO 6LWLR :HE GH *( $SSOLDQFHV ODV KRUDV GHO GtD FXDOTXLHU GtD GHO DxR 8VWHG WDPELpQ SXHGH FRPSUDU PiV HOHFWURGRPpVWLFRV PDUDYLOORVRV GH *( $SSOLDQFHV \ aprovechar todos nuestros servicios de soporte a través de Internet, diseñados para su conveniencia. (Q (( 88 GEAppliances.