
Installation Instructions


Dishwasher Installation
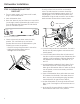
67(3,167$//-81&7,21%2;&29(5
If junction box cover is already installed, skip to
Step 18.
In this step you will need the junction box cover and
the #10 hex head screw from the screw kit set aside
in Step 1.
• Install the junction box cover using the #10 hex
head screw. Check to be sure that wires are not
pinched under the cover.
STEP 18: PRE-TEST CHECK LIST
• Verify that power is turned off at the source.
• Open the dishwasher door and remove all foam
and cardboard packaging.
• Read the Owner’s Manual to familiarize yourself
with the operation of the dishwasher.
• Check to be sure that the wiring is secure under
the dishwasher, and not pinched or in contact with
door springs or other dishwasher components.
• Check that the door spring does not contact the
water line, fill hose, or adjacent cabinets. See
Steps 13 and 14
• Pull lower rack about halfway out. Check to be sure
it does not roll back into dishwasher or further out.
If it does, re-level the dishwasher. See Step 12
• Check to be sure control panel does not touch
adjacent cabinets. If it does, reposition the
dishwasher. See Step 13
• Turn on the hot water faucet at the sink to verify
that the water temperature is at least 120°F and not
more than 150°F. Adjust water heater if necessary.
• Add two quarts of water to the bottom of the
dishwasher to lubricate the pump seal.
• Turn on water supply.
• Check for water leaks. Tighten connections if
necessary. See Step 14
• Remove the protective film if present from the
control panel, access panel and door panel.
If house wiring is not 2-wire with a ground
wire, a ground must be provided by the
installer.
When house wiring is aluminum, be sure to
use U.L. listed anti-oxidant compound and
aluminum-to-copper connectors.
WARNING
13
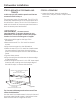
STEP 16: CONNECT POWER SUPPLY
If a power cord with plug is already installed,
proceed to Step 17.
Figure Z
White
Ground
Black
Note: Check that harness leads are
threaded through small hole in bracket
Junction
Box Bracket
• Secure house wiring to the back of the junction
box bracket with a strain relief.
• Locate the three dishwasher wires, (white, black
and green) with stripped ends. Insert dishwasher
wires through the small hole in the junction box
bracket. Use UL listed wire nuts of appropriate size
to connect incoming ground to green, white to
white and black to black.
ADVERTENCIA
Si el cableado de la casa no es de 2 cables
con un cable de conexión a tierra, el
instalador debe suministrar una conexión
a tierra. Cuando el cableado de la casa es en
aluminio, cerciórese de usar un compuesto
an ti-oxidante aprobado por U.L.
yun compuesto de aluminio a cobre.
CAUTION - The Current Sensing Module
(CSM) is a current-sensing device located behind the
toekick. It is possible for the CSM to trip during shipping.
If that occurs, the installer can reset the CSM during
installation. If the CSM trips after the appliance is installed
DQGHQHUJL]HG'21275(6(77+(&60&$//6(59,&(
Failure to have a qualified service technician examine
an installed dishwasher after the CSM trips can result in
personal injury or damage to the appliance or property.
PRECAUCIÓN - El Módulo de Detección
Actualizada (Current Sensing Module, CSM) es
un dispositivo de detección actualizada ubicado detrás
del tope de pie. Existe la posibilidad de que el CSM se
caiga durante el envío. Si esto ocurre, el instalador
puede reiniciar el CSM durante la instalación. Si el CSM
se cae luego de que el electrodoméstico fue instalado
\FRQHFWDGR125(,1,&,((/&60//$0($/6(59,&,2
TÉCNICO. Si el lavavajillas ya instalado no es examinado
SRUXQWpFQLFRFDOL¿FDGRGHOVHUYLFLRWpFQLFROXHJRGHXQD
caída del CSM, se podrán producir lesiones personales o
daños sobre el electrodoméstico o la propiedad.