
Installation Guide


3/4"3/4"
Countertop
Bracket
06F-1847D
Side Mount
Brackets (optional)
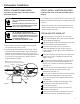
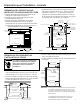
STEP 13: FASTEN DISHWASHER TO
UNDERSIDE OF COUNTERTOP OR SIDES
OF CABINET
In this step you will need the two 5/8" Phillips head
wood screws set aside in Step 1.
IMPORTANT – Dishwasher must be centered
in cabinet opening. Interference with cabinets or
countertop will cause leaks and damage to the
door panel and/or control panel.
• If countertop is wood or woodlike material, fasten
the dishwasher to the countertop by driving the
Phillips head screws through the countertop
brackets and into the countertop.
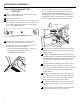
• If the countertop is granite or similar material,
drive Phillips screws through side mount brackets
and into the adjacent cabinets.
• Make sure screws are driven straight and ush
to prevent interference with door operation and
damage to the control panel. See Figure T.
Figure T
11
Dishwasher Installation
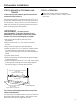
STEP 14: CONNECT WATER SUPPLY
Connect the water supply line to the 90° elbow
installed in Step 6.
• Slide the compression nut and then the ferrule over
end of the water line.
• Insert the water line into the 90° elbow.
• Slide the ferrule against the elbow and secure
with the compression nut.
Figure U
IMPORTANT – Check to be sure the door
water supply line. Test by opening and closing the
door. Re-route the water supply lines or slightly
bend the water valve bracket if a rubbing noise or
interference occurs.
Tip: Avoid unnecessary service charges for noise
or leaks
Make sure the door spring does not rub against the
ll hose or water supply line.
Tip: Avoid unnecessary service charges for leaks
or control panel damage.
Make sure the dishwasher is centered in the cabinet
and the door opens and closes freely without hitting
the adjacent cabinets. Drive mounting screws
straight and ush.
488Dia2
90° Elbow
Hot Water
Supply Line
Fill Hose
Water Valve Bracket
Ferrule
Hot Water
Supply Line
Compression Nut
90°
Elbow