
Installation Instructions


Dishwasher Installation
14
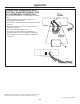
DISHWASHER WET TEST
CHECKLIST
• Turn on power supply or if power cord is used, plug
it into the wall outlet.
• Latch dishwasher door.
• For electronic dishwashers, select the NORMAL
WASH cycle and press the START pad one time.
• For dial models, press the NORMAL WASH only
pad, (or on some models, the NORMAL WASH
and HOT START pads if the model has them) and
then turn the control dial just enough to start the
dishwasher. Be careful not to turn the dial past the
first water fill. Dial should point to Hot Start Option
(or Hot Prewash Option) depending on model.
• Check to be sure that water enters the dishwasher.
This could take up to 4 minutes.
If water does not enter the dishwasher:
– Check to be sure that the water is turned on.
– Lightly tap the flood float cover to dislodge a stuck
flood float.
STEP 19
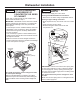
PRE-TEST CHECKLIST
Review this list after installing your dishwasher to
avoid charges for a service call that is not covered
by your Warranty.
• Verify that power is turned off at the source.
• Open the dishwasher door and remove all foam and
cardboard packaging.
• Read the Owner’s Manual to familiarize yourself with
the operation of the dishwasher.
• Check to be sure that the wiring is secure under the
dishwasher and not pinched or in contact with door
springs or other dishwasher components.
• Check that the door spring does not contact the
water line, fill hose, or adjacent cabinets. See Steps
13 and 14.
• Pull lower rack about halfway out. Check to be sure
it does not roll back into dishwasher or further out. If
it does, relevel the dishwasher. See Step 12.
• Check to be sure control panel does not touch
adjacent cabinets. If it does, reposition the
dishwasher. See Step 13.
• Turn on the hot water faucet at the sink to verify
that the water temperature is at least 120°F and not
more than 140°F. Adjust water heater if necessary.
• Add two quarts of water to the bottom of the
dishwasher to lubricate the pump seal.
• Turn on water supply.
• Check for water leaks. Tighten connections if
necessary. See Step 14.
• Remove the protective film, if present, from the
control panel, access panel and door panel.
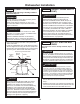
STEP 18
Hi- T emp
W ash
Heavy
W ash
P ots
& P ans
Cycles
Normal
W ash
Hot
S ta r t
Hea t ed
D r y
Hot Start
Option
S ta r t Delay
(HRS)
Cycle
on
Off
1
3
2
4
6
5
Pla t e W armer
(Heated D r y On)
Rinse Only
(Heated D r y Of f )
S ta r t
Light W ash
R eset
Appearance varies by model. Not all models have push pads.
On some models
Appearance varies by model.
P
ots
&Pans
Cycles
Options
Hot Start
Option
Start
Off
Plate Warmer
(Heated Dry On)
Rinse Only
(Heated Dry Off )
Light Wash
Normal
Wash
Heated
Dry
Reset
Option
On some models
Flood Float
Cover
H
EAVY
W
ASH
P
OTS
&
PANS
Cycles
N
ORMAL
W
ASH
C
HINA
C
RYSTAL
R
INSE
O
NLY
S
TAR T
R
ESET
C
LEAN
C
LEAN
HI T
EMP
R
INSE
HI T
EMP
W
ASH
H
EATED
D
RY
D
ELAY
H
OURS
L
OCK
(2 T
IMES
)
248
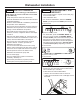
Appearance varies by model.
On some models