
Installation Instructions


STEP 1
PREPARATION
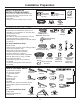
Locate the items in the installation package:
• Screws
• Junction box cover
• Drain hose and clamp
• Owner’s Manual
• Product samples and/or coupons
Dishwasher Installation
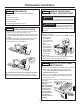
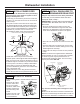
STEP 3
REMOVE WOOD BASE,
INSTALL LEVELING LEGS
IMPORTANT – Do not kick off wood base!
Damage will occur.
• Move the dishwasher close to the installation location
and lay it on its
back. NOTE:
Do not place the
dishwasher on its
side.
• Remove the 4
leveling legs on
the underside of
the wood base
with a 15/16”
socket wrench.
• Remove and
discard base.
• Screw leveling legs back into the dishwasher frame,
approximately 3/4” from frame as shown.
CHECK DOOR BALANCE
• With dishwasher on the wood base, check the door
balance by opening and closing the door.
• The door is properly balanced if it gently drops from a
1/2 open position and does not rise from the full open
position.
• If necessary increase or decrease tension as shown.
Latch door and adjust both springs to the same
tension setting to correct balance.
Tip: Avoid service calls for door balance problems.
Make sure the spring end is fully engaged in a frame
hole and the spring link is fully seated in the hinge arm.
7
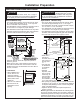
STEP 2
Do not remove wood base until you
are ready to install the dishwasher. The dishwasher will
tip over when the door is opened if base is removed.
CAUTION
No quite la base de madera
hasta que esté listo para instalar el lavaplatos. Si se
quita la base, el lavaplatos se volcará cuando se abra
la puerta.
PRECAUCIÓN
Insert Hook Through
Hole from Inside of Frame
Link fully seated
in hinge arm
REMOVE ACCESS PANEL
AND TOEKICK
The top mounting holes in the access panel are slotted.
• Remove the lower two 10-16 x 3/8” sheet metal
screws. Do not remove the two top 8-32 x 1/4”
machine thread screws.
• Slide the access panel to the left as far as it will go.
• Gently pull the access panel forward to remove it
from the top screws.
Set access panel, toekick and screws aside for use
in Step 20.
Tip: Prevent tub
damage.
Remove only the
3/8” sheet metal
screws in this
step. This will
help prevent a
mix- up with the
1/4” machine
thread screws in
Step 20.
STEP 4