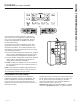
REFRIGERATORS Side by Side SAFETY INFORMATION OWNER’S MANUAL & INSTALLATION INSTRUCTIONS .....3 USING THE REFRIGERATOR Controls . . . . . . . . . . . . . . . . . . . . . . . . . . 5 ClimateKeeper2TM . . . . . . . . . . . . . . . . . . 7 TurboCoolTM. . . . . . . . . . . . . . . . . . . . . . . 7 ExpressChillTM . . . . . . . . . . . . . . . . . . . . . 8 Water Filter - MWF . . . . . . . . . . . . . . . . 9 Water Filter - XWFE . . . . . . . . . . . . . . 10 Shelves and Bins. . . . . . . . . . . . . . . .
THANK YOU FOR MAKING GE APPLIANCES A PART OF YOUR HOME. Whether you grew up with GE Appliances, or this is your first, we’re happy to have you in the family. We take pride in the craftsmanship, innovation and design that goes into every GE Appliances product, and we think you will too. Among other things, registration of your appliance ensures that we can deliver important product information and warranty details when you need them. Register your GE appliance now online.
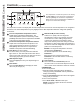
READ ALL INSTRUCTIONS BEFORE USING THE APPLIANCE WARNING To reduce the risk of fire, explosion, electric shock, or injury when using your refrigerator, follow these basic safety precautions: Ŷ 7 KLV UHIULJHUDWRU PXVW EH SURSHUO\ LQVWDOOHG DQG ORFDWHG LQ DFFRUGDQFH ZLWK WKH ,QVWDOODWLRQ ,QVWUXFWLRQV EHIRUH LW LV XVHG Ŷ 8QSOXJ WKH UHIULJHUDWRU EHIRUH PDNLQJ UHSDLUV RU cleaning. NOTE: Power to the refrigerator cannot be disconnected by any setting on the control panel.
SAFETY INFORMATION IMPORTANT SAFETY INFORMATION READ ALL INSTRUCTIONS BEFORE USING THE APPLIANCE CONNECTING ELECTRICITY WARNING ELECTRICAL SHOCK HAZARD Plug into a grounded 3-prong outlet 'R QRW UHPRYH WKH JURXQG SURQJ 'R QRW XVH DQ DGDSWHU 'R QRW XVH DQ H[WHQVLRQ FRUG )DLOXUH WR IROORZ WKHVH LQVWUXFWLRQV FDQ UHVXOW LQ GHDWK ILUH RU HOHFWULFDO VKRFN Do not, under any circumstances, cut or remove the third (ground) prong from the power cord.
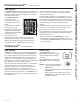
(on some models) Not all features are on all models. Your controls may be similar to the following: OR The temperature controls are preset in the factory DW ) & IRU WKH UHIULJHUDWRU FRPSDUWPHQW DQG ) & IRU WKH IUHH]HU FRPSDUWPHQW $OORZ KRXUV IRU WKH WHPSHUDWXUH WR VWDELOL]H WR WKH SUHVHW recommended settings. The temperature controls can display both the SET temperature as well as the actual temperature in the UHIULJHUDWRU DQG IUHH]HU 7KH DFWXDO WHPSHUDWXUH PD\ vary slightly f
USING THE REFRIGERATOR: Controls Controls (on some models) The temperature controls are preset in the factory at 37°F (2.8°C) for the refrigerator compartment and 0°F (-17.8°C) IRU WKH IUHH]HU FRPSDUWPHQW $OORZ KRXUV IRU WKH WHPSHUDWXUH WR VWDELOL]H WR the preset recommended settings. Filter Status The temperature controls can display both the SET temperature as well as the actual temperature in the refrigerator DQG IUHH]HU 7KH DFWXDO WHPSHUDWXUH PD\ YDU\ VOLJKWO\ IURP WKH 6(7 WHPSHUDWXUH EDVHG R
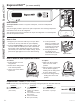
How it Works The ClimateKeeper2™ is the industry’s most advanced refrigeration system, delivering optimum temperature and humidity performance to keep food garden fresh longer DQG UHGXFH IUHH]HU EXUQ The ClimateKeeper2™ system features two evaporators—one for the refrigerator and one for the IUHH]HU This provides two separate cooling systems, and separates the airflow between WKH IUHVK IRRG DQG IUHH]HU compartments during normal cooling operations.
USING THE REFRIGERATOR: ExpressChill™ ExpressChill™ (on some models) How it Works The ExpressChill™ feature is a system of dampers, a fan and a temperature thermistor. The pan is tightly sealed to prevent the pan’s temperature from causing temperature fluctuations in the rest of the refrigerator. The controls for this pan are located in the top of the refrigerator or on the dispenser with the temperature controls. How to Use 1. Empty the pan. Place the Chill Tray in the pan.
Water filter cartridge The water filter cartridge is located in the back upper right corner of the refrigerator compartment. When to replace the filter on models with a replacement indicator light There is a replacement indicator light for the water filter cartridge on the dispenser. This light will turn orange to tell you that you need to replace the filter soon.
USING THE REFRIGERATOR: :DWHU )LOWHU &DUWULGJH ;:)( Water Filter Cartridge - XWFE (On some models) Water Filter Cartridge Filter Bypass Plug The water filter cartridge holder is located in the back upper-right corner of the fresh food refrigerator compartment. 6HOHFW PRGHOV XVH UDGLR IUHTXHQF\ LGHQWLILFDWLRQ 5),' WR GHWHFW OHDNV DQG PRQLWRU ILOWHU VWDWXV 7KH 5),' WHFKQRORJ\ LV FHUWLILHG E\ WKH )&& To reduce the risk of property damage due to water leakage, you MUST use the filter bypass plug whe
Not all features are on all models. Refrigerator Door Bins and Freezer Door Tilt-Out Bins Large Bins 7KH ODUJHU UHIULJHUDWRU GRRU ELQV DQG IUHH]HU WLOW RXW GRRU bins are adjustable. To remove: Lift the front of the bin straight up, then lift up and out. To replace or relocate: Engage the back side of the bin in the molded supports of the door. Then push down on the front of the bin. Bin will lock in place. Snugger Refrigerator bin Small Bins To remove: Lift the front of the bin straight up then out.
USING THE REFRIGERATOR: Shelves and Bins Shelves and Bins Not all features are on all models. Freezer Baskets (on some models) Door Wine/Beverage Rack (on some models) To remove, slide out to the stop position, lift the front past the stop position, and slide out. Make sure you push the baskets all the way back in before you close the door. This rack holds up to 5 cans, one bottle of wine or one 2-liter bottle of soda. The rack hangs from the sides of the dairy bin. To remove: (PSW\ WKH ZLQH EHYHU
Refrigerator Doors (on some models) The refrigerator doors may feel different than the ones \RX DUH XVHG WR 7KH VSHFLDO GRRU RSHQLQJ FORVLQJ feature makes sure the doors close all the way and are securely sealed. When opening and closing the door you will notice a stop SRVLWLRQ ,I WKH GRRU LV RSHQHG SDVW WKLV VWRS SRLQW WKH door will remain open to allow you to load and unload food more easily. When the door is only partially open, it will automatically close.
Fruit and Vegetable Crispers Convertible Deli Pan (on some models) Excess water that may accumulate in the bottom of the drawers should be wiped dry. On some models, the bottom drawer has full extension slides that allow full access to the drawer. The convertible deli pan has its own cold air duct to DOORZ D VWUHDP RI FROG DLU IURP WKH IUHH]HU FRPSDUWPHQW or refrigerator compartment to flow to the pan. The variable temperature control regulates the air flow IURP WKH &OLPDWH .
Not all features are on all models. Automatic Icemaker The icemaker will produce seven cubes per cycle— ,FHPDNHU ,FHPDNHU Power Switch approximately 100–130 cubes in a 24-hour period, GHSHQGLQJ RQ IUHH]HU FRPSDUWPHQW WHPSHUDWXUH URRP temperature, number of door openings and other use conditions.
USING THE REFRIGERATOR: $XWRPDWLF ,FHPDNHU Automatic Icemaker Accessing Ice and Reaching the Power Switch on Dispenser Models There are two types of ice storage bins on dispenser models. One has a shelf above the bin, the other does not. Special note for models with tilt-out ice bin: Ŷ 7KHVH PRGHOV KDYH D WLOW RXW LFH ELQ 7KH ELQ FDQ EH tilted out as shown in the illustrations, and it will hold itself up while you take ice out or turn the icemaker power switch on and off.
Using the Dispenser 6HOHFW &8%(' ,&( , &586+(' ,&( or WATER . Press the glass gently against the top of the dispenser cradle. The spill shelf is not selfdraining. To reduce water spotting, the shelf and its grille should be cleaned regularly. ,I QR ZDWHU LV GLVSHQVHG Spill Shelf when the refrigerator is first installed, there may be air in the water line system. Press the dispenser arm for at least two minutes to remove trapped air from the water line and to fill the water system.
CARE AND CLEANING Care and Cleaning Cleaning the Outside The dispenser drip area, (on some models) beneath the grille, should be wiped dry. Water left in this area may leave deposits. Remove the deposits by adding undiluted vinegar to the well. Soak until the deposits disappear or become loose enough to rinse away. The dispenser cradle (on some models). Before cleaning, lock the dispenser by pressing and holding the LOCK pad for 3 seconds.
Behind the Refrigerator Be careful when moving the refrigerator away from the wall. All types of floor coverings can be damaged, particularly cushioned coverings and those with embossed surfaces. Pull the refrigerator straight out and return it to position by pushing it straight in. Moving the refrigerator in a side direction may result in damage to the floor covering or refrigerator. When pushing the refrigerator back, make sure you don’t roll over the power cord or icemaker supply line (on some models).
CARE AND CLEANING Care and Cleaning Replacing the Light Bulbs (Cont.) WARNING Before replacing a burned-out light bulb, the refrigerator should be unplugged in order to avoid contact with a live wire filament. (A burned-out light bulb may break when being replaced.) 7XUQLQJ WKH FRQWURO WR WKH 2)) SRVLWLRQ GRHV QRW UHPRYH SRZHU WR WKH OLJKW FLUFXLW Refrigerator Compartment—Lower Light This light is located above the top drawer. 1. Unplug the refrigerator. 2. Lift the light shield up and pull it out. 3.
Refrigerator Models 22, 23, 25, 26, 27 & 29 Questions? Call 800.GE.CARES (800.432.2737) or visit our Website at: GEAppliances.com In Canada, call 1.800.561.3344 or visit our Website at: GEAppliances.ca BEFORE YOU BEGIN Read these instructions completely and carefully. • IMPORTANT — Save these instructions for local inspector’s use • IMPORTANT — Observe all governing codes and ordinances. • Note to Installer – Be sure to leave these instructions with the Consumer. • Note to Consumer – .
INSTALLATION INSTRUCTIONS Installation Instructions MOVING THE REFRIGERATOR CAUTION Lifting Hazard. Single person lift can cause injury. Use assistance when handling, moving or lifting the refrigerator doors. NOTE: When moving door, to prevent damage to door and electronics carefully place the door in a proper location. 2 REMOVE THE BASE GRILLE Remove the grille by removing the two Phillips head screws.
MOVING THE REFRIGERATOR (Cont.) 4 DISCONNECT THE POWER COUPLING (on some models) If the refrigerator has a water dispenser, there is a power line (harness) from the cabinet LQWR WKH ERWWRP KLQJH RQ WKH IUHH]HU GRRU WKDW must be disconnected. To disconnect, pull apart at the coupling.
INSTALLATION INSTRUCTIONS Installation Instructions MOVING THE REFRIGERATOR (Cont.) 7 REMOVE THE FREEZER DOOR WARNING )ROORZ DOO VWHSV IRU UHPRYLQJ DQG UHLQVWDOOLQJ WKH GRRU )DLOXUH WR IROORZ WKHVH instructions, leaving off parts, or overtightening screws, can lead to the door falling off and result in injury and property damage. A 5HPRYH WKH IUHH]HU GRRU WRS KLQJH FRYHU LI HTXLSSHG E\ HLWKHU VTXHH]LQJ LW DQG SXOOLQJ LW up or by prying it off with a plastic putty knife.
MOVING THE REFRIGERATOR (Cont.) 8 REMOVE THE REFRIGERATOR DOOR (Cont.) ' Lift the refrigerator door up and off the bottom hinge. ,I WKH UHIULJHUDWRU KDV D UHIUHVKPHQW FHQWHU RQH person should slowly lift the door up and off the bottom hinge and the second person should carefully guide the electrical lines (harnesses) through the bottom hinge.
INSTALLATION INSTRUCTIONS Installation Instructions INSTALLING THE REFRIGERATOR REFRIGERATOR LOCATION DIMENSIONS AND SPECIFICATIONS • 'R QRW LQVWDOO WKH UHIULJHUDWRU ZKHUH WKH WHPSHUDWXUH ZLOO JR EHORZ ) & EHFDXVH it will not run often enough to maintain proper temperatures. • 'R QRW LQVWDOO WKH UHIULJHUDWRU ZKHUH WKH WHPSHUDWXUH ZLOO JR DERYH ) & EHFDXVH it will not perform properly. • 'R QRW LQVWDOO WKH UHIULJHUDWRU LQ D ORFDWLRQ H[SRVHG WR water (rain, etc.) or direct sunlight.
INSTALLING THE REFRIGERATOR (Cont.) 1 CONNECTING THE REFRIGERATOR TO THE HOUSE WATER LINE C )DVWHQ WKH WXELQJ LQWR WKH FODPS SURYLGHG WR hold it in position. You may need to pry open the clamp.
INSTALLATION INSTRUCTIONS Installation Instructions INSTALLING THE REFRIGERATOR (Cont.) 4 PUT THE REFRIGERATOR IN 5 LEVEL THE REFRIGERATOR PLACE (cont.) Move the refrigerator to its final location. To adjust the rollers on 23’/25’ CustomStyle™ models: 5 LEVEL THE REFRIGERATOR Turn the front roller adjusting screws clockwise to raise Roller adjusting screws the refrigerator, counterclockwise to lower LW 8VH D ´ KH[ ZUHQFK ZLWK H[WHQVLRQ or an adjustable wrench.
INSTALLING THE REFRIGERATOR (Cont.) 7 REPLACE THE BASE GRILLE Replace the grille by installing the two Phillips head screws. 9 START THE ICEMAKER Set the icemaker power switch to the I (on) position. The icemaker will not begin to operate XQWLO LW UHDFKHV LWV RSHUDWLQJ WHPSHUDWXUH RI ) ± & RU EHORZ ,W ZLOO WKHQ EHJLQ RSHUDWLRQ DXWRPDWLFDOO\ ,W ZLOO WDNH ± GD\V WR ILOO WKH LFH bin.
INSTALLATION INSTRUCTIONS Installation Instructions INSTALLING THE WATER LINE (icemaker & dispenser models) BEFORE YOU BEGIN WHAT YOU WILL NEED 5HFRPPHQGHG FRSSHU ZDWHU VXSSO\ NLWV DUH :; ; :; ; RU :; ; GHSHQGLQJ RQ WKH DPRXQW RI tubing you need. Approved plastic water supply lines are Universal Water Line Refrigerator Tubing :; ; :; ; DQG :; ; When connecting your refrigerator to a Reverse Osmosis Water System, the only approved LQVWDOODWLRQ LV ZLWK D *( $SSOLDQFHV 59.
INSTALLING THE WATER LINE (Cont.) WHAT YOU WILL NEED (Cont.) NOTE: The only GE Appliances approved plastic tubing is that supplied in Universal Water Line 5HIULJHUDWRU 7XELQJ NLWV 'R QRW XVH DQ\ RWKHU SODVWLF water supply line because the line is under pressure at all times. Certain types of plastic will crack or rupture with age and cause water damage to your home.
INSTALLATION INSTRUCTIONS Installation Instructions INSTALLING THE WATER LINE (Cont.) 4 FASTEN THE SHUTOFF VALVE )DVWHQ WKH VKXWRII YDOYH WR WKH FROG ZDWHU SLSH with the pipe clamp. Pipe Clamp Saddle-Type Shutoff Valve Vertical Cold Water Pipe NOTE: Commonwealth of Massachusetts Plumbing Codes 248CMR shall be adhered to. Saddle valves are illegal and use is not permitted in Massachusetts. Consult with your licensed plumber.
Newer refrigerators sound different from older refrigerators. Modern refrigerators have more features and use newer technology. Do you hear what I hear? These conditions are normal. HUMMM... WHOOSH... Ŷ T he new high efficiency compressor may run faster and longer than your old refrigerator and you may hear a high-pitched hum or pulsating sound while it is operating. Ŷ Sometimes the refrigerator runs for an extended period, especially when the doors are opened IUHTXHQWO\ 7KLV PHDQV WKDW WKH )URVW *XDUG
TROUBLESHOOTING TIPS Troubleshooting Tips... Before you call for service Save time and money! Review the charts on the following pages first and you may not need to call for service. Problem Possible Causes What To Do Filter Status Indicator LED turns amber Filter reaching expired state Filter expired Press the Filter Status pad to show remaining filter life. Press the Filter Status pad to show remaining filter life. ,I WKH GLVSOD\ VKRZV WKH ILOWHU QHHGV WR EH replaced.
Problem Possible Causes What To Do Automatic icemaker does not work Icemaker switch is in the 2)) position. Slide the switch to the ON position. Water supply turned off or not connected. 6HH ,QVWDOOLQJ WKH ZDWHU OLQH Freezer compartment too warm. Wait 24 hours for the refrigerator to completely cool down. Piled up cubes in the storage bin cause icemaker to shut off. Level cubes by hand. Ice cubes stuck in icemaker. Turn off the icemaker, remove cubes and turn the icemaker back on.
TROUBLESHOOTING TIPS Troubleshooting Tips... Before you call for service Problem Possible Causes What To Do No water or ice cube production Supply line or shutoff valve is clogged. Call a plumber. Water filter clogged. Replace filter cartridge or remove filter and install plug. Dispenser is LOCKED. 3UHVV DQG KROG WKH /2&. &21752/6 SDG IRU seconds. Filter is not properly installed.
GEAppliances.com For US Customers, DOO ZDUUDQW\ VHUYLFH LV SURYLGHG E\ RXU )DFWRU\ 6HUYLFH &HQWHUV RU DQ DXWKRUL]HG &XVWRPHU &DUH® technician. To schedule service online, visit us at GEAppliances.com, or call GE Appliances at 800.GE.CARES (800.432.2737). Please have your serial number and your model number available when calling for service. In Canada, call 800.561.3344. Servicing your refrigerator may require the use of the onboard data port for diagnostics.
LIMITED WARRANTY Water Filter Cartridge MWF Limited Warranty Contact us at geapplianceparts.com, or call 800.GE.CARES. For the period of GE Appliances will replace Thirty Days )URP WKH GDWH of the original purchase Any part of the water filter cartridge which fails due to a defect in materials or workmanship during this limited thirty-day warranty.* What GE Appliances will not cover: Ŷ Ŷ Ŷ Ŷ Ŷ Ŷ Service trips to your home to teach you how to use the product.
Contact us at geapplianceparts.com, or call 800.GE.CARES. For the period of GE Appliances will replace Thirty Days )URP WKH GDWH of the original purchase Any part of the water filter cartridge which fails due to a defect in materials or workmanship during this limited thirty-day warranty.* What GE Appliances will not cover: Ŷ Ŷ Ŷ Ŷ Ŷ Ŷ Service trips to your home to teach you how to use the product.
Performance Data Sheet SmartWater™ Filtration System—GE Appliances MWF Cartridge The concentration of the indicated substances in water entering the system was reduced to a concentration less than or equal to the SHUPLVVLEOH OLPLW IRU ZDWHU OHDYLQJ WKH V\VWHP DV VSHFLILHG LQ 16) $16, 6WDQGDUG DQG 6WDQGDUG 6\VWHP WHVWHG DQG FHUWLILHG E\ 16) ,QWHUQDWLRQDO DJDLQVW 16) $16, 6WDQGDUG DQG 6WDQGDUG IRU WKH UHGXFWLRQ RI VXEVWDQFHV OLVWHG EHORZ Capacity 300 Gallons (1,135 Liters).
Performance Data Sheet Model: GE Appliances XWFE Ŷ 6\VWHP FHUWLILHG E\ ,$302 5 7 DJDLQVW 16) $16, 6WDQGDUGV DQG 3 IRU WKH UHGXFWLRQ RI FODLPV VSHFLILHG RQ WKH SHUIRUPDQFH GDWD VKHHW DQG at iapmort.org. Ŷ $FWXDO SHUIRUPDQFH PD\ YDU\ ZLWK ORFDO ZDWHU FRQGLWLRQV Substance Tested for Reduction ,QIOXHQW FKDOOHQJH Maximum permissible concentration product water PJ / FRQFHQWUDWLRQ PJ / Avg % Reduction Chlorine Taste and Odor PJ / 1 $ > 99 Chloramine Taste and Odor PJ /
APPLIANCE COMMUNICATION Appliance Communication (on some models) REGULATORY INFORMATION FCC/IC Compliance Statement: 7KLV GHYLFH FRPSOLHV ZLWK 3DUW RI WKH )&& 5XOHV 7KLV GHYLFH FRQWDLQV OLFHQVH H[HPSW WUDQVPLWWHU V UHFHLYHU V WKDW FRPSO\ ZLWK ,QQRYDWLRQ 6FLHQFH DQG (FRQRPLF 'HYHORSPHQW &DQDGD¶V OLFHQVH H[HPSW 566 V 2SHUDWLRQ LV subject to the following two conditions: 1. This device may not cause harmful interference. 2.
Notes 49-1000471 Rev.
CONSUMER SUPPORT Consumer Support GE Appliances Website Have a question or need assistance with your appliance? Try the GE Appliances Website 24 hours a day, any day of the year! You can also shop for more great GE Appliances products and take advantage of all our on-line support services designed for \RXU FRQYHQLHQFH ,Q WKH 86 GEAppliances.com ,Q &DQDGD GEAppliances.