Top Freezer Refrigerators GEAppliances.com Safety Instructions . . . . . . . . . . . . . 2, 3 Operating Instructions Owner’s Manual and Installation Instructions GTL12HBX GTR10HAX GTR12HBX Care and Cleaning . . . . . . . . . . . . . . . . . .6, 7 Control Settings . . . . . . . . . . . . . . . . . . . . . . .4 Ice Service . . . . . . . . . . . . . . . . . . . . . . . . . . . . . .5 Storage Drawers . . . . . . . . . . . . . . . . . . . . . . .
WARNING! Use this appliance only for its intended purpose as described in this Owner’s Manual. SAFETY PRECAUTIONS When using electrical appliances, basic safety precautions should be followed, including the following: ■ This refrigerator must be properly installed and located in accordance with the Installation Instructions before it is used. Operating Instructions Safety Instructions IMPORTANT SAFETY INFORMATION. READ ALL INSTRUCTIONS BEFORE USING.
WARNING! HOW TO CONNECT ELECTRICITY Do not, under any circumstances, cut or remove the third (ground) prong from the power cord. For personal safety, this appliance must be properly grounded. Have the wall outlet and circuit checked by a qualified electrician to make sure the outlet is properly grounded. Where a standard 2-prong wall outlet is encountered, it is your personal responsibility and obligation to have it replaced with a properly grounded 3-prong wall outlet.
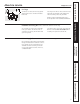
There is a temperature control in the fresh food compartment as well as the freezer compartment. Initially set the control to Normal in the fresh food and freezer compartments. Allow 24 hours for the temperature to stabilize. Operating Instructions Safety Instructions About the control on the refrigerator. Control Settings Adjust the fresh food control one increment at a time. Allow 12 hours after each adjustment for the refrigerator to reach the temperature you have set.
GEAppliances.com Ice Trays To release ice cubes, turn the tray upside down, hold it over a container and twist both ends. For only one or two ice cubes, leave the tray right-side up, twist both ends slightly and remove as many cubes as you want. Wash ice trays in lukewarm water only— do not put them in an automatic dishwasher. Operating Instructions Icemaker Accessory Kit (Models GTR12HBX and GTL12HBX only) An icemaker accessory kit is available from your dealer.
Cleaning the Outside Keep the outside clean. Wipe with a clean cloth lightly dampened with mild liquid dish detergent. Dry with a clean, soft cloth. Do not wipe the refrigerator with a soiled dish cloth or wet towel. These may leave a residue that can erode the paint. Do not use scouring pads, powdered cleaners, bleach or cleaners containing bleach because these products can scratch and weaken the paint finish. Operating Instructions Safety Instructions Care and cleaning of the refrigerator.
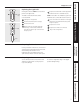
Replacing the Light Bulb Screw Hole Moving the control to COLD does not remove power to the light circuit. The bulb is located behind the shield in the back wall. Unplug the refrigerator. Remove the screw. Bulb Gently remove the light shield by inserting a flat head screwdriver into the slot at the top of the shield and pop it off. NOTE: If the bulb is not available at your local hardware store, contact GE customer service.
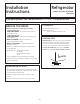
Installation Instructions Refrigerator Models GTL12HBX, GTR10HAX, GTR12HBX If you have questions, call 1.800.GE.CARES or visit our Website at: GEAppliances.com BEFORE YOU BEGIN CLEARANCES Read these instructions completely and carefully. Free-standing installation only. Minimum Clearances: Back – 3″ from the condenser coils • IMPORTANT – Save these instructions for local inspector’s use. • IMPORTANT – Observe all governing codes and ordinances.
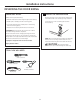
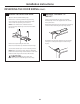
Installation Instructions REVERSING THE DOOR SWING IMPORTANT NOTES 1 REMOVE THE FREEZER DOOR When reversing the door swing: Remove the hinge cover screws (some models have lock washers with each screw), top hinge and shim. • Read the instructions all the way through before starting. Set the door on a non-scratching surface with the outside up. • Handle parts carefully to avoid scratching paint. • Set screws down by their related parts to avoid using them in the wrong places.
Installation Instructions REVERSING THE DOOR SWING (CONT.) 2 REMOVE THE FRESH FOOD DOOR 3 TRANSFER TOP HINGE TO Tape the door shut with masking tape. THE LEFT Remove the center hinge and shim by removing the screws (some models have lock washers with each screw). Lift up the hinge to remove it. Using a putty knife with the edge covered with masking tape, remove the plug buttons. Be careful of the paint finish. NOTE: Some models have a washer between the center hinge and the top of the fresh food door.
Installation Instructions 6 REHANG THE FRESH FOOD DOOR 4 TRANSFER BOTTOM HINGE TO THE LEFT Make sure the washer(s) are in place on the bottom hinge pin. Place the fresh food door on the bottom hinge, close the door and tape it in place with masking tape. To access the bottom hinge, move the refrigerator so it is 30″ from a wall. Then carefully tip the refrigerator back until it rests against the wall. CAUTION: Be sure that the coils on the back of the refrigerator do not rest against the wall.
Installation Instructions REVERSING THE DOOR SWING (CONT.) 8 TRANSFER FREEZER DOOR STOP 10 ALIGN THE DOORS TO THE LEFT Align the freezer door with the fresh food door so that the gap between the doors is even. Remove the door stop from the bottom of the right side of the door. Transfer the plug buttons from the bottom left side to the right side. Tighten the top hinge screws by turning them until snug. Then turn the screws a minimum of 1/2 turn using both hands. Install the door stop on the left side.
GEAppliances.com Newer refrigerators sound different from older refrigerators. Modern refrigerators have more features and use newer technology. Do you hear what I hear? These sounds are normal. ■ The new high efficiency compressor may run faster and longer than your old refrigerator and you may hear a high-pitched hum or pulsating sound while it is operating. ■ You may hear a whooshing sound when the doors close. This is due to pressure equalizing within the refrigerator.
Safety Instructions Operating Instructions Installation Instructions Troubleshooting Tips Consumer Support Before you call for service… Troubleshooting Tips Save time and money! Review the charts on the following pages first and you may not need to call for service. Problem Possible Causes What To Do Refrigerator does not operate Refrigerator in defrost cycle. • Wait about 30 minutes for defrost cycle to end. Refrigerator is unplugged. • Push the plug completely into the outlet.
What To Do Refrigerator has odor Foods transmitting odor to refrigerator. • Foods with strong odors should be tightly wrapped. • Keep an open box of baking soda in the refrigerator; replace every three months. Interior needs cleaning. • See Care and cleaning. Moisture forms on outside of refrigerator Not unusual during periods of high humidity. • Wipe surface dry.
Consumer Support Troubleshooting Tips Installation Instructions Operating Instructions Safety Instructions Notes.
All warranty service provided by our Factory Service Centers, or an authorized Customer Care® technician. To schedule service on-line, visit us at GEAppliances.com, or call 800.GE.CARES (800.432.2737). Please have serial number and model number available when calling for service. Staple your receipt here. Proof of the original purchase date is needed to obtain service under the warranty.
Consumer Support. GE Appliances Website GEAppliances.com Have a question or need assistance with your appliance? Try the GE Appliances Website, 24 hours a day, any day of the year! For greater convenience and faster service, you can now download Owner’s Manuals, order parts or even schedule service on-line. Schedule Service GEAppliances.com Expert GE repair service is only one step away from your door. Get on-line and schedule your service at your convenience any day of the year! Or call 800.GE.
Congelador superior Refrigeradores GEAppliances.com Instrucciones de seguridad . . . . . 2, 3 Manual del propietario e instalación Instrucciones de operación GTL12HBX GTR10HAX GTR12HBX Cajónes de almacenamiento . . . . . . . . . .4 Configuraciones de control . . . . . . . . . . .4 Cuidado y limpieza . . . . . . . . . . . . . . . . .6, 7 Servicio de hielo . . . . . . . . . . . . . . . . . . . . . . . .5 Instrucciones de instalación Cómo invertir el vaivén de la puerta . . . . . . . . . . . . . . . .
Safety Seguridad Instructions INFORMACIONES IMPORTANTES DE SEGURIDAD. LEA PRIMERO TODAS LAS INSTRUCCIONES. ¡ADVERTENCIA! Use este aparato sólo para los fines que se describen en este Manual del propietario. PRECAUCIONES DE SEGURIDAD Cuando use electrodomésticos, siga las precauciones básicas de seguridad, incluyendo las siguientes: ■ Antes de usarse, este refrigerador deberá estar instalado y ubicado de acuerdo con las instrucciones de instalación.
GEAppliances.com COMO CONECTAR LA ELECTRICIDAD Bajo ninguna circunstancia debe cortar o quitar la tercera punta (tierra) de la clavija. Para su seguridad personal, este aparato deberá conectarse debidamente a tierra. Haga que un electricista calificado verifique el enchufe de la pared y el circuito para asegurarse que la salida esté conectada debidamente a tierra.
Hay un control de temperatura en el compartimento de alimentos frescos y en el compartimento del congelador. Inicialmente configure el control en Normal de los compartimentos de alimentos frescos y del congelador. Deje pasar 24 horas hasta que la temperatura se estabilice. Operación Safety Seguridad Instructions Sobre el control del refrigerador. Configuraciones de control Ajuste el control de alimentos frescos subiendo una unidad por vez.
Sobre el servicio de hielo. GEAppliances.com Seguridad Bandejas para cubitos de hielo Para liberar los cubitos de hielo, dé vuelta la bandeja, sosténgala sobre un recipiente y retuerza ambos extremos. Para sólo uno o dos cubitos de hielo, deje la bandeja hacia arriba, retuerza ambos extremos ligeramente y quite todos los cubitos que desee. Lave las bandejas para cubitos de hielo sólo en agua tibia—no las coloque en el lavaplatos.
Limpieza de la parte exterior Mantenga la parte exterior limpia. Límpiela con un paño ligeramente humedecido con un detergente líquido para platos no agresivo. Seque con un paño suave y limpio. No limpie el refrigerador con un repasador sucio o con una toalla mojada. Estos pueden dejar un residuo que puede desgastar la pintura. No utilice esponjillas abrasivas, limpiadores en polvo, blanqueadores o limpiadores que contengan blanqueadores porque estos productos pueden rayar y dañar el acabado de la pintura.
GEAppliances.com Seguridad Cómo reemplazar las bombillas de luz Orificio para tornillo Desplazar el control a la posición COLD (fría) no elimina la corriente de electricidad dirigida al circuito de la luz. La bombilla se encuentra ubicada detrás de la protección en la pared trasera. Desenchufe el refrigerador. Retire los estantes (si fuera necesario). Quite el tornillo.
Instrucciones deInstalación Refrigerador Modelos GTL12HBX, GTR10HAX, GTR12HBX ¿Preguntas? Llame al 800.GE.CARES (800.432.2737) o bien Visite nuestra página Web: GEAppliances.com ANTES DE COMENZAR DISTANCIAS Lea estas instrucciones por completo y con detenimiento. Sólo instalación independiente. Despeje Mínimo: Parte trasera – 3″ desde las serpentinas del condensador • IMPORTANTE – Guarde estas instrucciones para el uso de inspectores locales.
Instrucciones de instalación CÓMO INVERTIR EL VAIVÉN DE LA PUERTA NOTAS IMPORTANTES 1 QUITE LA PUERTA DEL CONGELADOR Cuando invierta el vaivén de la puerta: Quite los tornillos de la tapa de la bisagra (algunos modelos cuentan con arandelas de presión con cada tornillo), la bisagra superior y la cuña. • Lea por completo todas las instrucciones antes de comenzar. • Manipule las piezas con cuidado para no rayar la pintura.
Instrucciones de instalación CÓMO INVERTIR EL VAIVÉN DE LA PUERTA (CONT.) 2 QUITE LA PUERTA DE ALIMENTOS 3 TRANSFIERA LA BISAGRA SUPERIOR FRESCOS A LA IZQUIERDA Cierre la puerta con cinta adhesiva. Utilizando una espátula con los bordes recubiertos con cinta adhesiva, quite los botones obturadores. Tenga cuidado con el acabado de pintura. Quite la bisagra central y cuña sacando los tornillos (algunos modelos cuentan con arandelas de presión con cada tornillo). Levante la bisagra para quitarla.
Instrucciones de instalación 6 VUELVA A COLGAR LA PUERTA 4 TRANSFIERA LA BISAGRA INFERIOR A LA IZQUIERDA DE ALIMENTOS FRESCOS Para acceder a la bisagra inferior, mueva el refrigerador a 30″ de la pared. Luego incline con cuidado el refrigerador hacia atrás hasta que descanse sobre la pared. Asegúrese que las arandelas estén en su lugar en el perno inferior de la bisagra. Coloque la puerta de alimentos frescos en la bisagra inferior, cierre la puerta y ciérrela con cinta adhesiva.
Instrucciones de instalación CÓMO INVERTIR EL VAIVÉN DE LA PUERTA (CONT.) 8 TRANSFIERA LA TRABA DE 10 ALINEE LAS PUERTAS LA PUERTA DEL CONGELADOR A LA IZQUIERDA Alinee la puerta del congelador con la puerta de alimentos frescos para que el espacio entre ellas se encuentre equilibrado. Quite la traba de la puerta de la parte inferior del lado derecho de la puerta. Transfiera los botones obturadores del lado inferior izquierdo al lado derecho.
Sonidos normales de la operación. GEAppliances.com ¿Usted escucha lo que yo escucho? Estos sonidos son normales. Seguridad Los refrigeradores más nuevos producen sonidos diferentes a los modelos más antiguos. Los refrigeradores modernos tienen más funciones y usan tecnología más reciente. HUMMM... WHOOSH... más rápido y durar más que el de su refrigerador anterior y puede escuchar un zumbido de tono alto o un sonido pulsante mientras opera.
Safety Seguridad Instructions Antes de solicitar un servicio… Solucionar problemas ¡Ahorre tiempo y dinero! Revise las tablas en las siguientes páginas y tal vez no necesitará de solicitar un servicio. Problema Causas Posibles Qué hacer El refrigerador no funciona El refrigerador está en el ciclo de descongelado. • Espere alrededor de 30 minutos para que termine el ciclo de descongelado. Servicio al consumidor Solucionar problemas Instalación Operación El refrigerador está desenchufado.
GEAppliances.com Seguridad Problema Causas Posibles Qué hacer El refrigerador tiene olor Los alimentos transmiten olor al refrigerador. • Los alimentos con olores fuertes deben envolverse bien. • Mantenga una caja abierta de bicarbonato de sodio en el refrigerador; cámbiela casa tres meses. Debe limpiarse la parte interna. • Ver Cuidado y limpieza.
Safety Seguridad Instructions Operación Garantía del Refrigerador. (Para consumidores en los EE.UU.) Todos los servicios de garantía los proporcionan nuestros Centros de Reparación de Fábrica o nuestros técnicos Customer Care ® autorizados. Para concertar una cita de reparación, en línea, visíte nos al GEAppliances.com, o llame al 800.GE.CARES (800.432.2737). Cuando llame para solicitar servicio, por favor tenga a mano el número de serie y el número de modelo.
GEAppliances.com Notas.
Servicio al consumidor. Página Web de GE Appliances GEAppliances.com ¿Tiene alguna pregunta sobre su electrodoméstico? ¡Pruebe la página Web de GE Appliances, 24 horas al día, cualquier día del año! Para mayor conveniencia y servicio más rápido, ya puede descargar los Manuales de los Propietarios, pedir piezas o incluso hacer una cita en línea para que vengan a realizar una reparación. Solicite una reparación GEAppliances.com El servicio de expertos GE está a tan sólo un paso de su puerta.