
Installation Guide

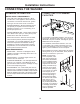


• Rotate elbow sections so that
the opening points to the side
to which you want to vent.
• Preassemble 4” elbow with
4” duct. Use only 4” UL
approved rigid metal for
ducting inside the dryer.
• Connect duct assembly to the internal dryer elbow
duct.
Be sure not to pull or damage the electrical wires
inside the dryer when inserting the duct.
• Apply duct tape as shown on
the joint between the dryer
internal duct and the elbow,
and also the joint between
the elbow and the side duct.
Internal duct joints must
be secured with tape,
otherwise they may
separate and cause a
safety hazard.
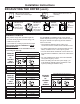
Installation Instructions
24” MODELS ONLY
BOTTOM OR SIDE VENTING
Disconnect dryer from electrical supply.
Wear gloves and arm guards.
Failure to do so may result in fire, electrical
shock or lacerations.
- Fire Hazard
WARNING
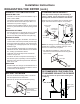
For Downward Venting:
• Insert elbow, rotate it so
that it points downward and
connect it to the dryer’s
internal duct. Use only 4”
UL approved rigid metal for
ducting inside the dryer.
• Apply duct tape as shown
on the joint between the
dryer internal duct and the
elbow, and also the joint
between the elbow and
the bottom duct.
Internal duct joints must
be secured with tape,
otherwise they may
separate and cause a safety hazard.
Dryer
duct
Duct
tape
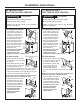
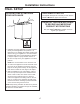
For Side Venting:
• Detach and remove the right
or left side knockout (one only)
as desired.
• Rotate elbow sections so that
the opening points to the side
to which you want to vent.
• Preassemble 4” elbow with 4” duct. Use only 4” UL
approved rigid metal for ducting inside the dryer.
• Insert duct assembly through the side opening and
connect to the internal dryer elbow duct.
Be sure not to pull or damage the electrical wires
inside the dryer when inserting the duct.
• Apply duct tape as shown on
the joint between the dryer
internal duct and the elbow,
and also the joint between
the elbow and the side duct.
Internal duct joints must
be secured with tape,
otherwise they may
separate and cause a
safety hazard.
Duct
tape
ALL
duct
joints
Dryer
duct
Duct
tape
15
Insert and
connect to
dryer duct
Remove Desired Knockout
(one only)
Duct
tape
ALL
duct
joints
27” MODELS ONLY
BOTTOM OR SIDE VENTING
For Downward Venting:
• Insert elbow, rotate it so
that it points downward and
connect it to the dryer’s
internal duct. Use only 4”
UL approved rigid metal for
ducting inside the dryer.
• Apply duct tape as shown
on the joint between the
dryer internal duct and the
elbow, and also the joint
between the elbow and
the bottom duct.
Internal duct joints must
be secured with tape,
otherwise they may
separate and cause a safety hazard.
Dryer
duct
Duct
tape
For Side Venting:
Duct
tape
ALL
duct
joints
Dryer
duct
Duct
tape
Duct
tape
ALL
duct
joints
Insert and
connect to
dryer duct
Disconnect dryer from electrical supply.
Wear gloves and arm guards.
Failure to do so may result in fire, electrical
shock or lacerations.
- Fire Hazard
WARNING