WATER FILTRATION SYSTEM SAFETY INFORMATION . . . . . . . . .3 SYSTEM OVERVIEW . . . . . . . . . . . . .4 INSTALLATION INSTRUCTIONS Cold Water Connection. . . . . . . . . . . . . . . . .5 Control Valve Installation . . . . . . . . . . . . . . .6 Mounting the System . . . . . . . . . . . . . . . . . . .8 Filter Change Light . . . . . . . . . . . . . . . . . . . .9 Filter Replacement . . . . . . . . . . . . . . . . . . . . .9 Flush Procedure . . . . . . . . . . . . . . . . . . . . . . .
THANK YOU FOR MAKING GE APPLIANCES A PART OF YOUR HOME. Whether you grew up with GE Appliances, or this is your first, we’re happy to have you in the family. We take pride in the craftsmanship, innovation and design that goes into every GE Appliances product, and we think you will too.
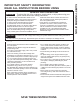
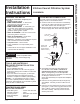
WARNING IMPORTANT SAFETY INSTRUCTIONS To reduce the risk of fire, explosion, electric shock, or injury when using your system follow these basic safety precautions: To reduce the risk associated with choking, do not allow children under 3 years of age to have access to small parts during the installation of this product.
SYSTEM OVERVIEW: How it works How it works When the control valve is pointing toward your kitchen faucet, filtered water is dispensed. This system allows you to choose between filtered and unfiltered water from your existing kitchen faucet. The system consists of a control valve, timer, and filters. The existing water line is split into two lines. One line passes through the filtration system to the control valve. The other line connects directly to the control valve.
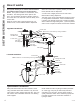
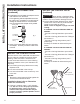
Kitchen Faucet Filtration System GXK185KBL BEFORE YOU BEGIN COLD WATER CONNECTION Read these instructions completely and carefully. A typical connection using the included water supply fitting is shown in the illustration below. 1. Close the water shut-off valve that is immediately in front of the supply tube and open the faucets to drain water from the sink cold water pipe. 2. Remove line that connects the cold water from faucet line to the supply valve. Some water may spill out.
INSTALLATION INSTRUCTIONS Installation Instructions COLD WATER CONNECTION (continued) INSTALL THE CONTROL VALVE (continued) 6. Hand tighten the cold water line adapter into the cold water line from the faucet. Finish tightening with two adjustable wrenches. Be careful not to overtighten or cross thread as damage to threads can occur. Some threads may be exposed when adapter is fully seated. CAUTION When drilling in Stainless Steel, edges may be sharp and could damage wire.
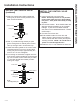
INSTALL THE CONTROL VALVE (continued) INSTALL THE CONTROL VALVE (continued) 3. With wire routed under rubber gasket and locking nut (as shown below) thread nut at least 3/4 toward bottom. 7. Insert control knob into valve body. NOTE: Knob only inserts in one position, rotate slowly until you feel it drop slightly into place. Then push down firmly to snap in place. 8. Check knob rotation. Knob should rotate 180 degrees and point towards you as it rotates left/right.
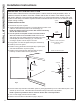
INSTALLATION INSTRUCTIONS Installation Instructions MOUNTING SYSTEM INSTALLATION Pick a location under the sink to mount the system. Location should be easily accessible, with 4” of clearance between the bottom of the filter canisters and the floor or bottom of the cabinet; any less will result in difficulty of removing filter canisters (see Fig. 5). Allow enough space on either side of the system for the tubing connections.
FILTER CHANGE LIGHT The clear ring at the bottom of the control knob will flash red to indicate it is time to change the filter and the battery. The ring will double flash at six months to indicate it is time to replace the filter. The ring will have a single fading flash at one year to indicate it is time to replace the filters and the batteries.
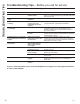
TROUBLESHOOTING TIPS Troubleshooting Tips... Before you call for service Save time and money! Review the charts on the following pages first and you may not need to call for service. Problem Possible Causes What To Do Water contains tiny black particles New filter canisters contain activated carbon. • Turn on the filtered water faucet and allow to run for 6 gallons (or 10 minutes) to flush out any harmless carbon fines that may be present.
Ref. No. 001 002 003 004 005 999 004 Part No. Part Description WS22X21084 WS15X21085 WS10X21083 WS19X21443 FQK1K 49-50306 Install Kit Timer Control Valve Assembly (Chrome) Filtration Manifold Filter Set Owner’s Manual 1 1 1 1 1 1 PARTS LIST Parts List To obtain replacement parts, call toll-free 877.959.8688.
PERFORMANCE DATA SHEET Performance Data Sheet Filtration System GXK185KBL, GXRLQK, TFWFSET using filter FQK1K Ŷ 6 \VWHP WHVWHG DQG FHUWLILHG E\ ,$302 5 7 DJDLQVW 16) $16, 6WDQGDUGV IRU WKH UHGXFWLRQ RI FODLPV specified on the performance data sheet at iapmort.org. Ŷ $FWXDO SHUIRUPDQFH PD\ YDU\ ZLWK ORFDO ZDWHU FRQGLWLRQV WARNING Do not use with water that is microbiologically unsafe or with water of unknown quality without adequate disinfection before or after the system.
LIMITED ONE-YEAR WARRANTY • What does this warranty cover? — Any defect in materials or workmanship in the manufactured product. • What does this warranty not cover? — Filter canisters and batteries after 30 days from date of purchase. — Service trips to your home to teach you how to use the product. — Improper installation, delivery or maintenance. — Failure of the product if it is abused, misused, altered, used commercially or used for other than the intended purpose.
CONSUMER SUPPORT Consumer Support GE Appliances Website Have a question or need assistance with your appliance? Try the GE Appliances Website 24 hours a day, any day of the year! You can also shop for more great GE Appliances products and take advantage of all our on-line support services designed for your convenience. In the US: GEAppliances.
SISTEMA DE FILTRADO DE AGUA INFORMACIÓN DE SEGURIDAD . . . . . . . . . . . . . . . . 3 GENERALIDADES DEL SISTEMA . . . . . . . . . . . . . . . . . . 4 INSTRUCCIONES DE INSTALACIÓN Suministro del agua . . . . . . . . . . . . . . . . . . . Instale la válvula de control . . . . . . . . . . . . Instalación del sistema de montaje . . . . . . Cambio del filtro de luz. . . . . . . . . . . . . . . . Reposición del filtro. . . . . . . . . . . . . . . . . . . Procedimiento para lavar . . . . . . . . . . . . . .
GRACIAS POR HACER QUE LOS ELECTRODOMÉSTICOS GE SEAN PARTE DE SU HOGAR. Ya sea que haya crecido usando Electrodomésticos GE, o que ésta es su primera vez, nos complace tenerlo en la familia. Sentimos orgullo por el nivel de arte, innovación y diseño de cada uno de los Electrodomésticos GE, y creemos que usted también.
ADVERTENCIA INSTRUCCIONES IMPORTANTES DE SEGURIDAD A fin de reducir el riesgo de incendio, explosión, descargas eléctricas o lesiones al usar su refrigerador, siga estas precauciones básicas de seguridad: A fin de reducir el riesgo asociado con descargas, no permita que los niños menores de tres años tengan acceso a las partes pequeñas durante la instalación de este producto.
VISIÓN GENERAL DEL SISTEMA: Cómo funciona. Cómo funciona Observará un flujo de agua levemente inferior cuando se esté dispensando agua filtrada. Este sistema le permite elegir entre agua filtrada y no filtrada del grifo actual de su cocina. El sistema consta de una válvula de control, un temporizador y filtros. La tubería de agua existente está dividida en dos tuberías. Una pasa a través del sistema de filtrado hasta la válvula de control. La otra tubería se conecta directamente a la válvula de control.
Sistema de Filtrado del Grifo de la Cocina GXK185KBL ANTES DE INICIAR Lea estas instrucciones completa y cuidadosamente. • • • • • • • • Iinstrucciones MPORTANTE – Guarde estas para uso del inspector local. IMPORTANTE – Consulte con su departamento local de obras públicas para los códigos de plomería. Usted debe seguir estas pautas a medida que instala el sistema de filtración de agua. Nota al instalador – Asegúrese de dejar estas instrucciones con el consumidor.
INSTRUCCIONES DE INSTALACIÓN Instrucciones de instalación ACCESORIO PARA EL SUMINISTRO DE AGUA FRÍA (continúa) INSTALE LA VÁLVULA DE CONTROL (continúa) 6. Ajuste de forma manual el adaptador de la tubería de agua fría en la tubería de agua fría desde el grifo. Al perforar sobre acero inoxidable, es posible que los extremos sean filosos y esto podría dañar el cable. Sea cuidadoso a fin de no sufrir un corte ni dañar el cable. Termine de colocar con dos llaves de ajuste.
INSTALE LA VÁLVULA DE CONTROL (continúa) INSTALE LA VÁLVULA DE CONTROL (continúa) 3. Con el cable conducido debajo de la junta de goma y la tuerca de bloqueo (como se muestra a continuación), enrosque la tuerca por lo menos ¾ hacia abajo. 7. Inserte la perilla de control en el cuerpo de la válvula. NOTA: La perilla sólo se inserta en una posición; gire lentamente hasta que sienta que está levemente colocada en su posición. Luego empuje hacia abajo de manera firma para ajustarla en su posición. 8.
INSTRUCCIONES DE INSTALACIÓN Instrucciones de instalación INSTALACIÓN DEL SISTEMA DE MONTAJE Elija una ubicación debajo del lavabo para montar el sistema. La ubicación debe ser de fácil acceso, con un espacio de 4” entre la parte inferior de los cartuchos de los filtros y el piso o la parte inferior del gabinete; menos espacio dificultará el retiro de los cartuchos de los filtros (vea la Fig. 5). Deje suficiente espacio sobre cualquiera de los lados del sistema de conexión de las tuberías.
CAMBIO DEL FILTRO DE LUZ El anillo de limpieza en la parte inferior de la perilla de control titilará para indicar que es hora de cambiar el filtro y la batería. El anillo titilará de forma doble a los seis meses para indicar que es hora de reemplazar el filtro. El anillo titilará una vez de manera tenue al año para indicar que es hora de reemplazar los filtros y las baterías.
CONSEJOS PARA LA SOLUCIÓN DE PROBLEMAS Consejos para la Solución de Problemas... Antes de solicitar el servicio técnico Solucionar problemas ¡Ahorre tiempo y dinero! Revise la siguiente tabla primero y tal vez no necesitará de solicitar un servicio.
Ref. No. 001 002 003 DESCRIPCION DE LA PARTE Instale el Juego Temporizador Conjunto de válvula de control (Cromo) 004 WS19X21443 Colector de Filtración 005 FQK1K Conjunto de Filtros 999 49-6000061 Manual del Propietario Para obtener piezas de recambio o las herramientas opcionales, llámenos gratuitamente al 877.959.8688. 004 005 PARTE NO.
FICHA TÉCNICA DE RENDIMIENTO Ficha Técnica de Rendimiento Filtración Sistema GXK185KBL, GXRLQK, TFWFSET usando FQK1K filtro Ŷ Sistema evaluado y certificado por IAPMO R&T contra los Estándares 42,53, y 401 de NSF/ANSI para la reducción de reclamos especificados en la ficha técnica de rendimiento y en aipmort.org.
GARANTÍA LIMITADA POR UN AÑO • ¿Qué cubre esta garantía? — Cualquier defecto de fábrica en los materiales o la manufactura del producto. • ¿Qué no cubre esta garantía? — Cartuchos de los filtros y las baterías después de treinta días a partir de la fecha de la compra. — Viajes a su casa para enseñarle cómo usar el producto. — Instalación o entrega inapropiada, o mantenimiento impropio.
SOPORTE PARA EL CONSUMIDOR 14 Soporte para el Consumidor Sitio Web de GE Appliances ¿Desea realizar una consulta o necesita ayuda con su electrodoméstico? ¡Intente a través del Sitio Web de GE Appliances las 24 horas del día, cualquier día del año! Usted también puede comprar más electrodomésticos maravillosos de GE Appliances y aprovechar todos nuestros servicios de soporte a través de Internet, diseñados para su conveniencia. En EE.UU.: GEAppliances.