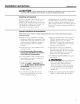
wwvv.GEAppliances.com Safety Information .......... Installation Instructions Step-by-step instructions . ._3-1_2 . . .6-12 Operating Instructions Breaking a salt bridg_ ....... Cleaning the nozzle and venturi assembly ........... Features .................. Service ............. V_'ater softener system Care and Cleaning Troubleshooting Tips Water Softening System 2 14 14 ]5 Models GXSF35E,GXSF39E 13, 16-18 .... 13-18 ........ ....
IMPORTANTSAFETYINFORMATION. READALL INSTRUCTIONSBEFOREUSING. WARNING! For your safety, the information in this manual must be followed to minimize the risk of electric shock, property damage or personal injury. SAFETY PRECAUtiONS _: Check codes. and cmnl)ly with vour state and You must tollow ti/ese guidelines. local _: Use clean water softening salts only, at least 99.5% pm'e. NUGGET, PEI,I,ET or coarse SOLAR salts are recommended.
Installation instructions. GEA.,liances cam A_ CAUTION: Certain plumbing skills are needed for installation. If you are unsure about any part of the installation of this product, consult a professional plumber. Unpacking and Inspection Be sure to check the entire softener for any shipi)ing damage or parts loss. Also note dmnage to tile shii)ping cartons. (:ontact the transportation company for all damage and loss claims. The ii/antlf_lCttli'ei" is not responsible fl)r damages in transit.
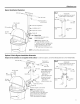
Installation instructions. Plan How You Will Install the Softener You must first decide how to mm in and out pipes to the softener. I,ook at the house main water pipe at the point where you will connect the soiiener. Is the pipe soldered coppe_; glued plastic or threaded galwmized? What is the pipe size? See Yypical Installation Illustration, Fig. 1. Use this as a guide when planning yore" particular installation. Be sure to direct the incoming hard water supply to the softener valve inlet fitting.
GEAppliances.com Typical Installation Illustration Fig. 1 /VAT_i_ P/RE Softwater " _ .... _ :__-_-_ Hardwater Hard water Hardwater to 120-voltoutlet CROSSOVER Useif water supplyflows from the left. Includesingle or 3-valvebypass. Softwater outsidefaucets J _-_ Union(notsupplied)(2) 24V transf( From softener, )utlet ._-_ Installationnut (2) ,_ To softener inlet -._-.
Step-by-step installation instructions. ::Ji:: Turn off the gas or electric supply to the water heatei, in the possibility that the water heater may be drained while draining pipes. ::Ji:: Turn off the water water pipes. supply to pipes to be cut and drain installation, remove 0ut,et the house _: Open both hot and cold hucets at the lowest location possible. Release 2 clips at rear of cover. Rotate cover tin'ward and lilt up. NOTE: For easier Fig3A 0rain the top cover.
GEAppliances.com 4. CONNECT AND RUN THE VALVEDRAIN HOSE • Use the valve provided drain fitting, use a hose the remainder • i,ocate drain to secure in Step other • Tie this or wire cause hose the of the Also provide point. into the softener, Cut the blowing to the the necessary at a suitable terminates hose length _rlight Valve drainhose off, and use at the the drain back-wash of at least An air drain at the point sewer.
Step-by-step installation instructions. 6. INSTALL GROUNDING CLAMP Tovalveinlet Hg6 A DANGER:F ,il,ue t,,i,t,,petl, ,tt .ht.,u,d clamp could result in electrical shock. Groundclam If phunbing is metal, to maintain electrical ground continuity in the house cold water piping, install the included ground clamps as shown in Eg. 6. " Clean clamp pipe with emery paper is to be installed.
GEAppliances.com Programming the Control SET WATER HARDNESS NUMBER Q_ SALT {_w_'_ LEVEl PM DAYS i U'U iJ _ ttl _ I 0 i'_ RECHARGE HARDNESS TIME ® upon REQUIRED power outage. installation NOTES: ::A:: WHEN THE TRANSFORMER IS PI,UGGED INTO THE EI,ECTRICAI, OUTI,ET, 12:00 PM (flashing), and an arrow 1_ is displayed next to PRESENT TIME on the taceplate decal. The bhm indicator light will also flash. Program the control as instructed beh)w.
Step-by-step installation instructions. Programming the Control (cont.) DAYS TO EMPTY I. Press the MODE button until The words SET SALT arrow I_ LEVEL points to SALT LEVEL. _ _j] _] SALT LEVEL 2. Determine level of salt in brine tank using yellow indicator on side of brine well, inside brine tank (see illustration on page 5). 3. Press UP • or DOX4N • button to set the SALT LEVEL .... ..... to correspond to lexel on yellow indicator in brine tank.
GEAppliances.com Optional Control Settings The controller display has sexeral options and LOST TIME SIGNAL teatm'es. If time blue LOW SALTSALTALARM, ALARM The somM will LOW the beeper when when the enabled, DAYS TO EMPTYxalue is 15 da_s or less, To present I?__&_ __ 4_)1 LIm n SALTEFFICIENCY SALT .EVEL _4hen the SALTEFFICIENCYfeamre the refit will efficiency of at least hardness remoxed operation the with salt less to lengthen proxide more two salt.
Step-by-step installation instructions. Sanitizing Procedures Tocomplete the installation, do the following sanitizing procedures. Care is taken water softener used to make 4 IL after taucet at the tactorv to kee I) your clean and sanitary: Materials the softener will not infect or contaminate wmr Catlse bacteria to dm'ing shipI)ing, operating, bacteria sofiener.
About the water softener system. GEAppliances. Service When the water sott water, hard water pipe into water up softening the water sottening sottening s):stem of thousands service, water main tank plastic through the hard ion-exchanging. attracting and hard ininerals sottening is providing During system. resin of tiny, hard water passes attracts and holds called system it is called "Service." flows fl'om the house Inside is a bed resin beads. the bed, minerals.
About the water softener system. Breaking a Salt Bridge Pushtool into salt bridgeto break Sometimes, a hard c_ust or salt bridge forms in the salt storage area. It is usually caused by high humidity or the wrong kind of salt. When the salt bridges, an empty space fin'ms between the water and salt. Then salt will not dissolve in the water to make brine. If the brine tank if wm have a salt but the bridge is best way to check is fldl of salt, it is hard to tell bridge. Salt is loose on top, under it.
GEAppliances.com Normal Operation, Control Displays During normal operation, tile present time of day and AM or PM and DAYS TO EMPTgshow in tile control display area. When tile demand computer determines a recharge is needed, RECHARGE TONIGHTbegins to flash in tile display along with tile present time. RECHARGE TONIGHTflashes until tile next recharge start time; then changes to RECHARGE which flashes until tile recharge is over.
About the water softener system. Service: Electronic Demand Time Features and Service ERRORCODE DISPLAYED ERR01 POSSIBLEDEFECT ERR02 ERR03 ERR04 • Motor inoperative • Position switch • Motor inoperative or wiring harness • Position switch or wiring harness • Wiring harness or connection to switch • Control • Control • Control ERR05 • Control • Position switch • Control Toremovean errorcode: I. Unplugtransformer Z Correct defect. 3. Plug transformer in. 4. Wait for at least 6 minutes.
GEAppliances.com Service: Manually Initiated Electronics Diagnostics I. To enter diagnostics, the MODE button press and 3 seconds for the LOW SALTALARMscreen 2. Press the MODEbutton hold until shows. 9 times 4111 01-1 to SALT .EVEL adwmce through LOW SALT ALARM and SALT EFFICIENCY options. See Programming the Control for details on these - If there is no reading in the display; with fimcet open, check the sensor.
About the water softener system. Service: Manually Advance Recharge Check NOTE:The control time (not flashing). I. Press display must show a steady the RECHARGE @ button and hold in liar three seconds. RECHARGEbegins to flash as the water snitching system enters the fill cycle of recharge. Remove the brinewell cover and, using a flashlight, observe fill water entering the brine tank. If water does not enter the tank, look liar an obstructed nozzle, venturi, fill flow plug or brine tubing.
Care and cleaning of the water softening system. CEAppliancesce Checking the Salt Storage Level and Refilfing Brine (salt dissolved in water) is needed fi>r each and every recharge. Tile water For making brine is metered into tile salt storage area by tile water softening system wflve and control. However, you must keep the tank supplied with salt. Use When to refill with salt: If tile blue A CAUTION:W.terso,ening s.
Before you call for service... Troubleshooting tips Save time and money! Review the chart on following pages first and you may not need to call for service. NO SOFt WATER--Most Common Problems: Check the following before calling for service. * Not enough salt--should be at least 1/3 full. • Bypass valve in "Bypass" position knob should be in the "OUT" (service) position. • Hardness setting too low--check hardness setting and adjust.
GEAppliances.com Problem Possible Causes What To Do Waterhardsometimes Using hot water while the water softening system is regenerating • Avoid using hot water during water s()ftening system recharge beca use tile water heater will refill with hard water. See Automatic Hard Water Bypass DuringRechargesection, page 13.
Before you call for service... _ Troubleshooting -tips Problem Possible Causes Salty tasting or Unit not sanitized What To Do • Conq)lete brown/yellow colored waterafter installation the Sanitizing Procedures on page 12. • At ('(nnl)lefion of recharge, cycle, (approx, ti'om timcets to purge the salty watex: Low water pressure Restricted drain hose _2hLO,_run water Check pI'esstlI'e, • Drain height 8' or less, pressure shotfld be minimum of 20 psi. • Drain height should ot 50 psi.
Notes.
Parts lisL 4 \ 28 j18 \ \ \ 24 26 24
GEAppliances.com 152 \ 151 ,M 25 153 134 133 132 145 107_ 144 -- 130 \ 143 124_ 115 ,/ 146 147 117 150 118 119 120 121 25
Parts catalog. GENERAL 26' ELECTRIC PARTS CATALOG REE NO. PART NO.
GEAppliances.com GENERAL ELECTRIC PARTS CATALOG REE NO. PART NO.
GE Water Softening System Warranty. (For Customers in the United States) All warranty service provided by our SmartWateF MAuthorized Servicer Network. To schedule service, on-line, 24 hours a day, visit us at GEAppliances.com, or carl 800.GE.CARES (800.432.2737) (U.S), or 866.777.7627 (Cana da). For The Period Of." We Will Replace: One Year From the date of the originalpurchase Anypart of the _hter Softening this full one-year During to replace Service the (lelecti\'e part.
GE Water Softening System Warranty. (ForCustomers inCanada) All warranty service provided by our Factory Service Centers or an authorized technician. For service, call toll free 1.866.777.7627. For The Period Of.
Notes.
Informaci6n de seguridad ..... 39 Instrucciones para la instalaci6n ............... 33-4_ Instrucciones paso pot paso . . .36-4_ Instrucciones para la operaci6n C6mo limi)iar la ensambladura de la boquilla y el Venturi ....... 45 C6mo romper un puente de sal . . .44 Funciones ................... 46 Servicio ................ 43, 47-49 Sistema de descalcificaci6n de agua .................. Cuidado y limpieza 43-49 ........... 50 Consejos para la soluci6n de averias ................
INFORMACIONIMPORTANTEDE SEGURIDAD. LEATODASLAS INSTRUCCIONESANTES DELUSO. AADVERTENCIA Per su seguridad, se debe seguir la informaci6n en este manual con el fin de reducir el riesgo de una descarga el#ctrica, dafios a la propiedad o dafios personales. PRECAUCIONES DESEGURIDAD _: Revise y ctunpla locales. Observe _: Tenga cuidado descalcificacidn _IITilStI'e con to(los los c6digos estatales las pautas aquf presentadas. v al manipular el sistema de de agua.
Instrucciones de instalacion. C ,,,ia.ces.com f _ PRECAUCION:so nocosita -- cierta habilidad de plomeria para la instalaci6n. Si usted no estb seguro acerca de la instalaci6n de alguna de las partes de este producto, consulte a un plomero profesional. Desempacado e inspeccion Cerci6rese de descalcificador inspeccionar en busca envfo que o partes Tambi0n revise de envfo.
Instrucciones de instalacion. Planifique la instalacion del Descalcificador i,o prin_ero tuberfas que que debe ei_ti'an decidir es c6mo y salen F!jese en la tuberfa de agua conectaM el descalcificadoi: soldada con cobre, gal\mfizada? instalar las del descalcificadoi: en el ptmto ;I_ mberfa pegada con donde estfi plfistico, 4Cu51 es el talnafio o roscada marcada IN (ENTRADA)y OUT (SALIDA). Consulte la ilustracidn en la pfigina 3:5 como ayuda para la preparaci(m.
GEAppliances.com Ilustracion de instalacion normal Fig. 1 Aguadescalcificada VIADEENLACE Uselasi el flujo de suministrofluye desdela izquierda.Incluyaunaderivaci6n .....___ . sencillao de 3 v_lvulas. Ag dura -"f-.--Aguadura -_"_ Agua durahacia losgrifos externos Tomacorriente de 120 voltios 8_-_ TransformadOrde 24V -"'b.
Instrucciones de instalacion paso por paso. Fig. 3R ::Ji:: Suspenda el suministro de gas o de ene_gfa elOctrica que alimenta el calentador de agua, en la posibilklad de que el calentador pueda dremu_e mientras usted drena las tuberfas. _: Desconecte el smninistro de agua hacia los tubos drene las tuberfas de agua de la casa. que han de set cortados ,_-_ Salida mils tilci], I'eIlltleVa la cubierta Accesoriode dr@aje--'_ el tap6n plfistico de embak!je J en la intlesca superior.
GEAppliances.com 4. CONECTEY HAGA FUNCIONAR LA MANGUERA DE DRENAJE DE LA VALVULA " Use la manguera adherirla del agua expulse asegurarla en el Paso " Ubique drenar Corte extremo los c6dJgos evitar para que la presi6n use una abrazadera de mangueras para necesaria y use la parte restante de la manguera en un punto sumidero, tina apropiado de lavanderia, de alcantarillado. le drenaje V_lvula de la manguera &_{ ,_ Abrazadera .
Instrucciones de instalacion paso por paso. 6. INSTALELASABRAZADERASDE TIERRA A PELIGRO: No adherir abrazadera elg_ctrica. de tierra podrfa Haciala entradade la vNvula Fig6 aproi)iadamente la result;u" en una descarga Abrazaderade_-_ Si las tuberfas son de metal, para mm_tener conthmidad de fierra el_ctrica en la mberfa de agua flqa, instale las abrazaderas de tierra inchfidas como se muestra en la Fig. 6. • Limpie la mberfa con papel de esmerilar la abrazadera seifi inst;dada.
GEAppliances.com Programacion del control AJUSTE EL MVEL DE DUREZA DEL AGUA LEVEL PM DAYS @Q_ SALT _ ! LI'L! I_l I. Optima el bot6n MODE (modo) hasta que la flecha I_ sefiale HARDNESS (dureza). PRESENTTIME TO EMPTY iI iFb]-I i J7 ]'_ ! --I 0 If,- HARDNESS SALTLEVEL RECHARGE TIME ® 2. Optima ® los botones UP • o DOWN • para ajustar dureza del agua en la pantalla. DO_N disnfinuve de dureza. UP aumenta el nivel de dureza.
Instrucciones de instalacion paso poTpaso. Programacion del control (cont.) AJUSTE EL NIVEL DE SAL M n U.u .... ..... I. Presione el bot6n MODE (modo) I SALTLEVEL hasta que la flecha I_ seflale SALT LEVEL (nivel de sail. 2. Detemfine utilizando de sahnuera, (vea la ilustraci6n 3. Presione dentro del de la pfigina el bot6n UP • ._ =_.
GEAppliances.com Ajustes opcionales de control I,a pantalla del controlador caracterfsticas. ot]'ece \m_ias opciones ALARMA DE BAJO NIVEL DE SAL y SERIAL DE HORA PERDIDA Si la hora se pieMe ell la pantalla debido ell el suministro elg_ctrico, la luz indicadora I&_L cuatro ingrese I,a LOW SALT(uando ALARM est;i (alarma de bajo t €) I-[ I-I nivel de sal), acti'_ada, sonaM cuando el valor de DAYS TO EMPTY(dias para desocupar)sea de 15 dfas o mends.
Instrucciones de instalacion paso por paso. Procedimientos de desinfeccion E1 indicador de RECHARGE(recargo)aparece intemfitente en la pantalla. E1 cloro es llevado hacia v a tray's del descalcNcador de agua. Esta proceso dm'a aproximadamente 2 horas. Para comp/etar/a insta/aci6n,siga los procedimientos de desinfecci6n siguientes. En la filbrica se siguen los cuidados mantener el descaldficador de agua desinfecta(h).
Sobre el sistema de descalcificacion de agua. GEA,,lia, ces.cem Servicio Cuando el sistema descalcificador propordonando llama agua "SexMcio'; fluve desde Din'ante la tuberfa casa hacia del descalcificacidn compuestn el agua de resinas dm'a pasa resina diminutn atrapa se le llama intercambio imfin que atrae hay tma dm'a del sistema pelfctfla plfisficas de o capa diminutns, a tra\'(_s de la capa, cada los minerales dm'os. A esto de iones.
Sobre el sistema de descalcificacion de agua. Como romper un puente de sal Empujeel instrumentohacia el interior del dep6sitode sal romperel puente A veces, una capa dura de sal o puente de sal se fl)I_na en el firea de ahnacenainiento de la sal. Esto generahnente se debe a la hunledad alta o al uso de algfin tipo de sal equiw)cada. (]/l[lil(lo la sal fl)rina ptlente, un espacio w_cfo se ti)rina entre el agua y la sal. Entonces la sal no se disuelve en el agua para hacer la sahnuera.
GEAppliances.com Como limpiar la ensambladura de la boquilla y el Venturi Es necesario que la boquilla y el Venturi esten limpios para que el sistema de descalcificaci6n de agua funcione apropiadamente. Esm pequefla unidad ejecum la succi6n para mover la sahnuera del firea de ahnacenamiento de sal Tapa hacia el tanque de resina din'ante la recarga. Si estfi atascada con arena, sucia, etc., el sistema de descalcificaci6n de agua no flmcionaM y usted solamente tendril agua dura.
Sobre el sistema de descalcificacion de agua. Operaci6n normal, Pantalla de control Durante la operacidn nolmal, la hera actual del dfa y AM o PM v DAYS TO EMPrY(dias hasta desocupar)se muestran en el _irea de la pantalla de control. Cuando la computadora de delnanda deterlnina que una recarga es necesaria, el inensaje RECHARGE TONIGHT (recargue esta noche) comienza a parpadear en la pantalla con la hera actual.
GEAppliances.com Servicio: Funciones y servicio del tiempo de demanda electronico CODIGODEERROR VISUALIZADO ERR01 ERR02 POSIBLEDEFECTO • El motor no funciona • Interruptor de posiciSn • Problemasen • Control el cableado o en la conexidn hacia el interruptor ERR03 ERR04 ERR05 • Motor no funciona o problemasen el cableado • Interruptor de posici6n o problemasen el cableado • Control • Control • Control • Interruptor de posicidn • Control Para eliminarunc6digode error: I.
Sobre el sistema de descalcificacion de agua. Servicio: Diagnostico electronico iniciado manualmente I. Para entrar a la flmciOn de diagnOstico, oprinm y mantenga owimido el botOn MODE (modo)per tres segundos hasta que aparezca la panmlla de LOWSALT ALARM(alarma de bajo nivel de sail • Medidor del agua--lndica de la wilvula.
GEAppliances.com Servicio: Configurar el codigo del modelo (F o H) I. Para cambiar presione o revisar prin_ero (modo)pot tres la pantalla de el c6digo y sostenga segundos del MODE el bot6n hasta que la LOW SALTALRRM 4 Presione modelo, aparezca (alarma de y sostenga MODE (modo) " la pantalla • (modo) a la operaci6n del se pondrfi en el c6digo ingresado. regresa actual vez cambi6: blanco luego de modelo una y visualizaci6n modelo momentfineamente, la hora 3.
Cuidado y limpieza del sistema de descalcificacion de agua. Inspeccione el nivel de almacenamiento de la sal y el rellenado Se necesita sahnuera (sal disuelta en agua) para cada recarga. E1 agua para hacer la sahntmra es medida cuando entra al firea de ahnacenamiento de la sal a trav(_s de la vfilvula Utilice sales de sistemas de descalcificaci6n de del sistema de descalcificaci6n de agua y el control. Sin embargo, usted debe mantener el tanque con sal. gfanulada ni de helade (para descengelar hiele).
Antes de Ilamar para solicitar servicio.., cu ,La.ces.com Consejos pare la idenfificaciSn y soluciSn de avedas iAhorre fiempo y dinero! Revise las tables en las siguientes p#ginas primero y quiz#s no tonga que Ilamar pare soficitar servicio. NO HAY AGUA DESCALCIFICADA_Problemas mils comunes: Inspeccione Io siguiente antes de Ilamar para solicitar servicio: • No hay suficiente sal---debe estar por lo menos lleno hasta 1/3.
Antes de Ilamar para solicitar servicio... Problema Posible causa No hayagua descalcificada(cont.) La boquilla ensmnblados Que hacer y el Venturi es_al hlcorrectaanente sucios, o dm-lados • Consulte las instrucciones Con la presi6n descalcificaci6n boquilla. parte segfin Usm" agua caliente mienlyas el descaJcificador de agua estfi en el proceso de regeneracion de agua, sea desam_e necesario. nmesca, etc.
GEAppliances.com Problema Posible causa El sistema de La turbhla Que hacer del medJdor estfi atascada descalcificaci6n no est# regenerando • Consulte la seccidn Servicio: Diagn6stico electr6nico manualmente, para procedinfientos en la pfigina 48. " IJmne Almnbre del sensor en el control no conectado v solMte • Consulte de soluci6n iniciado de averias, servMo. la seccidn Servicio: Oiagn6stico eloctr6nico iniciado de soluci6n de averias, manualmento,para procedimientos en la pfigina 48.
Antes de Ilamar para solicitar servicio... Problema Agua Posible causa de color La mfidad caf_/amarillo Las particulas estuvo por tm periodo de Que hacer Distribuidor inoperm_te • (_omplete los Procedimientos de desinfeccidn, de la pfigina 42. de tiempo agrietado • i Jame para solicitar servicio.
Notas. GEAppliances.
Lista de partes. 4 _, 28 12 56 _ 146 / 13 55 55 _------- 56 a -_.____.
GEAppliances.com 152 \ 151 .135 #/25 153 134 133 132 145 107_-_ 144 130 \ 143 124-- 115 ,/ 146 147 117 150 118 119 120 121 S 57
Catklogo de partes. CAT_A_OGO NO. 58 REFER. DE PARTES NO. DE PARTE DE GENERAL ELECTRIC DESCRIPCION DE LA PARTE 0003 0004 0005 0007 0008 0009 00] 0 0011 0012 0013 0016 _\q35XlO001 WS34X10015 WS07X10004 WS] 4X 10002 WS14X10001 WS01 X10002 _\$32X100] 1 _4\q31 X10022 _4\$31X 10023 _4\q21X10013 _4\$26X 10013 KIT DEI, SELI,O 0017 WS31X10021 0018 0019 0020 WS33X10001 WS33X10007 WS31X10024 CUBIERTA, AGt.!JERO CON ETIQUETAS BARREI/A DE VAPOR BORDE (_UBIERTA, DEPOSIT() 0021 0022 _4\q02X 10009 WS32
GEAppliances.com CAT_A_OGO NO. REFER. DE PARTES NO. DE PARTE 0106 0] 07 0108 0109 0] ]0 0] ] 1 0112 0113 0114 0115 0116 _\q31 X 10006 WS03X100] 0 WS26X10002 WS19X 10004 WS03X]00] 1 WS] 9X] 0005 _\S03X10013 _,_\S22X10020 _,_\S08X10005 _,_\S03X 10015 _,_\$22X 10021 0117 0118 0119 0120 0121 0122 0123 0124 WS03X10017 WS15X10034 WS03X10018 WS03X 10019 WS]5X]00]0 _,_\S03X 10020 _,_\S22X 10022 WS15X10009 0130 0132 _4\S35X 10005 _4\$22X 10023 0133 0134 _4\S03X 10021 _4\S03X 10022 0135 0136 0137 0138
Notas.
Notas. GEAppliances.
Garantia GEpara el Sistema de Descalcificacion de Agua. Todos los servicios de garantfa son proporcionados par nuestra red de proveedores de servicios autorizados SmartWaterY Para programar un servicio, par Intemet, las 24 horas al dfa, visftenos en GEAppfiances.com o Ilame a1800.GE.CARES (800.432.2737). Par el periodo de: Reemplazamos: Unoa#o A partirde la fecha de la compra original en la fid)ficacidn.
Soporte al Consumidor. P_ginaWebde GEAppliances GEAppliances.co ,_'Tiene alguna pregunta sobre su electmdom_stico? iPruebe la p;igina Web tie GE Appliances 24 horas al dfa, cualquier dfa del aflo'. Para mayor conveniencia v servicio re;is Mpido, );_ puede desca_gar los Manuales de los Propietarios, pedir pie/_s o incluso hacer tma dta en lfnea para que vengan a reali/_n" tma reparaci6n.
ConsumerSupport. gEAppliancesWebsite GEAppliances.com Have a question or need assistance with your appliance? Try the GE Appliances _.Vebsite 24 hotn_ a day, any clay of the year'. For greater convenience and faster setMce, you can now download Owner's Manuals, order parts, catalogs, or even schedule service on-line. You can also "_sk Our Team of EN)erts ..... yore" questions, and so much more... ScheduleService Expert (;E repair sets,ice vottr, {'on;enien{'e business hom_. GEAppliances.