
Manual


About the water softener system.
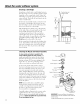
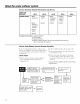
Breaking a Salt Bridge
Sometimes, a hard c_ust or salt bridge forms in
the salt storage area. It is usually caused by high
humidity or the wrong kind of salt. When the
salt bridges, an empty space fin'ms between the
water and salt. Then salt will not dissolve in the
water to make brine.
If the brine tank is fldl of salt, it is hard to tell
if wm have a salt bridge. Salt is loose on top,
but the bridge is under it. The following is the
best way to check tor a salt bridge.
Salt should be loose all the way to the bottom
of the tank. Take a broom handle or like tool,
and careftflly push it down into the salt,
working it up and down. If the tool strikes
a hard object (be sure it's not the bottom or
sides of the tank), it's most likely a salt bridge.
Carefifllv break the bridge with the tool.
Do notpound on the walls of the tank.
If the wrong kind of salt made the bridge, take
it out. Then fill the tank with nugget or pellet
salt only. In humid areas, it is best to fill with
less salt, more otten to prevent a salt bridge
fl'om torming.
Pencil
mark
Broom
handle
Pushtool intosalt
bridgeto break
/
Water level
bridge
14
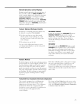
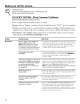
Cleaning the Nozzle and VenturiAssembly
A clean nozzle and venturi is needed for the
water softening system to work properly. This
small unit makes the suction to move brine
fl'om the salt storage area to the resin tank
during recharge. If it becomes i)lugged with
sand, dirt, etc., the water sottening system
will not work and w)u will get hard water.
To get to the nozzle and venturi, remove
the water sottening system top cover. Be sure
the water softening system is in service cycle
(no water pressure at nozzle and venturi).
Then, while holding the nozzle and venturi
housing with one hand, remove the cap. i,itt
out the screen sui)port and screen, then the
nozzle and venturi. X_'_sh and rinse the parts in
warm water until clean. If needed, use a small
bHIsh to remove iron or dirt. Also check and
clean the gasket.
NOTE: Some models have a small flow plug
located in the nozzle and venturi, and/or
a small cone shaped screen in the housing.
Be sure to check and clean these parts,
if wmr model is so equii)i)ed.
Careflflly replace all parts in the correct order.
I,ightly lubricate the o-ring seal with clean
silicone grease or petroleum ,jelly and place in
position. Install and tighten the cap, by hand only.
De net evertighten the cap.
Cap
O-ringseal-_D._ 0
Screensupport-_@
Screen._,-q_
*Flow plug-_,_ _'
i
Nozzle& Venturi._P.-_ _ _....t Screen
Gasket._,- _
*Flow plug-------------__
IMPORTANT"Be suresmallholesin the gasketare
centereddirectlyoverthe smallholesin the nozzleand
venturihousing.
*Install with numberedside up,concaveside down.