
Installation Guide


8 49-60698-3
Installation Instructions
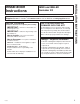
ICEMAKER INSTALLATION INSTRUCTIONS (Continued)
3
REMOVE THE OUTLET COVER
Peel off the outlet cover.
6
SET POWER SWITCH TO OFF
Set the icemaker power switch to OFF. Leave
the power switch in the OFF position until the
refrigerator
is connected
to the water
supply to
prevent
premature
operation.
7
INSTALL THE ICEMAKER
FILL CUP
For letters
U
&
V
Install the icemaker fill cup (13) into the
icemaker as shown.
For letter
W
Install the icemaker fill cup that came with your
refrigerator into the icemaker as shown. If the
fill cup has been misplaced, call 1.800.626.2002
and order part WR29X10074. If the correct fill
cup is not installed into the icemaker, there is the
possibility of water leaking into the freezer and
not into the icemaker.
5
INSTALL FILL TUBE
Go to the back of the refrigerator. On the
refrigerator side of the fill tube assembly (11 or
12 depending on model), there is an adhesive
backing. Remove the adhesive backing and slide
the tube into the hole near the top at the back
of the refrigerator. Firmly press on the fill tube
assembly to secure it to the refrigerator.
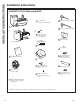
REMOVE ONLY
TO INSTALL
WATER FILL TUBE
11 12
or
Power
Switch
(Appearance may vary)
13
(Appearance
may vary)
INSTALLATION INSTRUCTIONS
4
PREPARE FOR INSTALLATION
Ɣ Inside the freezer, remove the two small white
plug buttons (on some models) from the side
wall. (If screws are present instead of plugs,
leave them in place.)
Ɣ$ODUJHZKLWHSOXJRUDZKLWHFDSVHFXUHGE\D
1/4" screw will be covering the fill tube opening
in the rear freezer wall.
Ɣ5HPRYHWKHODUJHZKLWHSOXJXVLQJDIODW
blade screwdriver. Remove the white cap by
unscrewing the 1/4" screw.
Ɣ5HPRYHWKHRXWOHWFRYHUZLWKDIODWEODGH
screwdriver.
Outlet
cover
Remove side wall plug buttons
or leave screws in place
Rear wall
plug button
(on some
models)