UseandCare& Installation Guide Electric Range with Convection Oven Safety Instructions ....................4–7 Problem Solver .......................54–56 Anti-Tip Device .................................4, 44, 53 Thermostat Adjustment– Do It Yourself.............................................33 More questions ?…call Operating Instructions, Tips Aluminum Foil .....6, 31, 34, 39, 41, 47, 48 Child Lock-Out ..............................................20 Clock and Timer ...............................
Congratulations! You have just purchased one of the most innovative and exciting products on the market today. A great deal of research and technology has gone into the development of this appliance and we believe that by choosing GE, you have made a wise investment that will provide years of enjoyment. With this range you not only get the assurance of GE quality, but many other exceptional features. Convection Cooking • Convection cooking has long been the choice of many professional chefs and bakers.
HELP US HELP YOU… Before using your range, read this guide carefully. Write down the model and serial numbers. If you received a damaged range… It is intended to help you operate and maintain your new range properly. Keep it handy for answers to your questions. If you don’t understand something or need more help, call: GE Answer Center® 800.626.2000 24 hours a day, 7 days a week You’ll find them on a label behind the range door or behind the storage drawer.
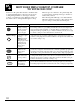
IMPORTANT SAFETY INSTRUCTIONS Read all instructions before using this appliance. IMPORTANT SAFETY NOTICE • The California Safe Drinking Water and Toxic Enforcement Act requires the Governor of California to publish a list of substances known to the state to cause birth defects or other reproductive harm, and requires businesses to warn customers of potential exposure to such substances.
Oven • Stand away from the range when opening the oven door. Hot air or steam which escapes can cause burns to hands, face and/or eyes. • When using cooking or roasting bags in the oven, follow the manufacturer’s directions. • Do not heat unopened food containers. Pressure could build up and the container could burst, causing an injury. • Keep the oven vent duct unobstructed. • Keep the oven free from grease buildup. • Place the oven shelf in the desired position while the oven is cool.
IMPORTANT SAFETY INSTRUCTIONS (continued) Surface Cooking Units (Electric Coil models only) • Use proper pan size—Select cookware having flat bottoms large enough to cover the surface unit heating element. The use of undersized cookware will expose a portion of the surface unit to direct contact and may result in ignition of clothing. Proper relationship of the cookware to the surface unit will also improve efficiency. • Never leave the surface units unattended at high heat settings.
Halogen/Radiant Surface Units (on some models) SAVE THESE INSTRUCTIONS 7 Important Safety Instructions • Use proper pan size—Select cookware having flat bottoms large enough to cover the selected surface unit. The use of undersized cookware will expose a portion of the surface unit to direct contact and may result in ignition of clothing. Proper relationship of the cookware to the surface units will also improve efficiency. • Never leave the surface units unattended at high heat settings.
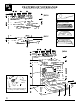
FEATURES OF YOUR RANGE Not all features are on all models. Appearance may vary. 11 12 13 14 29 15 10 JBP90 9 16 17 8 30 Broiler pan and grid 18 7 31 8 JBP95 36 32 18 36 7 11 12 13 14 JBP80 10 9 16 34 35 33 6 19 20 21 5 22 4 23 24 Support Rods Drip wells Electric coil models have lift-up cooktops for easier cleaning.
Feature Index* Explained on page 1 Storage Drawer or Kick Panel 4, 46 2 Anti-Tip Device 4, 44, 49, 51 3 Anti-Tip Label – 4 Probe Outlet 28, 36 5 Convection Fan Heating Element Operates during convection cooking. 23–26, 28 6 Oven Door Latch Used for self-cleaning only. 24, 25, 28, 29, 34, 38, 42, 43 7 Hot Surface Indicator Lights Glass Cooktop models only. 13, 14 Feature Index* 21 Oven Shelf Supports Shelf positions for cooking are suggested in the Baking, Roasting and Broiling sections.
HOW DOES THIS COOKTOP COMPARE TO YOUR OLD ONE? Your new cooktop has either electric coil surface units or a halogen/radiant glass cooktop. If you are used to cooking with gas burners or other types of electric cooktops, you will notice some differences when you use electric coils or a halogen/radiant glass cooktop. The best types of cookware to use, plus heat-up and cool-down times, depend upon the type of burner or surface unit you have.
General Information About Halogen/Radiant Surface Units Sliding aluminum cookware across the glass may leave metal marks. These metal marks will appear as small scratches. They can be removed with cleaning cream and a razor scraper. It is safe to place hot cookware from the oven or surface on the glass surface when the surface is cool. Avoid sliding pans on the glass cooktop. Pan edges that are even slightly rough or grit on the cooktop can cause scratches on the glass.
HOME CANNING TIPS Canning should be done on the surface units only. Pots that extend beyond 1 inch of the surface unit are not recommended for most surface cooking. However, when canning with water-bath or pressure canner, larger-diameter pots may be used. This is because boiling water temperatures (even under pressure) are not harmful to the cooktop surfaces surrounding the surface units. HOWEVER, DO NOT USE LARGE DIAMETER CANNERS OR OTHER LARGE DIAMETER POTS FOR FRYING OR BOILING FOODS OTHER THAN WATER.
SURFACE CONTROLS At both OFF and HI the control “clicks” into position. You may hear slight “clicking” sounds during cooking, indicating the control is keeping the unit at the heat level or power level you set. Switching heats to higher settings always shows a quicker change than switching to lower settings. Push the knob in and turn in either direction to the desired heat setting. Be sure you turn the control knob to OFF when you finish cooking.
SURFACE CONTROLS (continued) Dual Surface Unit Switch (Glass Cooktops Only) The right front surface unit has 2 cooking sizes to select from so you can match the size of the unit to the size of the cookware you are using. COIL SIZE 9" 6" To use the large (9 inch) surface unit, push in the right portion of the COIL SIZE switch next to the control knob. To use the small (6 inch) surface unit, push in the left portion of the COIL SIZE switch.
Wok Cooking Surface Controls Do not use woks that have support rings. Use of these types of woks, with or without the ring in place, can be dangerous. Placing the ring over the surface unit will cause Do not use woks that have support rings. a build-up of heat that will damage the porcelain cooktop. Do not try to use such woks without the ring. You could be seriously burned if the wok tipped over. We recommend that you use only a flat-bottomed wok. They are available at your local retail store.
SURFACE COOKWARE TIPS (Glass Cooktop models only—continued) How to Check Pan Performance Use of correct cookware can affect the cooking performance and cleaning of your cooktop. The correct cookware reduces the temperature of the cooktop surface and minimizes the chance of spillovers burning onto the cooktop. You must use pans with perfectly flat bottoms. Some pans may have curved or rounded bottoms or may be warped. If you are unsure of the flatness of your pans you may do this quick test.
HALOGEN/RADIANT SURFACE CLEANING (on some models) Glass Cooktop Cleaning PRECAUTIONS • If pots with a thin overlay of aluminum, copper or enamel are allowed to boil dry, the overlay may bond with the glass cooktop and leave a black discoloration. This should be removed immediately before heating again or the discoloration may be permanent. • Water stains (mineral deposits) are removable using the cleaning cream or full strength white vinegar.
FEATURES OF YOUR OVEN CONTROL 1 2 3 4 5 6 7 8 OVEN TIMER CONV. BAKE HR BROIL 10 – LO CONV. ROAST 11 AUTO SELF CLEAN 12 + 13 1. BAKE. Press this pad to select the bake function. 2. CONV. BAKE. Press this pad to select baking with convection. 3. PROBE. Press this pad when using the probe to cook food. 4. PROGRAM STATUS. Words light up in the display to indicate what is in time display.
OVEN CONTROL, CLOCK AND TIMER The clock must be set for the automatic oven timing functions to work properly. The time of day cannot be changed during a Timed Baking or CLEAN cycle. Timer The timer is a minute timer; it does not control oven operations. The maximum setting on the timer is 9 hours and 55 minutes. To Set the Clock 1. Press the CLOCK pad. CLOCK + – 2. Press the + or – pad to set the time of day. 3. Press the CLOCK pad to start. To Set the Timer TIMER ON/OFF 1.
OVEN CONTROL, CLOCK AND TIMER (continued) INCREASE (+) and DECREASE (–) Pad Speed You can change the speed of the + and – pads. While the oven is off and the time of day shows in the display, press and hold the + and – pads and the TIMER ON/OFF pad at the same time for about 2 or 3 seconds. A number from 1 to 5 will replace “0:00” in the display. The slowest is 1 and the fastest is 5. Use the + or – pad to change the number, then press the CLEAR/OFF pad to return to the time of day display.
USING YOUR OVEN Oven Control, Clock and Timer Before Using Your Oven 1. Look at the controls. Be sure you understand how to set them properly. Read over the directions for the Oven Controls so you understand how to use them. 2. Check the oven interior. Look at the shelves. Take a practice run at removing and replacing them properly, to give sure, sturdy support. 3. Read over the information and tips that follow. 4.
USING YOUR OVEN (continued) Oven Shelves The shelves are designed with stop-locks so that when placed correctly on the shelf supports, they will stop before coming completely out from the oven, and will not tilt when removing food from or placing food on them. When placing cookware on a shelf, pull the shelf out to the bump on the shelf support. Place the cookware on the shelf, then slide the shelf back into the oven. This will eliminate reaching into the hot oven.
CONVECTION COOKING What is Convection? You can use your favorite recipes in the convection oven. Recipe conversion is as easy as 1, 2, 3. 1. When roasting, reduce normal roasting time by 25%. 2. When baking, reduce baking temperature by 25°F. 3. No need to preheat when cooking longer than 15 minutes. CAUTION: The convection oven fan shuts off when the oven door is opened.
CONVECTION BAKING Adapting Recipes For Convection Baking As a general rule, reduce the temperature by 25°F. for convection baking. For more specific instructions, follow the guidelines in the Convection Cookbook. Preheating is not necessary with foods having a bake time of over 15 minutes. Check foods for doneness at the minimum suggested cooking time. Use pan size recommended in the recipe.
TIMED CONVECTION BAKING How to Convection Time Bake To set the clock, first press the CLOCK CLOCK pad. Press the + or – pad until correct time of day is displayed. Press the CLOCK pad to start. How to Set Immediate Start and Automatic Stop Convection Bake To avoid possible burns, place the oven shelves in the correct position before you turn the oven on. The oven will turn on immediately and cook for a specific length of time. At the end of Cook Time, the oven will turn off automatically. 1.
How to Set Delay Start and Automatic Stop Convection Bake Quick Reminder 1. Press the CONV. BAKE pad. 2. Press the + or – pad to select the oven temperature. 3. Press the COOK TIME pad. 4. Press the + or – pad to set the length of Cooking Time. 5. Press the STOP TIME pad. 6. Press the + or – pad until the desired Stop Time appears in the display. To avoid possible burns, place the shelves in the correct position before you program the oven.
CONVECTION ROASTING The special roasting rack and pan allow heated air to circulate over and under the meat. This allows the meat to brown on all sides. Adapting Recipes for Convection Roasting Use the temperature recommended in the Convection Roasting Guide. Preheating is not necessary. Check foods for doneness at the minimum suggested time.
CONVECTION ROASTING (continued) How to Set Your Oven for Convection Roasting When Using the Temperature Probe NOTE: For best results when roasting large turkeys and roasts, we recommend using the probe included in the convection oven. For the correct placement of the probe, see the description in the Regular Roasting section. Do not lock the oven door with the latch during convection roasting. The latch is used for selfcleaning only.
CONVECTION ROASTING GUIDE Meats Beef Rib, Boneless Rib, Top Sirloin (3 to 5 lbs.) Rare Medium Well Beef Tenderloin Rare Medium Pot Roast (21⁄2 to 3 lbs.) Chuck, Rump Pork Bone-in, Boneless (3 to 5 lbs.) Chops 2 chops (1/2 to 1-inch thick) 4 chops 6 chops Ham Canned, Butt, Shank (3 to 5 lbs. fully cooked) Lamb Bone-in, Boneless Medium (3 to 5 lbs.) Well Seafood Fish, whole (3 to 5 lbs.) Lobster Tails (6 to 8 oz. each) Poultry Whole Chicken (21⁄2 to 31⁄2 lbs.
REGULAR BAKING (continued) Oven Shelves Arrange the oven shelf or shelves in the desired locations D while the oven is cool. The correct C shelf position B depends on the kind of food and the A browning desired. As a general rule, place most foods in the middle of the oven, on either shelf position B or C. See the chart for suggested shelf positions. B will be used more than C.
Baking Guides When using prepared baking mixes, follow package recipe or instructions for the best baking results. Cookies When baking cookies, flat cookie sheets (without sides) produce better-looking cookies. Cookies baked in a jelly roll pan (short sides all around) may have darker edges and pale or light browning may occur. Do not use a cookie sheet so large that it touches the walls or the door of the oven. Never entirely cover a shelf with a large cookie sheet.
REGULAR TIMED BAKING How to Time Bake To set the clock, first press the CLOCK Do not lock the oven door with the latch during regular timed baking. The latch is used for selfcleaning only. Your oven can be set to turn on and off automatically. NOTE: Before beginning, make sure the oven clock shows the correct time of day. CLOCK pad. Press the + or – pad until correct time of day is displayed. Press the CLOCK pad to start.
How to Set Delay Start and Automatic Stop To avoid possible burns, place the shelves in the correct position before you program the oven. You can set the oven control to delay-start the oven, cook for a specific length of time and then turn off automatically. For example: Let’s say it’s 2:00 and dinner time is shortly after 7:00. The recipe suggests 3 hours baking time at 325°F. Here’s how: 1. Press the BAKE pad. 2. Press the + or – pad until “325°” is displayed. 3. Press the COOK TIME pad. 4.
REGULAR ROASTING Do not lock the latch during regular roasting. The latch is used for self-cleaning only. Roasting is cooking by dry heat. Tender meat or poultry can be roasted uncovered in your oven. Roasting temperatures, which should be low and steady, keep spattering to a minimum. Roasting is really a baking procedure used for meats. Therefore, oven controls are set for Baking or Timed Baking. (You may hear a slight clicking sound, indicating the oven is working properly.
REGULAR ROASTING WITH THE PROBE See the Regular Roasting Guide. Correct Placement of the Temperature Probe Ham or Lamb For roasts with no bone, insert the probe into the meatiest part of the roast. For bone-in ham or lamb, insert the probe into the center of the lowest large muscle or joint. Cable Probe Plug Handles (appearance may vary) 2. Insert the probe into the meat up to the point marked off with your finger. It should not touch the bone, fat or gristle.
REGULAR ROASTING WITH THE PROBE (continued) How to Set the Oven When Using the Temperature Probe The display will flash “PROBE” and the oven control will signal if the probe is inserted into the outlet, but the oven is not programmed for the probe. 1. Insert the probe into the meat. 2. Plug the probe into the outlet on the oven wall. Make sure it’s pushed all the way in. Close the oven door. 3. Press the PROBE pad. PROBE + – 4.
REGULAR ROASTING Q. Is it necessary to check for doneness with a meat thermometer? A. Checking the finished internal temperature at the completion of cooking time is recommended if you did not use the probe while cooking. Temperatures are shown in the Roasting Guide. For roasts over 8 lbs., check with thermometer at half-hour intervals after half the cooking time has passed. Q. Why is my roast crumbling when I try to carve it? A.
BROILING Do not lock the oven door with the latch during broiling. The latch is used for self-cleaning only. Broiling is cooking food by intense radiant heat from the upper broil element in the oven. Most fish and tender cuts of meat can be broiled. Follow these directions to keep spattering and smoking to a minimum. Turn the food only once during broiling. Time the foods for the first side according to the Broiling Guide.
Use of Aluminum Foil You can use aluminum foil to line your broiler pan and broiler grid. However, you must mold the foil tightly to the grid and cut slits in it just like the grid. Without the slits, the foil will prevent fat and meat juices from draining to the broiler pan. The juices could become hot enough to catch on fire. If you do not cut the slits, you are frying, not broiling. Questions and Answers Q. Why are my meats not turning out as brown as they should? A.
BROILING GUIDE • When arranging food on the pan, do not let fatty edges hang over the sides because the dripping fat will soil the oven. • Frozen steaks can be broiled by positioning the oven shelf at next lowest shelf position and increasing cooking time given in this guide 11⁄2 times per side. • Use LO Broil to cook foods such as poultry or thick pork chops thoroughly without over-browning them. • Always use a broiler pan and rack.
OPERATING THE SELF-CLEANING OVEN Normal Cleaning Time: 3 hours Quick Reminder: 1. Latch the door. 2. Press the AUTO SELF CLEAN pad. 3. Press the + or – pad to set the Clean Time. (continued next page) Oven light Oven front frame Oven door gasket Area outside gasket Area inside gasket 41 Operating the Self-Cleaning Oven We recommend venting with an open window or using a ventilation fan or hood during the first selfclean cycle. The range must be completely cool in order to set the self-clean cycle.
OPERATING THE SELF-CLEANING OVEN (continued) How to Set the Oven for Cleaning Quick Reminder: 1. Latch the oven door. 2. Press the AUTO SELF CLEAN pad. 3. Press the + or – pad until the desired Clean Time appears. If the oven is too hot and you start to set a clean cycle, the word “OFF” will appear in the display. Allow additional time for cooling before you try to set the cycle. 1. Follow the directions to prepare the oven for cleaning. 2.
How to Delay Start of Cleaning Quick Reminder: 1. Latch the oven door. 2. Press the AUTO SELF CLEAN pad. 3. Press the + or – pad until desired Clean Time appears. 4. Press the STOP TIME pad. 5. Press the + or – pad until the desired Stop Time appears in the display. Questions and Answers Q. If my oven clock is not set to the correct time of day, can I still self-clean my oven? A. If the clock is not set to the correct time of day you will not be able to set a delay clean to end at a specific time. Q.
CARE AND CLEANING Proper care and cleaning are important so your range will give you efficient and satisfactory service. Follow these directions carefully in caring for it to help assure safe and proper maintenance. BE SURE ELECTRIC POWER IS OFF BEFORE CLEANING ANY PART OF THE RANGE. If your range is removed for cleaning, servicing or any reason, be sure anti-tip device is re-engaged properly when the range is replaced. Failure to take this precaution could result in tipping of the range and cause injury.
Lift-Off Oven Door • Do not rub or clean the door gasket—the fiberglass material of the gasket has an extremely low resistance to abrasion. An intact and well-fitting oven door gasket is essential for energy-efficient oven operation and good baking results. If you notice the gasket becoming worn, frayed or damaged in any way or if it has become displaced on the door, you should have it replaced. NOTE: The gasket is designed with a gap at the bottom to allow for proper air circulation.
CARE AND CLEANING (continued) Probe The temperature probe may be cleaned with soap and water or a soap-filled scouring pad. Cool the temperature probe before cleaning. Scour stubborn spots with a soap-filled scouring pad, rinse and dry. Do not immerse the temperature probe in water. Do not store the temperature probe in the oven. Broiler Pan and Grid After broiling, remove the broiler pan from the oven. Remove the grid from the pan. Carefully pour out the grease from the pan into a proper container.
Painted Surfaces Metal Parts Glass Window Painted surfaces include the sides, control panel and drawer front. Clean these with soap and water or a vinegar and water solution. Do not use commercial oven cleaners, cleansing powders, steel wool or harsh abrasives on any painted surface. Do not use steel wool, abrasives, ammonia or commercial oven cleaners. To safely clean surfaces; wash, rinse and then dry with a soft cloth. To clean the outside of the oven window, use a glass cleaner.
CARE AND CLEANING (continued) Lift-Up Cooktop (Electric Coil Models) Some models have a cooktop that can be lifted up for easier cleaning. To make cleaning easier, the entire cooktop may be lifted up and supported in the up position. Be sure all surface units are turned off before raising the cooktop. The surface units and drip pans do not need to be removed, however, you may remove one to make raising the cooktop easier. There are 2 side supports that lock into position when the cooktop is lifted up.
INSTALLATION INSTRUCTIONS BEFORE YOU BEGIN Read these instructions completely and carefully. IMPORTANT: Save these instructions for the local electrical inspector’s use. IMPORTANT: OBSERVE ALL GOVERNING CODES AND ORDINANCES. NOTE TO INSTALLER: Leave these instructions with the appliance after installation is completed. NOTE TO CONSUMER: Keep this Use and Care Guide and Installation Instructions for future use. NOTE: This appliance must be properly grounded.
INSTALLATION INSTRUCTIONS (continued) PREPARE THE OPENING (continued) Flooring Under the Range Your range, like many other household items, is heavy and can settle into soft floor coverings such as cushioned vinyl or carpeting.
STEP 4 3 WIRE POWER CORD INSTALLATION STEP 5 4 WIRE POWER CORD INSTALLATION Remove the 3 wire terminal screws from the connector block. Insert screws through each power cord terminal ring and into the connector block until the screws engage the nuts. Be certain that the center wire is connected to the center screw of the connector block. Tighten screws securely. Do NOT remove ground strap connection. CONNECTOR A. Remove the 3 screws from the connector block. B.
INSTALLATION INSTRUCTIONS (continued) STEP 6 3 WIRE CONDUIT INSTALLATION STEP 7 4 WIRE CONDUIT INSTALLATION Remove the 3 screws from the connector block. Insert bare wires between the connector block terminals and movable nuts. Tighten screws securely. Do not remove ground strap connection. Remove the 3 screws from the connector block. Remove the grounding strap from the connector block middle location and the screw connecting it to the frame of the range.
STEP 8 ANTI-TIP BRACKET INSTALLATION STEP 9 LEVELING THE RANGE AN ANTI-TIP bracket is supplied with instructions for installation in a variety of locations. The instructions include a template, a parts list and a list of tools necessary to complete the installation. Read the IMPORTANT SAFETY INSTRUCTIONS and the instructions that fit your situation before beginning installation. The range must be level. Leveling feet are located at each corner of the base of the range.
QUESTIONS? USE THIS PROBLEM SOLVER PROBLEM POSSIBLE CAUSE “F–AND A NUMBER” FLASH IN THE DISPLAY • If the time display flashes “F–and a number”, you have function error code. If a function error code appears during the self-cleaning cycle, check the oven door latch. The latch may have been moved, even if only slightly, from the latched position. Make sure the latch is moved to the right as far as it will go. Press the CLEAR/OFF pad. Allow the oven to cool for one hour. Put the oven back into operation.
POSSIBLE CAUSE OVEN DOOR ACCIDENTALLY LOCKED DURING COOKING • Press the CLEAR/OFF pad. Allow the range to cool to room temperature and reset the controls. OVEN DOOR WILL NOT UNLOCK • The oven must cool below the locking temperature. OVEN DOOR IS CROOKED • Because the oven door is removable, it sometimes gets out of position during installation. To straighten the door, push down on the high corner. OVEN NOT CLEAN AFTER CLEAN CYCLE • The oven controls are not set properly.
THE PROBLEM SOLVER (continued) PROBLEM POSSIBLE CAUSE Glass Cooktop Models (continued) FOODS COOK SLOWLY • Improper cookware being used. Pan bottoms should be flat, fairly heavy weight and the same diameter as the surface unit selected. TINY SCRATCHES (may appear as cracks) OR ABRASIONS ON GLASS COOKTOP SURFACE • Incorrect cleaning methods have been used, cookware with rough bottoms has been used, or coarse particles (salt or sand) were between the cookware and the surface of the cooktop.
NOTES The Problem Solver 57
NOTES 58
We’ll Be There With the purchase of your new GE appliance, receive the assurance that if you ever need information or assistance from GE, we’ll be there. All you have to do is call—toll-free! GE Answer Center® 800.626.2000 Whatever your question about any GE major appliance, GE Answer Center® information service is available to help. Your call—and your question— will be answered promptly and courteously. And you can call any time. GE Answer Center® service is open 24 hours a day, 7 days a week.
YOUR GENERAL ELECTRIC RANGE WARRANTY WHAT IS COVERED WHAT IS NOT COVERED Staple sales slip or cancelled check here. Proof of original purchase date is needed to obtain service under warranty. FULL ONE-YEAR WARRANTY For one year from date of original purchase, we will provide, free of charge, parts and service labor in your home to repair or replace any part of the range that fails because of a manufacturing defect.