Microwave Oven GEAppliances.com Safety Instructions . . . . . . . .2–6 Operating Instructions Convenience Features . . . . . . 13–15 Microwave Terms . . . . . . . . . . . . . . 18 Oven Features . . . . . . . . . . . . . . . . 7, 8 Other Features . . . . . . . . . . . . . 16, 17 Power Levels . . . . . . . . . . . . . . . . . . . . 9 Time Features . . . . . . . . . . . . . . 10–12 Owner’s Manual JES1145 Care and Cleaning . . . . . . . . . 19 Troubleshooting Tips . . . . . . 20 Things That Are Normal . .
IMPORTANT SAFETY INSTRUCTIONS. READ ALL INSTRUCTIONS BEFORE USING. WARNING! For your safety, the information in this manual must be followed to minimize the risk of fire or explosion, electric shock, or to prevent property damage, personal injury, or loss of life. PRECAUTIONS TO AVOID POSSIBLE EXPOSURE TO EXCESSIVE MICROWAVE ENERGY (a) Do Not Attempt to operate this oven with the door open since open-door operation can result in harmful e[posure to microwave energy.
GEAppliances.com WARNING! ARCING If you see arcing, press the CLEAR/OFF pad and correct the problem. Arcing is the microwave term for sparks in the oven. Arcing is caused by: Metal, such as twist-ties, poultry pins or goldrimmed dishes, in the microwave. Metal or foil touching the side of the oven. Recycled paper towels containing small metal pieces being used in the microwave. Foil not molded to food (upturned edges act like antennas).
IMPORTANT SAFETY INFORMATION. READ ALL INSTRUCTIONS BEFORE USING. WARNING! MICROWAVE-SAFE COOKWARE Make sure all cookware used in your microwave oven is suitable for microwaving. Most glass casseroles, cooking dishes, measuring cups, custard cups, pottery or china dinnerware which does not have metallic trim or glaze with a metallic sheen can be used. Some cookware is labeled “suitable for microwaving.
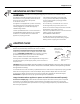
GEAppliances.com GROUNDING INSTRUCTIONS WARNING³Improper use of the grounding plug can result in a risk of electric shock. This appliance must be grounded. In the event of an electrical short circuit, grounding reduces the risk of electric shock by providing an escape wire for the electric current. If the outlet is a standard 2-prong wall outlet, it is your personal responsibility and obligation to have it replaced with a properly grounded 3-prong wall outlet.
IMPORTANT SAFETY INFORMATION. READ ALL INSTRUCTIONS BEFORE USING. WARNING! EXTENSION CORDS A short power supply cord is provided to reduce the risks resulting from becoming entangled in or tripping over a longer cord. E[tension cords may be used if you are careful in using them.
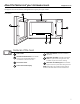
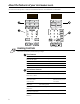
About the features of your microwave oven. GEAppliances.com Throughout this manual, features and appearance may vary from your model. 1100 Watts Features of the Oven Door Latches. Door Latch Release. Press latch release to open door. Window with Metal Shield. Screen allows cooking to be viewed while keeping microwaves confined in the oven. Removable Turntable. Turntable and support must be in place when using the oven. The turntable may be removed for cleaning. Convenience Guide.
About the features of your microwave oven. You can microwave by time or with the convenience features. Not all features on all models. Popcorn Potato Pizza Beverage Reheat Vegetable Time Power Auto Time Cook Level Defrost Defrost Express Cook 1 2 3 4 5 6 7 8 9 Timer 0 Clock Clear Add 30 Sec Pause Off Start Cooking Controls Check the Convenience Guide before you begin.
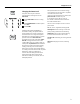
GEAppliances.com Changing the Power Level Power Level The power level may be entered or changed before entering the time for Time Cook. Express Cook 1 2 3 4 5 6 7 8 9 0 Start Pause TIME COOK and enter cooking 1 Press time. Press POWER LEVEL and select power 2 level 10-0. 3 Press START. Variable power levels add fle[ibility to microwave cooking. The power levels on the microwave oven can be compared to the surface units on a range.
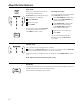
About the time features. Time Cook Time Cook Allows you to microwave for any time up to 99 minutes and 99 seconds. Express Cook 1 2 3 4 5 6 7 8 9 HI power level is automatically set, but you may change it for more fle[ibility. 1 2 Enter cooking time. 3 Press START. Press TIME COOK. You may open the door during Time Cook to check the food. Close the door and press START to resume cooking.
GEAppliances.com MyPyramid Feature (on some models) Allows you to microwave healthy food choices by servings. HI power level is automatically set, but you may change it for more fle[ibility. Express Cook 1 2 3 4 5 6 7 8 9 0 1 Press MyPyramid pad. 2 Enter the food code. See Cooking Guide for MyPyramid below for codes. the number of servings (1-4). Then 3 Enter the microwave will start immediately. You may open the door during cooking to check the food.
About the convenience features. Time Defrost Time Allows you to defrost for a selected length of time. See the Defrosting Guide for suggested times. (Auto Defrost e[plained in the About the convenience features section.) Defrost Express Cook 1 2 3 4 5 6 7 8 9 0 Start Pause 1 Press TIME DEFROST. 2 Enter defrosting time. 3 Press START. 4 Turn the food over after half the time. 5 Press START.
GEAppliances.com Popcorn Popcorn Use only with prepackaged microwave popcorn weighing 3.0 to 3.5 ounces. To use the Popcorn feature: Follow package instructions, using 1 Time Cook if the package is less than 1.75 ounces or larger than 3.5 ounces. Place the package of popcorn in the center of the microwave. POPCORN once for a 3.5 ounce 2 Press package of popcorn, twice for a 3.0 ounce package. The oven starts immediately. Reheat Reheat 1 Press Reheat pad. Enter the food code.
About the convenience features. Beverage Beverage To use the Beverage feature: Press BEVERAGE pad. The microwave will automatically be set to heat an 8 ounce beverage. The microwave will start immediately. If you would like to change the the setting for the beverage size: 1 Press BEVERAGE pad. the key pad for the following 2 Press serving size: Key Pad Ounces per Serving 1 4 ounces 2 8 ounces 3 12 ounces 4 16 ounces 3 The microwave will start immediately.
GEAppliances.com Potato (on some models) Potato To use the Potato feature: 1 Press the POTATO pad. Press the number of servings 1-4. The 2 oven will start immediately. To use the Vegetable feature:. Vegetable 1 Press VEGETABLE pad. Enter the Vegetable code. See Cooking 2 Guide for Vegetables below for codes. the number of servings (1-4). Then 3 Enter the microwave will start immediately.
About the other features. Clock Clock Press to enter the time of day. Express Cook 1 2 3 4 5 6 7 8 9 1 Press CLOCK. 2 Enter time of day. 3 Press CLOCK. 0 Start Pause Start Pause Clear Off Pause START/PAUSE allows you to stop cooking without opening the door or clearing the display. Press START/PAUSE again to restart the oven. Child Lock-Out You may lock the control panel to prevent the microwave from being accidentally started or used by children.
GEAppliances.com Timer Timer This pad performs the following functions: It operates as a minute timer. It can be used as a hold setting after defrosting. How to Use as a Minute Timer The Timer operates without microwave energy. 1 Press TIMER. 2 Enter the amount of time you want to count down. 3 Press START. When the time is up, the timer will signal. How to Use to Set a Holding Time 1 2 3 4 5 Press AUTO DEFROST and select food weight, or press TIME DEFROST and enter defrosting time.
Microwave terms. Term Definition Arcing Arcing is the microwave term for sparks in the oven. Arcing is caused by: metal or foil touching the side of the oven. foil that is not molded to food (upturned edges act like antennas). metal such as twist-ties, poultry pins, gold-rimmed dishes. recycled paper towels containing small metal pieces. Covering Covers hold in moisture, allow for more even heating and reduce cooking time.
Care and cleaning of the microwave oven. GEAppliances.com Helpful Hints An occasional thorough wiping with a solution of baking soda and water keeps the inside fresh. Unplug the cord before cleaning any part of this oven. How to Clean the Inside Walls, Floor, Inside Window, Metal and Plastic Parts on the Door Some spatters can be removed with a paper towel; others may require a damp cloth. Remove greasy spatters with a sudsy cloth, then rinse with a damp cloth.
Troubleshooting Tips. Problem Possible Causes What To Do Oven will not start A fuse in your home may be blown or the circuit breaker tripped. Replace fuse or reset circuit breaker. Power surge. Unplug the microwave oven, then plug it back in. Plug not fully inserted into wall outlet. Make sure the 3-prong plug on the oven is fully inserted into wall outlet. Door not securely closed. Open the door and close securely. Door not securely closed. Open the door and close securely.
Notes. GEAppliances.
Notes.
GE Microwave Oven Warranty. Staple your receipt here. Proof of the original purchase date is needed to make a warranty claim. For The Period Of: What GE Will Provide: One Year From the date of the original purchase Replacement unit for any product which fails due to a defect in materials or workmanship. The e[change unit is warranted for the remainder of your product’s original one-year warranty period. In Order to Make a Warranty Claim: Properly pack your unit.
Consumer Support. GE Appliances Website GEAppliances.com Have a question or need assistance with your appliance? Try the GE Appliances Website 24 hours a day, any day of the year! For greater convenience and faster service, you can now download Owner’s Manuals, order parts, catalogs, or even schedule service on-line. You can also “Ask Our Team of E[perts™” your questions, and so much more… Real Life Design Studio GEAppliances.