Self-Cleaning Gas Ranges GEAppliances.com Safety Instructions . . . . . .2–7 Operating Instructions Aluminum Foil . . . . . . . . . . . . . . . .13 Clock and Timer . . . . . . . . . . .15, 16 Oven . . . . . . . . . . . . . . . . . . . . . .10–25 Baking and Roasting . . . . . . . .13 Broiling, Broiling Guide . . . . . . .14 Oven Control . . . . . . . . . . . . .10, 11 Power Outage . . . . . . . . . . .12, 16 Preheating . . . . . . . . . . . . . . . . . . .13 Sabbath Feature . . . . . . . . .
WARNING! For your safety, the information in this manual must be followed to minimize the risk of fire or explosion, electric shock, or to prevent property damage, personal injury, or loss of life. Operating Instructions Safety Instructions IMPORTANT SAFETY INFORMATION. READ ALL INSTRUCTIONS BEFORE USING. ® Care and Cleaning — Do not store or use gasoline or other flammable vapors and liquids in the vicinity of this or any other appliance.
WARNING! IMPORTANT SAFETY NOTICE Operating Instructions The California Safe Drinking Water and Toxic Enforcement Act requires the Governor of California to publish a list of substances known to the state to cause birth defects or other reproductive harm, and requires businesses to warn customers of potential exposure to such substances.
SAFETY PRECAUTIONS Locate the range out of kitchen traffic path and out of drafty locations to prevent poor air circulation. Be sure all packaging materials are removed from the range before operating it to prevent fire or smoke damage should the packaging material ignite. Be sure your range is correctly adjusted by a qualified service technician or installer for the type of gas (natural or LP) that is to be used. Your range can be converted for use with either type of gas.
WARNING! SURFACE BURNERS Always use the LITE position when igniting the top burners and make sure the burners have ignited. Adjust the top burner flame size so it does not extend beyond the edge of the cookware. Excessive flame is hazardous. When using glass cookware, make sure it is designed for top-of-range cooking.
COOK MEAT AND POULTRY THOROUGHLY… Cook meat and poultry thoroughly—meat to at least an INTERNAL temperature of 160°F and poultry to at least an INTERNAL temperature of 180°F. Cooking to these temperatures usually protects against foodborne illness. OVEN Operating Instructions Safety Instructions IMPORTANT SAFETY INFORMATION. READ ALL INSTRUCTIONS BEFORE USING. Stand away from the range when opening the door of a hot oven. The hot air and steam that escape can cause burns to hands, face and eyes.
ELECTRIC WARMING DRAWER (on some models) SELF-CLEANING OVEN Before self-cleaning the oven, remove the racks, any broiler pan, grid and other cookware. Do not clean the door gasket. The door gasket is essential for a good seal. Care should be taken not to rub, damage or move the gasket. Do not use oven cleaners. No commercial oven cleaner or oven liner of any kind should be used in or around any part of the oven.
Throughout this manual, features and appearance may vary from your model. Care and Cleaning Drip pans are supplied with your range; they should be used at all times. Do not operate the burner for an extended period of time without cookware on the grate. The finish on the grate may chip without cookware to absorb the heat. Be sure the burners and grates are cool before you place your hand, a pot holder, cleaning cloths or other materials on them.
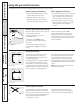
Top-of-Range Cookware Aluminum: Medium-weight cookware is recommended because it heats quickly and evenly. Most foods brown evenly in an aluminum skillet. Use saucepans with tight-fitting lids when cooking with minimum amounts of water. Enamelware: Under some conditions, the enamel of some cookware may melt. Follow cookware manufacturer’s recommendations for cooking methods. Heatproof Glass-Ceramic: Can be used for either surface or oven cooking. It conducts heat very slowly and cools very slowly.
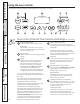
Throughout this manual, features and appearance may vary from your model. Care and Cleaning Operating Instructions Safety Instructions Using the oven controls. Oven Control, Clock and Timer Features and Settings (on some models) Bake/Temp Recall Pad Kitchen Timer On/Off Pad Touch this pad to select the bake function. Touch this pad to select the timer feature. Then press the + and – pads to adjust the timer. Bake Light Flashes while in edit mode—you can change the oven temperature at this point.
Oven Control, Clock and Timer Features and Settings (on some models) Clear/Off Pad This lights anytime the oven has been programmed using the Cooking Time or Start Time functions. Touch this pad to cancel ALL oven operations except the clock and timer. Oven Light On/Off Pad Broil Hi/Lo Pad Touch this pad to select the broil function. Touch this pad to turn the oven light on or off. – Pad Short taps to this pad will decrease the time or temperature by small amounts.
Safety Instructions Operating Instructions To avoid possible burns, place the racks in the desired position before you turn the oven on. Before you begin… The racks have stop-locks, so that when placed correctly on the rack supports (A through E), they will stop before coming completely out, and will not tilt. When placing and removing cookware, pull the rack out to the bump on the rack support. To replace, place the end of the rack (stop-locks) on the support, tilt up the front and push the rack in.
GEAppliances.com If your model has a door latch, do not lock the oven door with the latch during baking or roasting. The latch is used for self-cleaning only. How to Set the Upper Oven for Baking or Roasting Your oven is not designed for open-door cooking. Touch the BAKE pad. Touch the START pad. The oven has a special low rack (R) position just above the oven bottom. Use it when extra cooking space is needed, for example, when cooking a large turkey.
Safety Instructions Operating Instructions Using the oven. Do not lock the oven door with the latch during broiling. The latch is used for self-cleaning only. How to Set the Oven for Broiling NOTE: On models with an OVEN TEMP knob, turn it to BROIL. Touch the Start/On pad. When broiling is finished, touch the Clear/Off pad. Place the meat or fish on a broiler grid in a broiler pan. Serve the food immediately, and leave the pan outside the oven to cool during the meal for easiest cleaning.
GEAppliances.com Not all features are on all models. To Set the Clock The clock must be set to the correct time of day for the automatic oven timing functions to work properly. The time of day cannot be changed during a delayed cooking or a delayed self-cleaning cycle. Touch the + or – pads. Make sure the clock is set to the correct time of day. To check the time of day when the display is showing other information, simply touch the Clock pad. The time of day shows until another pad is touched.
Not all features are on all models. To Reset the Timer If the display is still showing the time remaining, you may change it by touching the Kitchen Timer On/Off pad and then touching the + or – pads until the time you want appears in the display. Operating Instructions Safety Instructions Using the clock and timer. (on some models) To Cancel the Timer Touch the Kitchen Timer On/Off pad twice.
GEAppliances.com Do not lock the oven door with the latch during timed cooking. The latch is used for self-cleaning only. NOTE: Foods that spoil easily—such as milk, eggs, fish, stuffings, poultry and pork—should not be allowed to sit for more than 1 hour before or after cooking. Room temperature promotes the growth of harmful bacteria. Be sure that the oven light is off because heat from the bulb will speed harmful bacteria growth. How to Set an Immediate Start and Automatic Stop Touch the Bake pad.
Safety Instructions Your new touch pad control has additional features that you may choose to use. The following are the features and how you may activate them. The special feature modes can only be activated while the display is showing the time of day. They remain in the control’s memory until the steps are repeated. When the display shows your choice, touch the Start/On pad. The special features will remain in memory after a power failure.
(Designed for use on the Jewish Sabbath and Holidays) GEAppliances.com The Sabbath feature can be used for baking/roasting only. It cannot be used for broiling, self-cleaning or delay start cooking. NOTE: The oven light comes on automatically (on some models) when the door is opened and goes off when the door is closed. The bulb may be removed. See the Oven Light Replacement section. On models with a light switch on the control panel, the oven light may be turned on and left on.
(Designed for use on the Jewish Sabbath and Holidays) How to Exit the Sabbath Feature Touch the Clear/Off pad. If the oven is cooking, wait for a random delay period of approximately 30 seconds to 1 minute, until only ⊃ is in the display. Touch and hold both the Bake and Broil Hi/Lo pads, at the same time, until the display shows SF. Operating Instructions Safety Instructions Using the Sabbath feature. (on some models) Touch the Start/On pad.
GEAppliances.com You may find that your new oven cooks differently than the one it replaced. Use your new oven for a few weeks to become more familiar with it. If you still think your new oven is too hot or too cold, you can adjust the thermostat yourself. Do not use thermometers, such as those found in grocery stores, to check the temperature setting of your oven. These thermometers may vary 20–40 degrees. NOTE: This adjustment will not affect the broiling or the self-cleaning temperatures.
Control Knob (on models equipped with a knob) Push and turn the control knob to any desired setting. NOTE: The warming drawer should not be used during a self-clean cycle. Lo . . . . . . . . . . . . . . . . . . . . . . . . . . . . . . . . .Pies Medium (midposition on the knob) . . . . . . .Casseroles Hi . . . . . . . . . . . . . . . . . . . . . . . . . . . . . . .Meats Operating Instructions Safety Instructions Using the warming drawer.
Temperature Selection Chart To keep several different foods hot, set the control to the food needing the highest setting. The temperature, type and amount of food, and the time held will affect the quality of the food. Repeated opening of the drawer allows hot air to escape and food to cool. Allow extra time for the temperature inside the drawer to stabilize after adding items. Do not use plastic containers or plastic wrap.
Safety Instructions Never force the latch handle. Forcing the handle will damage the door lock mechanism. The oven door must be closed and all controls set correctly for the cycle to work properly. Before a Clean Cycle For the first self-clean cycle, we recommend venting your kitchen with an open window or using a ventilation fan or hood. Remove the racks, any broiler pan, broiler grid, all cookware and any aluminum foil from the oven. Wipe up heavy soil on the oven bottom.
The oven door must be closed and all controls set correctly for the cycle to work properly. How to Delay the Start of Cleaning (on some models) Change the Start Time by touching the + or – pads. The start time will appear in the display. Make sure the clock shows the correct time of day. The self-clean cycle will automatically begin at the time set. Follow the directions in the Before a Clean Cycle section. While the oven is self-cleaning, you can touch the Clock pad to display the time of day.
Be sure electrical power is off and all surfaces are cool before cleaning any part of the range. WARNING: If your range is removed for cleaning, servicing or any reason, be sure the anti-tip device is reengaged properly when the range is replaced. Failure to take this precaution could result in tipping of the range and cause injury. Burner Grates Operating Instructions Safety Instructions Care and cleaning of the range. Lift out when cool.
Standard Twin Burner Assemblies (on some models) Grate Drip pan (if so equipped) For cleaning information on sealed burners, see section below. Sealed burner cooktops do not lift up. On models with standard twin burners, the cooktop lifts up for easy access. Surface burner CAUTION: Do not operate the cooktop without all burner parts, drip pans (if so equipped) and grates in place. The burner grates and drip pans (if so equipped) can be lifted off, making them easy to clean.
Safety Instructions Care and cleaning of the range. Burner Caps and Heads NOTE: Before removing the burner caps and heads, remember their size and location. Replace them in the same location after cleaning. Burner caps On some models: Medium head and cap For proper ignition, make sure the small hole in the section that fits over the electrode is kept open. A sewing needle or wire twist-tie works well to unclog it. Use a sewing needle or twist-tie to unclog the small hole in the burner head.
Cooktop Surface To avoid damaging the porcelain-enamel surface of the cooktop and to prevent it from becoming dull, clean up spills right away. Foods with a lot of acid (tomatoes, sauerkraut, fruit juices, etc.) or foods with high sugar content could cause a dull spot if allowed to set. NOTE: Do not lift the cooktop on sealed burner models. Lifting the cooktop can lead to damage and improper operation of the range. Operating Instructions When the surface has cooled, wash and rinse.
Safety Instructions Operating Instructions Lift-Off Oven Door Lift the door straight up and off the hinges. The gasket is designed with a gap at the bottom to allow for proper air circulation. Do not rub or clean the door gasket— it has an extremely low resistance to abrasion. If you notice the gasket becoming worn, frayed or damaged in any way or if it has become displaced on the door, you should have it replaced. Installation Instructions Care and Cleaning Care and cleaning of the range.
Removable Kick Panel (on some models) The kick panel may be removed for cleaning under the range. Operating Instructions To remove: Lift up the bottom of the panel slightly to disengage the panel from the tabs at the base of the range. Pull the bottom of the panel forward until the spring clips are released at the top of the panel. To replace: Insert the two slots at the bottom of the panel onto the two tabs at the base of the range, and push the top of the panel forward to engage the spring clips.
Lower Control Panel (Front Manifold Panel) and Knobs Pull the knob straight off the stem. Care and Cleaning Do not bend knobs by pulling them up or down or by hanging a towel or other such loads. This can damage the gas valve shaft. The control knobs may be removed for easier cleaning. Make sure the knobs are in the Off positions and pull them straight off the stems for cleaning. The knobs can be cleaned in a dishwasher or they may also be washed with soap and water.
Installation Instructions Range If you have questions, call 1.800.GE.CARES or visit our Website at: GEAppliances.com FOR YOUR SAFETY In the Commonwealth of Massachusetts: • This product must be installed by a licensed plumber or gas fitter. • When using ball-type gas shut-off valves, they shall be the T-handle type. • A flexible gas connector, when used, must not exceed 3 feet.
Installation Instructions Avoid placing cabinets above the range. To reduce the hazard caused by reaching over the open flames of operating burners, install a ventilation hood over the range that projects forward at least 5″ beyond the front of the cabinets. WARNING! INSTALLATION SAFETY INSTRUCTIONS The ventilating hood must be constructed of sheet metal not less than 0.0122″ thick.
Installation Instructions DIMENSIONS AND CLEARANCES Provide adequate clearances between the range and adjacent combustible surfaces. These dimensions must be met for safe use of your range. The location of the electrical outlet and pipe opening (see Gas Pipe and Electric Outlet Locations) may be adjusted to meet specific requirements. The range may be placed with 0″ clearance (flush) at the back wall.
Installation Instructions DIMENSIONS AND CLEARANCES (CONTINUED) Depth with door closed (includes door handle): 28” to 281⁄4” 30” Depth varies depending on model. See specifications sheet for your model. Height 473⁄8” 36 1⁄4” ± 1⁄4” Depth with door open: 46 3⁄8” WARNING! ANTI-TIP DEVICE For free-standing or slide-in ranges, never completely remove the leveling legs or the range will not be secured to the anti-tip device properly.
Installation Instructions 2 CONNECT THE RANGE TO GAS LOCATION Shut off the main gas supply valve before disconnecting the old range and leave it off until the new hookup has been completed. Don’t forget to relight the pilot on other gas appliances when you turn the gas back on. Do not locate the range where it may be subject to strong drafts. Any openings in the floor or wall behind the range should be sealed.
Installation Instructions GAS PIPE AND ELECTRICAL OUTLET LOCATIONS (for models with Sealed Burners) This area allows for flush range installation with through-the-wall connection of pipe stub/shut-off valve and rear wall 120V outlet. Shortest connection from hard pipe stub location to range hookup. This area allows for flush range installation with through-the-floor connection of pipe stub/shut-off valve.
Installation Instructions FLEXIBLE CONNECTOR HOOKUP (for models equipped with Sealed Burners) Gas Flow into Range Pressure regulator Adapter Flex connector (6 ft. max.) Adapter Installer: Inform the consumer of the location of the gas shut-off valve.
Installation Instructions FLEXIBLE CONNECTOR HOOKUP (for models equipped with Standard Twin Burners) Pressure regulator Gas Flow into Range Manifold pipe Adapter Flex connector (6 ft. max.) Installer: Inform the consumer of the location of the gas shut-off valve.
Installation Instructions 3 ELECTRICAL CONNECTIONS 3 ELECTRICAL CONNECTIONS (CONT.) Electrical Requirements A. Usage Situations Where Appliance Power Cord Will Be Disconnected Infrequently. 120-volt, 60 Hertz, properly grounded branch circuit protected by a 15-amp or 20-amp circuit breaker or time-delay fuse. An adapter may be used only on a 15-amp circuit. Do not use an adapter on a 20-amp circuit.
Installation Instructions 3 ELECTRICAL CONNECTIONS (CONT.) 5 CHECK OPERATION OF SURFACE BURNERS B. Usage Situations Where Appliance Power Cord Will Be Disconnected Frequently. Operation of all cooktop and oven burners should be checked after the range and gas supply lines have been carefully checked for leaks. Do not use an adapter plug in these situations because disconnecting of the power cord places undue strain on the adapter and leads to eventual failure of the adapter ground terminal.
Installation Instructions 7 ADJUST THE BAKE AND BROIL 6 CHECK OPERATION OF OVEN BURNERS BURNER AIR SHUTTERS IF NECESSARY (CONT.) (CONT.) B. To operate the Bake burner, press the Bake pad and then press the number pads until 350 appears in the display. Press the Start/On pad. After 30 to 90 seconds, the burner will ignite. The air shutter for the broil burner is accessible in the top rear of the oven.
Installation Instructions 9 INSTALLING THE ANTI-TIP DEVICE 9 INSTALLING THE ANTI-TIP DEVICE (CONT.) WARNING! Wallboard Range must be secured with an approved Anti-Tip device. Back of range Anti-Tip device Unless properly installed, the range could be tipped by you or a child standing, sitting or leaning on an open door. Wood screw After installing the Anti-Tip device, verify that it is in place by carefully attempting to tilt the range forward.
GEAppliances.com Troubleshooting Tips Save time and money! Review the charts on the following pages first and you may not need to call for service. Possible Causes What To Do Top burners do not light or do not burn evenly Plug on range is not completely inserted in the electrical outlet. • Make sure electrical plug is plugged into a live, properly grounded outlet. Burner hole or slits on the side of the burner may be clogged.
Troubleshooting Tips Problem Possible Causes What To Do Food does not bake or roast properly Oven controls improperly set. • See the Using the oven section. Rack position is incorrect. • See the Using the oven section. Incorrect cookware or cookware of improper size being used. • See the Using the oven section. Oven thermostat needs adjustment. • See the Adjust the oven thermostat—Do it yourself! section. Clock not set correctly. (on some models) • See the Using the clock and timer section.
Possible Causes What To Do Excessive smoking Excessive soil. • On models with touch pads, touch the Clear/Off pad. On models with an OVEN TEMP knob, turn it to OFF. Open the windows to rid the room of smoke. Wait until the SELF CLEAN light goes off. Wipe up the excess soil and reset the clean cycle. Oven door will not open after a clean cycle Oven too hot. • Allow the oven to cool below locking temperature. Oven not clean after a clean cycle Oven controls not properly set.
Safety Instructions Before you call for service… Troubleshooting Tips Problem Possible Causes What To Do Display goes blank A fuse in your home may be blown or the circuit breaker tripped. • Replace the fuse or reset the circuit breaker. The clock is turned off so that it does not show in the display. • See the Using the clock and timer section. Power failure. • Reset the clock. Oven control pads were not touched properly.
GEAppliances.com Looking For Something More? (Not all accessories are available for all models) You can find these accessories and many more at GEAppliances.com (U.S.) or www.GEAppliances.ca (Canada), or call 800.626.2002 (U.S.) or 800.661.1616 (Canada) (during normal business hours). Have your model number ready. Surface Burner Heads and Caps Operating Instructions Grates Knobs Surface Elements and Drip Pans Safety Instructions Accessories.
Safety Instructions GE Gas Range Warranty. (For customers in the United States) All warranty service provided by our Factory Service Centers, or an authorized Customer Care® technician. To schedule service, visit us on-line at GEAppliances.com, or call 800.GE.CARES (800.432.2737). Please have serial number and model number available when calling for service. Staple your receipt here. Proof of the original purchase date is needed to obtain service under the warranty.
All warranty service provided by our Factory Service Centres or an authorized Customer Care® technician. For service, call 1.800.561.3344. Please have serial number and model number available when calling for service. Staple your receipt here. Proof of the original purchase date is needed to obtain service under the warranty. For The Period Of: Mabe Will Replace: Any part of the range which fails due to a defect in materials or workmanship.
Consumer Support. GE Appliances Website In the U.S.: GEAppliances.com Have a question or need assistance with your appliance? Try the GE Appliances Website 24 hours a day, any day of the year! For greater convenience and faster service, you can now download Owner’s Manuals, order parts or even schedule service on-line. In Canada: www.GEAppliances.ca Schedule Service In the U.S.: GEAppliances.com Expert GE repair service is only one step away from your door.