
Owner's Manual


49-2000316 Rev. 3
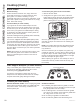
1. Convection Bake (on some models):
Convection cooking uses increased air circulation
to improve performance when baking on multiple
racks. See the Cooking Modes section for more
information.
2. Traditional Cooking Modes: Your oven has
the following traditional cooking modes: Bake, Broil
Hi and Broil Lo. See the Cooking Modes section for
more information.
3. Clean (on some models): There are two
cleaning modes: Self Clean and Steam Clean.
See the Cleaning the Oven section for important
information about using these modes.
4. Start: Must be pressed to start any cooking,
cleaning or timed function.
5. Cancel/Off: Cancels ALL oven operations except
the clock and timer.
6. Cook Time: Counts down cooking time and turns
off the oven when the cooking time is complete.
3URJUDPWKHGHVLUHGFRRNLQJPRGHDQGWHPSHUDWXUH
and press Start. Then, press the Cook Time pad
and use the number pads to program a cooking
time in hours and minutes. Then, press Start again.
This can only be used with Traditional Bake and
Convection Bake.
7. Clock: Sets the oven clock time and clock display
RQVRPHPRGHOV7RVHWWKHFORFNGLVSOD\RQRII
press the Set ClockSDGRQVRPHPRGHOVRQFH,I
your model does not have a Set Clock pad, see the
Special Features section for instructions on how to
adjust the clock display. To set the clock time, press
both the + and - pads and hold for 3 seconds or
press the Set Clock pad until the display is flashing.
8VHWKH+ and -SDGVWRDGMXVWWKHFORFN3UHVV
Start to save the time.
8. Timer: :RUNVDVDFRXQWGRZQWLPHU3UHVVWKH
Timer pad and the + and - pads to program the
WLPHLQKRXUVDQGPLQXWHV3UHVVWKHStart pad.
The oven will continue to operate when the timer
countdown is complete. To turn the timer off, press
the Timer pad.
9. Delay Time: Delays when the oven will turn on.
8VHWKLVWRVHWDWLPHZKHQ\RXZDQWWKHRYHQWR
VWDUW3UHVVWKHDelay Time pad, and use the + and
- pads to program the time of day for the oven to
turn on. Then press the desired cooking mode pad,
use the + and - pads to adjust the temperature, then
press Start. After Start has been pressed, a cook
time may also be programmed if desired. Once the
Delay Time has been programmed, the start time
set for the oven will be displayed until that time is
UHDFKHG7KHQHLWKHUWKHFRRNWLPHLISURJUDPPHG
or the temperature will be displayed. Delay Time
can only be used with Traditional Bake, Convection
%DNHDQGWKH&OHDQPRGHVRQVRPHPRGHOV
NOTE: When using the delay time feature, foods
WKDWVSRLOHDVLO\²VXFKDVPLONHJJVILVKVWXIILQJV
SRXOWU\DQGSRUN²VKRXOGQRWEHDOORZHGWRVLW
DWURRPWHPSHUDWXUHIRUPRUHWKDQKRXUEHIRUH
or after cooking, as this may promote the growth
of harmful bacteria. Be sure that the oven light is
off, because heat from the bulb will speed harmful
bacteria growth.
10. Oven Light (on some models): Turns the
oven light on or off.
11. Lock Controls (on some models): Locks
out the control so that pressing the pads does not
DFWLYDWHWKHFRQWUROV3UHVVDQGERWKWKH+ and -
pads and hold for 3 seconds to lock or unlock the
control. Cancel/Off is always active, even when the
control is locked.
USING THE RANGE: Oven Controls
Oven Controls (Cont.)