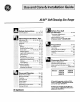
XL44 B Safety Instructions Anti-Tip Self-CleaningGas Range ...................... 2-5 Device ................................ 2, 3 35, 43 Operating Instructions, Aluminum lips Foil.......................... 5, 16_ 20-22, 24 Features ......................................................................... 6, 7 Oven .............................................................................. 13-27 Baking Broiling, Broiling Guide ........................... 22, 23 Door Latch ..................
HELP US HELP YOU... Read this guide carefully. It is intended to help you operate your new range properly. Keep it handy for answers and maintain to your questions. If you don't understand something more help, call: GE Answer Center ® 800.626.2000 24 hours a day, 7 days a week or need WARNING: If the information in this guide is not followed exactly, a fire or explosion may result causing property damage, personal injury or death.
IMPORTANT SAFETY INSTRUCTIONS Read all instructionsbeforeusing this appliance. IMPORTANT SAFETY N(YnCE • The California Safe Drinking Water and Toxic Enforcement Act requires the Governor of California to pubhsh a list of substances known to the state to cause cancer, birth defects or other reproductive harm, and requires businesses to warn customers of potential exposure to such substances.
(continued) Surface Cooking TO • Always heat fat slowly, and watch as it heats. • Always use the LITE position (on electric i_nifion models) or the ..HIposition (on standing i_dot models) when igniting the top burners anQ _imke sure the burners have ignited. TO REACH • Never leave the surface burners unattended at high flame settings. Boilovers cause smoking and greasy spillovers that may catch on nre. cool • Adjust the top burner flame size so it does not extend beyond the edge of the cookware.
, Keep the oven free from greasebuildup. . When using glass eookware, make sure it is designed for top-of-range cooking. . If a combination of oils or fats will be used in frying, stir together before heating or as fats melt slowly. • Pulling out the shelf to the shelf-stop is a convenience in lifting heavy foods. It is also a precaution against burns from touching hot surfaces of the door or oven walls. The lowest position "R" is not designed to slide.
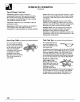
FEATURES OF YOUR RANGE Features and appearance may vary_ ® ® II Sealed _ Burners Standard Twin Burners BurnerCap Drip Pan (on some models) ?, 6 Your range is equipped with one of the two types of surface burners shown above_ |
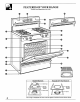
Feature Index (Not all models have all features° Appearance 1 Air Intake 2 Model and Serial Numbers (on front frame of range, behind storage 3 (under storage drawer See page of features or kick panel) Lift-Off Oven Door (easily removed for oven cleaning) 5 Oven Bottom 6 Oven Interior 7 Oven Light On/OffSwitch 8 Grates, Drip Pans (on some models) 9 Fluorescent 10 Oven Control, 11 Night kick panel) 2, 3, 35, 43 Instructions.
HOW DOES THIS COOKTOP COMPARE TO YOI_ OLD ONE? Your new cooktop has gas burners.
SURFACE COOKING Surface Burner Controls The knobs that turn the surface burners on and off are Iocated on the control panel in front of the burners. On ranges The two knobs on the left control the left front and left rear burners. The two knobs on the fight control the right front and fight rear burners. • The smaller burner (right rear position) the best simmer results.
SURFACE COOKING (continued) Top-of-Range Cookware Aluminum: Medium-weight cookware is recommended because it heats quickly and evenly. Most foods brown evenly in an aluminum skillet. Use saucepans with tight-fitting lids when cooking with minimum amounts of water. Cast-Iron: satisfactory If heated results.
FEATURES OF YOUR O't, ,N CONTROL (appearance ? i i, i_:e. OVEN? i i , i i 'n ,,i,,ulnl,l,UU,l,ll,, O_oOOBp/E//°_I II M TIME ttl/LO, O 0 I STO_'- I v OVEN Press this pad to select the bake function. 2, BROIL or BROIL the broil traction C-'-OOK][ Inll'lll VENO.!..1!21.I_.1!o!0 1. BAKE. may vary) Press this pad to select 3. PROGRAM STATUS. Words light up in the display to indicate what is in the time display.
OVEN CONTROL, CLOCK AND TIMER Clock To Set the Clock The clock must be set for the automatic oven timing functions to work properly. The time of day cannot be changed during a Timed Baking or Self-Cleaning cycle. 1. Press the CLOCK CLOCK 2. Press the + or_ . time of day. 3. Press the CLOCK Timer pad to set the pad to start. To Set the Timer The timer is a minute timer; it does not control oven operations. The maximum setting on the timer is 9 hours and 55 minutes. ON/OFT pad. 1. ress the TIMER 2.
USING YOUR OVEN Before Using Your Oven Be sure you understand how to set the controls properly. Practice removing and replacing the shelves while the oven is cool. Read the information and tips on the follo_nkng pages., Keep this guide handy where you can refer to it, especially during the first weeks of using your new range. Electric Ignition Power Outage CAUTION: Do not make any attempt to operate the electric ignition oven during an electrical power failure.
USING YOUR OVEN (continued) Oven Vents The oven is vented through duct openings at the rear of the cooktop. See the Features section. Do not block these openings when cooking in the oven--it is important that the flow of hot air from the oven and flesh air to the oven burners be uninterrupted. . The vent openings and nearby surfaces may become hot. Do not touch them. • Handles of pots and pans on the cooktop may become hot if left too close to the vent.
BAKING Do not lock the oven door with the latch during baking. The latch is used for serf-cleaning only. Your oven temperature is controlled using the latest technology oven control systems° It is recommended that you operate your new oven for a number of weeks to become familiar with its performance. If you think an adjustment is necessary, see the Adjust the Oven Thermostat section. It gives easy Do It Yourself instructions on how to adjust the thermostat.
BAKING (continued) Pan PLacement For even cooking and proper browning, there must be enough room for air circulation in the oven. Baking results will be better ff baking pans are centered as much as possible rather than being placed to the front or to the back of the oven, Pans should not touch each other or the walls of the oven° Allow well as from sides.
Don't Peek Set the timer for the estimated cooking time and do not open the door to look at your food. Most recipes provide minimum and maximum baking times such as "bake 30-40 minutes" DO NOT open the door to check until the minimum time. Opening the oven door frequently during cooking allows heat to escape and makes baking times longer, Your baking results may also be affected° TIMED BAKING How to Time Bake Do not lock the oven door with the latch during Timed Baking.
TIMED BAKING (continued) How to Set Delay Start and Automatic Stop 4. Change the Stop Time from 5:00 to 7:00 by pressing the + pad until "7:00" appears in the display. Quick Reminder: 1. Press the COOK TIME pad° 2, Press the + or - pad to set the length of Cooking Time. 5. Press the BAKE pad. 3. Press the STOP TIME pad° 4. Press the + or- pad to set the Stop Time. 5. Press the BAKE pad° 6. Press the + or - pad until the desired temperature appears in the display.
ADJUST THE OVEN THERMOSTAT-DO IT YOURSELF! You may find that your new oven cooks differently than the one it replaced. We recommend that you use your new oven for a few weeks to become more familiar with it, following the times given in your recipes as a guide° To Adjust the Thermostat: If you think your new oven is too hot or too cold, you can adjust the thermostat yourself. If you think it is too hot, adjust the thermostat to make it cooler.
ROASTING Do not lock the oven door with the door latch during roasting. This is used for serf-cleaning only. Roasting is cooking by dry heat_ Tender meat or poultry, can be roasted uncovered in your oven. Roasting temperatures, which should be low and steady, keep spattering to a minimum. The oven has a special low shelf OR) position just above the oven bottom° Use it when extra cooking space is needed, for example, when roasting a large turkeyr The shelf is not designed to slide out at this position. 1.
Questions and Answers Q. Is it necessary to check for doneness meat thermometer? with a Q. Do I need to preheat my oven each time I cook a roast or poultry? A. Checking the finished internal temperature at the completion of cooking time is recommended. Temperatures are shown in Roasting Guide. For roasts over 8 lbs., check with thermometer at halfhour intervals after half the time has passed° Q. Why is my roast crumbling carve it? when I try to A.
BROILING Do not lock the oven door with the latch during broiling. The latch is used for seLf-cleaning only. Broiling is cooking food by direct heat from above the food_ Most fish and tender cuts of meat can be broiled_ Follow these directions to keep spattering and smoking to a minimum. 1. If the meat has fat or gristle around the edge, cut vertical slashes through both about 2" apart. If desired, the fat may be trimmed, leaving layer about 1/8" thick_ 2.
BROHJNG The oven door must be closed during GUIDE • If desired, marinate meats or chicken before broiling. Or brush with barbecue sauce last 5 to 10 minutes only. broiling, • Always use the broiler pan and grid that comes with your ranger It is designed to minimize smoking and spattering by trapping juices in the shielded lower part of the pan° • When arranging food on the pan, do not let fatty edges hang over the sides because dripping fat could soil the oven.
OPERATING THE SELF-CLEANING OVEN Normal Cleaning Time: 3 hours Before a Clean Cycle 3, Clean spatters or spills on the oven front frame, and the oven door outside the gasket with a dampened cloth The oven front frame and the oven door outside Quick Reminder: 1. Prepare the oven for cleaning. the gasket do not get cleaned by the self-clean cycle° On these areas use detergent and hot water or a soapfilled steel woo! pad, Rinse well with a vinegar and water solution.
How to Set the Oven for Cleaning 3. Press the AUTO CLEAN Quick Reminder: 1. Prepare the oven for cleaning° SELF CLEAN or AUTO pad_ 2. Close and latch the oven door° 3. Press the AUTO CLEAN pad. CLEAN or AUTO SELF 4. Press the + or - pad° If you wish to change the preset Clean Time of 3 hours, press the + or - pad until the desired Stop Time appears in the display. 1. Follow the directions section. in the Before a Clean Cycle 2.
OPERATING THE SELF-CLEANING OVEN (continued) How to Delay Start of Cleaning Delay Start is setting the oven timer to start the clean cycle automatically at a later time than the present time of day. NOTE: Before beginning make s_e shows the correct time of day° Quick Reminder--Delay the oven clock Start for Serf-Clean: 1. Prepare the oven for cleaning. 2. Close the oven doo_ 3. Press the AUTO CLEAN or AUTO CLEAN pad. 4, Press the + or - pad until the desired Time appears. 5.
Questions and Answers Q. If my oven clock is not set to the correct day, can I still self-clean my oven? time of A. If the clock is not set to the correct time of day you will not be able to set a delay clean to end at a specific time, Q. Can I use commercial oven cleaners of my serf-cleaning oven? on any part A.
CARE AND CLEANING Proper care and cleaning are important so your range %5_ give you efficient and satisfactory service° Follow these directions carefully in caring for it to help assure safe and proper maintenance° BE SURE ELECTRICAL POWER IS DISCONNECTED CLEANING ANY PART OF YOUR RANGE. I (IF CAUTION: DO NOT INOPERATE SO EQUIPPED) PLACE.
CAUTION: DO NOT INOPERATE (IF SO EQUIPPED) PLACE. THE BURNER WITHOUT ALL BURNER PARTS AND DRIP PANS Standard Twin Burners (onsome models) Grate (on somemodels) j _ On models with standard lifts up for easy access. burner twin burners, the cook-top iku'n all controls OFF before removing parts and drip pans (if so equipped). burner The burner grates and drip pans (if so equipped) can be lifted off, making them easy to clean.
CAPE AND CLEANING (continued) Burner Grates Lift out when cool,. Grates should be washed regularly and, of course, after spillovers. Wash them in hot, soapy water and rinse with clean water. After cleaning, dry them thoroughly by putting them in a warm oven for a few minutes_ Don't put the grates back on the range while they are wet. When replacing the grates, be sure they're positioned securely over the burners.
Lift-Off Oven Door • Do not rub or clean the door gusketmthe fiberglass material of the gasket has an extremely low resistance to abrasion. An intact and wellfitting oven door gasket is essential for energyefficient oven operation and good baking results, If you notice the gasket becoming worn, frayed or damaged in any way or if it has become displaced on the door, you should have it replaced. The oven door is removable, but it is heavy. You may need help removing arid replacing the door.
CARE AND CLEANING (continued) Oven Light Replacement (onsomemodels ) CAUTION: Before replacing your oven light bulb, disconnect the electrical power to the range at the main fuse or circuit breaker panel. Be sure to let the fight cover and bulb cool completely. DO NOT REMOVE REMOVE COVER. The oven light bulb is covered with a removable glass cover that is held in place with a bail-shaped wirer Remove the oven door, if desired, to reach cover easily° To replace To remove: 1.
Oven Air Vents Never block the vents (air openings) of the range. They provide the air inlet and outlet that are necessary for the range to operate properly with correct combustion° Air openings are located at the rear of the cooktop, at the top and bottom of the oven door, and at the bottom of the range, under the kick panel or storage drawer (depending on the model). Lift-up Cooktop (on models with standard twin burners) Clean the area under the cooktop often.
FORYOUR SAFETY CAUTIOH If you smell gas: 1. Open windows. 2. Don't touch electrical Do not attempt to operate the oven of this range during a power failure O_lectric Ignition models only). 3. Extinguish 4. Immediately switches. any open flame. call your gas supplier. IMPORTANT Remove all packing material and literalaxre from oven before connecting gas and electrical supply to range.
IMPORTANT SAFETYINSTRUCTIONS Installation of this range must conform with local codes, or in the absence of local codes, with the National Fuel Gas Code, ANSI 7223.1, latest edition. In Canada, installation must conform with the cttrrent Natural Gas Installation Code, CAN/CGA-B149.1 or the cttrrent Propane Installation C_de, CAN/CGAB149.2, and with local codes where applicable. This range has been design-certified by the American Gas Association according to ANSI Z21.
GENERAL MODELAND SERIALHUMBER LOCATIOH • See Dimensions and Clearances in this section for all rough-in and spacing dimensions. These dimensions must be met for safe use of your range. The location of the electrical outlet and pipe opening (see Gas Pipe and Electric Outlet Locations) may be adjusted to meet specific requirements. • The range may be placed with 0" clearance (flush) at the back wall and side walls of the range.
_] PROVIDE ADEQUATE GAS SUPPLY Your range is designed to operate at a pressure of 4" of water column on natural gas or, ff designed for LP gas (propane or butane), 10" of water column_ Make sure you are supplying your range with the type of gas for which it is designed. This range is convertible for use on natural or propane gas. If you decide to use this range on LP gas, conversion must be made by a qualified LP installer before attempting to operate the range on that gas.
Flexible Connector and Rigid Pipe Hookups for Models Equipped with Standard Twin Burners €OHHECTTHE RAHGETO GAS (continued) Flexible Connector Hookup for Models Equipped with Sealed Burners Flexible I Connectorl Hookup Pressure Regulator ---'1 !_ Adapter _ J r-!-7- Nipple I Rigid Pipel J Hookup I L..--] un!onII I _ F__-J o go L_ Elbow Flex Connector (6 ffomax.) / max,) [] Manifold Pipe .,e{--_ Installer: Inform the I consumer of the location of the gas shut-off valve.
[] [_ ELECTRICALCOHNECTIOHS(on some models) Electrical Requirements 120-volt, 60 Hertz, properly grounded branch circuit protected by a 15-amp or 20-amp circuit breaker or time delay fuse_ Extension Cord Cautions Because of potential safety hazards associated with certain conditions, we strongly recommend against the use of an extension cord.
ELECTRICALCONNECTIONS(continued) [_ Usage Situations where Appliance Power Cord will be Disconnected Infrequently. An adapter may be used only on a 15-amp circuit Do not use an adapter on a 20-amp circuit Where local codes permit, a TEMPORARY CONNECTION may be made to a properly grounded two-prong wall receptacle by the use of a UIAisted adapter, available at most hardware stores.
i Seal any openings in the wall behind the range and in the floor under the range when hookups _ completed. SLOJ.THEOPEHIHG$ are I Quulity of Flames The combustion quality of burner to be determined visually. flames needs lrlrYIrVVVVV_ I Call for service [] CHECK IGHITIOH OF SURFACE BURNERS Operation of all cooktop and oven burners should be checked after the range and gas supply lines have been careflflly checked for leaks.
ii [_ i ii ii iii iii ADJUST BROIL AND OVEH BURNER AIR ADJUSTMEHT SHUTTERS IF NECESSARY Air adjustment shutters for the top and bottom burners regulate the flow of air to the flames. il 1J The air adjustment shutter for the top (broil) burner is in the center of the rear wall of the oven. To determine if the bottom burner flames are burning properly, remove the oven bottom.
[] IHSTALL|NG THE AHTI-TiP DEVICE WARNING: • Range approved MUST be secured Anti-Tip device. with an . Unless properly installed, the range could be tipped by you or a child standing, sitting or leaning on an open door: For cement or concrete construction, you wilt need a 1/4" x 1½" lag bolt and a 1/2" O.D. sleeve anchor, which are not provided. Drill the recommended size hole for the hardware. Install the sleeve anchor into the drilted hole and then install the lag bolt through the device.
BEFORE PROBLEM TOP BURNERS QUESTIONS? YOU CALL FOR SERVICE.,, POSSIBLE CAUSE electrical plug is plugged into a live power outlet,, around the top of burner may be clogged. Remove burners (on models with standard twin burners) or burner heads (on models with sealed :burners) or burner caps on spill-proof models, and clean them with a Sewing needle or twist-tie. Make sure you do not enlarge the holes. On spill-proof models, Check electrode area for burned-on food or grease.
POSSIBLE PROBLEM CAUSE • Range electrical plug must be securely blown fuse or tripped circuit breaker. ::OVEN LIGHT :COMEON NIGHT LIGHT :DOES NOT: i: :::: :::: :::: : DOES NIYl" WORK seated in a live power outlet. Check for • Bulb may be loose or burned out. • Electrical plug must be plugged into a live power outlet. • Fluorescent , Switch bulb is loose or defective° Adjust or mplaceo operating the light is broken. Call for service.
BEFORE YOU CALL FOR SERVICE.,, (continued) PROBLEM POSSIBLE CAUSE :OVEN:DOOR:i:: • Press the CLEAR!OFF pad. Allow the oven to cool and then unlatch the door. Acc_ENTALLY "door" :APPEARS THE DISPLAY • Serf-cleaning cycle has been selected but latch handle was not moved all the way to the fight. Move the latch handle. Latch handle was moved to the fight but a program other than self-cleaning was selected. Move the latch handle to the fight only when setting the self-cleaning cycle.
We'll Be There With the purchase information ofyour new GE appliance, receive or assistance from the assurance that ifyou ever need GE, we'll be there. All you have to do is call--toll-free! GEAnswerCenter_ 800.626.2000 Whatever your question about any GE major appliance, GE Answer Center ® information service is available to help. Your call-and your question-will be answered promptly and courteously.
Staple sales slip or cancelled check here. Proof of original purchase date is needed to obtain service under warranty. YOUR GE GAS RANGE WARRANTY WHAT IS COVERED FULL ONE-YEAR WARRANTY For one year from date of original purchase, we wilt provide, free of charge, parts and service labor in your home to repair or replace any part of the range that fails because of a manufacturing defect.