DRYERS SAFETY INFORMATION . . . . . . . . . 3 USING THE DRYER. . . . . . . . . . . . . . . . 4 Appliance Communication . . . . . . . . . . . . . 5 Controls . . . . . . . . . . . . . . . . . . . . . . . . . . . . 6 Settings . . . . . . . . . . . . . . . . . . . . . . . . . . . . . . 8 LOADING. . . . . . . . . . . . . . . . . . . . . . . . . . 9 VENTING . . . . . . . . . . . .
THANK YOU FOR MAKING GE APPLIANCES A PART OF YOUR HOME. Whether you grew up with GE Appliances, or this is your first, we’re happy to have you in the family. We take pride in the craftsmanship, innovation and design that goes into every GE Appliances product, and we think you will too. Among other things, registration of your appliance ensures that we can deliver important product information and warranty details when you need them. Register your GE appliance now online.
READ ALL INSTRUCTIONS BEFORE USING THE APPLIANCE WARNING To reduce the risk of fire, explosion, electric shock, or injury to persons when using your appliance, follow basic precautions, including the following: • Read all instructions before using the appliance. • DO NOT dry articles that have been previously cleaned in, washed in, soaked in, or spotted with gasoline, dry-cleaning solvents, or other flammable or explosive substances, as they give off vapors that could ignite or explode.
SAFETY INFORMATION IMPORTANT SAFETY INFORMATION READ ALL INSTRUCTIONS BEFORE USING THE APPLIANCE ADDITIONAL GAS DRYER WARNINGS WARNING - Fire or Explosion Hazard Failure to follow safety warnings exactly could result in serious injury, death, or property damage. -D O NOT store or use gasoline or other flammable vapors and liquids in the vicinity of this or any other appliance. - WHAT TO DO IF YOU SMELL GAS: • DO NOT try to light any appliance.
T o reduce the risk of fire, electric shock, or injury to persons, read the IMPORTANT SAFETY WARNING INFORMATION before operating this appliance. WARNING - Fire Hazard • Keep flammable materials and vapors, such as gasoline, away from dryer. • DO NOT dry anything that has ever had anything flammable on it (even after washing). • No washer can completely remove oil. • DO NOT dry anything that has ever had any type of oil on it (including cooking oils).
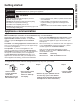
USING THE DRYER Getting started Features and appearance will vary. A E G C H B A F E D Cycle Status: Drying Cooling Pause Damp On B A Power B Start and Pause C Display and Status Lights Est. Time Remaining Controls 90 min. 60 min. More Dry High Clean Lint Filter 40 min. Dry Medium Check Vent 20 min. Less Dry Low 10 min. Damp No Heat E I H D F H Press to “wake up” the display. If the display is active, press to put the dryer into idle mode.
D E Control Lock You can lock the controls to prevent any selections from being made. Or you can lock the controls after you have started a cycle. Children cannot accidentally start the dryer by touching buttons with this option selected. To lock/unlock the dryer controls, depending on model, press and hold the Less Time and Wrinkle Care or the ecoDry and Delay Dry buttons for 3 seconds. The control lock icon will flash while locking/unlocking, stay on when locked, and turn off when unlocked.
USING THE DRYER Getting started G Settings Individual settings for cycle minutes (Time), dryness level (Level) and temperature (Temp) can be set from the minimum (lowest in column) to maximum (highest in column). In general, the higher up the column, the more energy will be used. NOTE: The selected cycle set Time can be further adjusted, in one minute increments, by pressing the More Time and Less Time buttons. Dryness Level - Selection only used for Sensor cycles. Timed cycles run for the selected time.
Always follow fabric manufacturer’s care label when laundering. Sorting and Loading Hints WARNING - Fire Hazard • Keep flammable materials and vapors, such as gasoline, away from dryer. • DO NOT dry anything that has ever had anything flammable on it (even after washing). • No washer can completely remove oil. LOADING Loading • DO NOT dry anything that has ever had any type of oil on it (including cooking oils). • Items containing foam, rubber, or plastic must be dried on a clothesline.
VENTING Venting Venting the Dryer For the best drying performance, the dryer needs to be properly vented. The dryer will use more energy and run longer if it is not vented to the specifications below. Carefully follow the details on Exhausting in the Installation Instructions. nU se only rigid metal 4” diameter ductwork inside the dryer cabinet. Use only rigid metal or UL listed flexible metal 4” diameter ductwork for exhausting to the outside. n Do not use plastic or other combustible ductwork.
Interior and Duct The interior of the appliance and exhaust duct should be cleaned once a year by qualified service personnel. The Exhaust Duct: Inspect and clean the exhaust ducting at least once a year to prevent clogging. A partially clogged exhaust can lengthen the drying time. Follow these steps: 1 Turn off electrical supply by disconnecting the plug from the wall socket. 2 Disconnect the duct from the dryer. 3 Vacuum the duct with the hose attachment and reconnect the duct.
TROUBLESHOOTING TIPS Troubleshooting Tips... Before you call for service Problem Possible Cause Dryer shakes or makes noise Some shaking/noise is normal. Dryer may be sitting unevenly. Move dryer to an even floor space, or adjust leveling legs as necessary until even. Clothes take too long to dry Improper or obstructed ducting Check the Installation Instructions to make sure the dryer venting is correct. Make sure ducting is clean, free of kinks and unobstructed.
Problem Dryer doesn’t heat Inconsistent drying times Clothes are still wet and dryer shut off after a short time Clothes are wrinkled Clothes shrink Greasy spots on clothes Lint on clothes 49-3000198-1 Possible Causes What To Do Fuse is blown/circuit breaker is tripped; the dryer may tumble but not heat Check the building’s fuse/circuit breaker box and replace both fuses or reset both breakers. Your dryer may tumble if only one fuse is blown or one breaker tripped.
TROUBLESHOOTING TIPS Troubleshooting Tips...
GEAppliances.com All warranty service is provided by our Factory Service Centers, or an authorized Customer Care® technician. To schedule service online, visit us at GEAppliances.com/service, or call GE Appliances at 800.GE.CARES (800.432.2737). Please have your serial number and your model number available when calling for service. Servicing your appliance may require the use of the onboard data port for diagnostics.
CONSUMER SUPPORT Consumer Support GE Appliances Website Have a question or need assistance with your appliance? Try the GE Appliances Website 24 hours a day, any day of the year! You can also shop for more great GE Appliances products and take advantage of all our on-line support services designed for your convenience. GEAppliances.
SECADORAS INFORMACIÓN DE SEGURIDAD. . . . . . . . . . . . . . . . . . . . . . . 2 Manual del propietario INSTRUCCIONES DE OPERACIÓN. . . . . . . . . . . . . . . . . . . 4 Comunicación del Electrodoméstico . . . . . 5 Paneles de control . . . . . . . . . . . . . . . . . . . 6 Funciones . . . . . . . . . . . . . . . . . . . . . . . . . . . . 8 CARGA. . . . . . . . . . . . . . . . . . . . . . .
GRACIAS POR HACER QUE GE APPLIANCES SEA PARTE DE SU HOGAR. Ya sea que haya crecido usando GE Appliances, o que ésta es su primera vez, nos complace tenerlo en la familia. Sentimos orgullo por el nivel de arte, innovación y diseño de cada uno de los electrodomésticos de GE Appliances, y creemos que usted también. Entre otras cosas, el registro de su electrodoméstico asegura que podamos entregarle información importante del producto y detalles de la garantía cuando los necesite.
LEA TODAS LAS INSTRUCCIONES ANTES DE USAR Para reducir el riesgo de incendio, explosión, descargas eléctricas o lesiones sobre las ADVERTENCIA personas al usar su electrodoméstico, siga las precauciones básicas, incluyendo lo siguiente: ■L ea todas las instrucciones antes de usar este electrodoméstico.
INFORMACIÓN DE SEGURIDAD 4 INFORMACIÓN IMPORTANTE DE SEGURIDAD LEA TODAS LAS INSTRUCCIONES ANTES DE USAR ADVERTENCIAS ADICIONALES SOBRE LA SECADORA A GAS ADVERTENCIA - Riesgo de incendio o de explosión El incumplimiento estricto de las advertencias de seguridad podría resultar en lesiones graves, la muerte o daños a la propiedad. -N O guarde ni use gasolina u otros vapores y líquidos inflamables cerca de éste ni de otros electrodomésticos.
P ara reducir el riesgo de incendios, descargas eléctricas o heridas, lea las INFORMACIÓN ADVERTENCIA IMPORTANTE DE SEGURIDAD antes de utilizar este electrodoméstico. ADVERTENCIA - Riesgo de incendio • Mantenga cualquier material y vapores inflamables, tales como gasolina, alejados de la secadora. • NO seque nada que alguna vez haya tenido algo inflamable en éste (incluso luego de lavar). • Ninguna lavadora puede eliminar el aceite por completo.
COMO USAR LA SECADORA Puesta en Marcha Las características y apariencia variarán. A E G C H B A F E D Cycle Status: Drying Cooling Pause Damp On B I G C Sensing H Est. Time Remaining Controls 90 min. 60 min. More Dry High Clean Lint Filter 40 min. Dry Medium Check Vent 20 min. Less Dry Low 10 min.
D E Control Lock (Bloqueo del Control) Puede bloquear los controles para evitar que se haga cualquier selección. O puede bloquear los controles luego de haber iniciado un ciclo. Los niños no pueden iniciar de forma accidental la secadora presionando las teclas cuando esta opción haya sido seleccionada.
COMO USAR LA SECADORA Puesta en Marcha G Configuraciones H Wrinkle Care (Prevención de arrugas) Configuraciones individuales para el ciclo secado por tiempo (Time), el nivel de secado (Level) y temperatura (Temp) se pueden configurar desde el mínimo (inferior en la columna) al máximo (superior en la columna). En general, cuanto más arriba en la columna, más energía se usará.
Siempre siga las instrucciones del fabricante de la ropa cuando lave. Consejos de clasificación y carga ADVERTENCIA - Riesgo de incendio • Mantenga cualquier material y vapores inflamables, tales como gasolina, alejados de la secadora. • NO seque nada que alguna vez haya tenido algo inflamable en éste (incluso luego de lavar). • Ninguna lavadora puede eliminar el aceite por completo. CARGA Carga • NO seque nada que alguna vez haya tenido algún tipo de aceite (incluyendo aceites de cocina).
VENTILACIÓN Ventilación Ventilación de la Secadora Para un mejor funcionamiento del secado, es necesario que la secadora sea ventilada de forma apropiada. La secadora usará más energía y funcionará durante más tiempo si no está ventilada de acuerdo con las especificaciones siguientes. Siga cuidadosamente los detalles sobre el Escape en las Instrucciones de Instalación. nU tilice únicamente ducto de metal rígido de 4″ de diámetro en el interior del gabinete de la secadora.
Interior y Conducto Un técnico calificado debe limpiar la parte interna del aparato y del conducto de salida una vez por año. El ducto de escape: Inspeccione y limpie el ducto de escape por lo menos una vez al año para evitar los obstrucciones. Un escape parcialmente taponado puede prolongar el plazo de secado. Siga estos pasos: 1 2 3 Apague el suministro eléctrico desconectando el enchufe de la pared. Desconecte el conducto de la secadora.
ANTES DE SOLICITAR EL SERVICIO TÉCNICO 12 Consejos para la solución de problemas Problema Causas posibles La secadora se El movimiento/ruido es normal. mueve o hace ruido La secadora puede estar colocada en un lugar desnivelado Las prendas Conducto inadecuado u obstruido tardan mucho en secarse Solución Desplace la secadora a un lugar nivelado, o ajuste las patas niveladoras según sea necesario. Revise las Instrucciones de instalación para verificar que la ventilación de la secadora sea la correcta.
Problema La secadora no calienta Causas posibles Fusible quemado/disyuntor desconectado; es posible que la secadora gire sin calentar Solución Revise la caja de fusibles/disyuntores y reemplace ambos fusibles y reconecte ambos disyuntores. Es posible que la secadora gire si únicamente un fusible se ha quemado o un solo disyuntor ha saltado. NOTA: Ya que algunos modelos de secadoras eléctricas utilizan 2 fusibles/disyuntores, asegúrese de que ambos funcionen.
ANTES DE SOLICITAR EL SERVICIO TÉCNICO 14 Consejos para la solución de problemas Problema Ocurre estática Causas posibles No se utilizó ningún tipo de suavizador de telas Sobresecado Los cuellos y pretinas aún se encuentran húmedos al final del ciclo Pequeña variación del color metálico. La secadora sigue girando después de que la pantalla indica Complete (finalización) Durante un ciclo de vapor no pueden verse las prendas porque la puerta está muy cubierta por vapor.
GEAppliances.com Todo el servicio de garantía es provisto por nuestros Centros de Servicio de Fabricación, o un técnico autorizado de Servicio al Cliente (Customer Care®). Para programar una visita del servicio técnico, visítenos a través de Internet en GEAppliances.com/service, o llame GE Appliances al 800.GE.CARES (800.432.2737). Cuando llame para solicitar el servicio, tenga los números de serie y modelo disponibles.
SOPORTE PARA EL CONSUMIDOR Soporte para el Consumidor Sitio Web de GE Appliances ¿Desea realizar una consulta o necesita ayuda con su electrodoméstico? ¡Intente a través del Sitio Web de GE Appliances las 24 horas del día, cualquier día del año! Usted también puede comprar más electrodomésticos maravillosos de GE Appliances y aprovechar todos nuestros servicios de soporte a través de Internet, diseñados para su conveniencia. GEAppliances.