GasSlide=inRan#e '" i, lllll Contents Aluminum Foil Anti-Tip Device 5, 12, 16 3, 7, 28 Appliance Registration Cm'e and Cleaning Clock Consumer Services Electronic Conu_ols Energ3,-Sm4ng Tips 2 18-19 Under 10 4 Safety Instructions Surface Cooldng Model Oven rimer Burner 6 Bunaers 6 10 and Serial Number's Aii Adjustment Baking, Baldng 7 2 9-10 Guide Broiler Pan and Rack Broiling, Broiling Guide Control Settings Door Removal Light; Bulb Replacement Oven Bottom Removal Oven Timer Preheatin
Help us help yOUo,o Read this book carefully. If you need service... It is intended and maintain properly To obtain service, see the Consumer Services page in the back of this book to help you operate your new range Keep it handy for' answers questions. to your If you don't understand something or need more help, write (include your phone number): Consumer Affairs GE Appliances AppIiance Park Louisville, KY 40225 Write down the model and serial numbers.
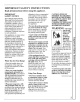
IMPORTANT SAFETY Read all instructions INSTRUCTI[ONS before using this appliance. IMPORTANT SAFETY NOTICE The California Safe Drinking Water and Toxic Enforcement Act requires the Governor' of California to publish a list of substances known to the state to cause cancer, birth defects or other reproductive harm, and requires businesses to warn customers of potential exposure to such substances.
IMPORTANT SAFETY INSTRUCTIONS o Never wear loose fitting or hanging garments while using the appliance. Be careful when reaching for items storedin cabinets over the cooktop. Flammable material could be Surface Cooldng burners have ignited ignite d if brought in contact with flame or hot oven surfaces * Never leave and may cause severe burns. - For your safety, never use your appliance for warming or heating the room. • Do not use water on grease fires. Never pick up a flaming pan.
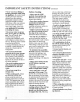
* Do not leave plastic items on the cooktop--they may melt if left too close to the vent, o Do not leave any items on the cooktop. The hot air from the vent may ignite flammable items and wilt increase pressure in closed containers, which may cause them to burst, * To avoid the possibility of a burn, always be certain that the controls for aH burners are at the OFF position and all grates are cool before attempting to remove them. * When flaming foods are under the hood, turn the fan off.
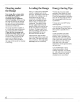
Flooring under the Range Your range, like so many other household items, is heavy and can settle into soft floor coverings such as cushioned vinyl or carpeting.
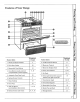
Features of Your Range t_ m t_ I _o Feature Explained on page Index t Model and Serial Numbers 2 Explained on page Feature Index 11 OVEN CANCEL 2 Oven Door Gasket 20 12 Electronic Controls 3 Removable 24 I3 Electronic Display Oven Bottom 4 Oven Shelves (easily removed or repositioned on shelf supports) 5 Automatic Oven Door Latch 9, i9 20 6 Surface Burner Controls 8 7 Glass Cooktop 16 8 Oven Vent 10 9 Anti-Tip Device (see Installation Instructions) 10 Surface Burners and Grate
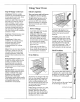
Surface Cooking Electric Ignition To Light a Surface Burner Your surface burners are lighted by electric ignition, eliminating the need fOr'standing pilot lights with constantly burning flames, "Watch the flame, not the knob, as you reduce heat, The flame size on a gas burner should match the cookware you are using, In case of a power failure, you can light the surface burner's on your" range with a match Hold a lighted match to the burner, then turn the knob to the LITE position Use extreme caution
Using Your Oven Top-of-Range Cookware Aluminum: Medium-weight cookware is recommended because it heats quickly and evenly, Most foods brown evenly in an aluminum skillet, Minerals in food and water wilt stain but will not harm aluminum A quick scour with a soap-filled steel wool pad after each use keeps aluminum cookware looking shiny and new, Use saucepans with tight-fitting lids when cooking with minimum amounts of water.
Using Your Oven Electronic Controls (continued) Oven Vent Your oven is vented through ducts at the rear of the range (see page 7)_ Do not block these ducts when cooking in the oven--it is important that the flow of hot air flom the oven and fresh air to the oven burner be uninterrupted, Avoid touching the vent openings or' neaxby surfaces during oven or' broiler operation--they may become hot, • Vent openings and nearby surfaces may become hot. Do not touch them.
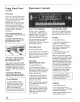
ERectronic Controlts (oomin ed) Automatic Oven Timer The oven timer will automatically start and stop your oven cooking or' self=cleaning operation for you For automatic oven cooking: 1, Push COOK TIME. button 2, Turn SET knob to set length of' baking time 3. Push BAKE button 4. Turn SET knob to set desired temperature. When cook time is reached, the End-of-Cycle Tone (3 long beeps) wilt sound and the oven wilt turn off.
Baking How to Set Your Oven for Baking 1. Position the shetf or shelves in the oven If cooking on two shelves at the same time, stagger the cookware for best heat circulation 2, Close oven door: 3. Push the BAKE button and turn the SET knob until desired temperature is displayed If' preheating is desired, do not put food in the oven until a one-second beep sounds to tell you the oven is preheated° 4.
Baking Guide 1. Preheating is very important when baking foods such as biscuits, cookies, cakes and other pastries. Preheating is not necessary when roasting or' for' long-time cooking of whole meals. 2. Aluminum pans conduct heat quickly, For most conventional baking, light, shiny finishes give best results because they help prevent overbrowning, 17oi.best browning results, we recommend dull bottom surfaces for'cake pans and pie plates..
Roasting Roasting is cooking by dry heat, Tender meat or' poultry can be roasted uncovered in your' oven Roasting temperatures, which should be low and steady, keep spattering to a minimum When roasting, it is not necessary to sear, baste, cover' or add water to your meat, Roasting is easy, just follow these steps: Step 1: Position oven shelf at second from bottom position (B) for small size roasts (3 to 5 pounds) and at bottom position (A) for' larger roasts, 1 Step 2: Ch_ck weight of roast.
Roasting Guide 1)0pe Oven Temperature Meat Tender cuLs; rib, high quality sirloin tip.
Broiling Broiling is cooking food by intense radiant heat from the upper bruit unit in the upper' oven., Most fish and tender' cuts of meat can be broiled. Follow these steps to keep spattering and smoking to a minimum, Step 7: When finished broiling, push the oven CANCEL. button. Serve food immediately, and leave pan outside oven to cool during meal for easiest cleaning Use of Aluminum Foil Step 1: If meat has fat or. gristle near edge, cut vertical slashes through both about 2" apart.
Broiling Guide t. Always use broiler pan and rack that comes with your ovem It is designed to minimize smoldng and spattering by trapping juices in the shielded lower part of the pan the meat Use tongs to turn meat over to prevent piercing meat and losing juices 4. If desired, marinate meats or' chicken before broiling or brush with barbecue sauce last 5 to t0 minutes only, 2.
Care and Cleaning (See Cleaning Guide on page 23.) Proper care and cleaning are important so your oven will give you efficient and satisfactory service Follow these directions carefully in caring for' it to assure safe ,and proper maintenance. BE SURE ELECTRICAL POWER IS OFF BEFORE CLEANING ANY PART OF THE RANGE. CAUTION: DO NOT COOK ON OR CLEAN A BROKEN OR CRACKED COOKTOP.
Lift-Off Oven Door Broiler Pan & Rack The oven door is removable to make tile interior" more accessible. After broiling, remove the broiler pan and rack and carefully pour off the grease Wash and rinse the broiler pan and rack in hot, soapy water. If' food has burned on, sprinkle the rack while hot with detergent and cover with wet paper towels or a dishcloth.
Operating Programmed 3 7,-hours the Self-Cleaning Cleaning Time: Prepare the Oven Before Setting the Controls The oven must be completely cool in order to set the self-clean cycle Step 1: Remove the broiler pan, broiler rack, all cookwme and any aluminum foil from the oven (Oven shelves may be left in the oven Note: shelves will discolor during the self-cleaning cycle..) Step 2: Wipe up heavy soil on oven bottom. If you use soap, rinse thoroughly before self-cleaning to prevent staining.
! i i I l Set the Oven for Cleaning To Set a Delayed Start After Self-Cleaning The range must be completely cool in order to set the self-clean cycle, 1, Push STOP TIME button. 1. When a clean cycle is finished, the word "CLEAN" will be off in the display_ 1. Push the CLEAN button_ 2° Turn SET knob in the clockwise direction about t/2 turn,. The display will show "3:30?' The words "CLEAN TIME" will be displayed on the left. Within 20 seconds, the words "CLEAN LOCK" will be displayed on the right.
Operating Questions the Self-Cleaning and Answers Q° If my range clock is not working, can I still self-clean my oven? A. No "four' Electronic Controls use the range clock to help start and stop your self-cleaning cycle Q. Can I use commercial oven cleaners on any part of my self-cleaning oven? A.
Cleaning NOTE: Guide Let ove n parts cool before touching PART MATERIALS Broiler' Pan and Rack • Soap and Water , Soap-Filled Scouring Pad • PIastic Scouring Pad • Dishwasher-Safe .............. J Control Panel or handling.
Minor Adjustments You Can Make Broil and Oven Burner Air Adjustment Shutters Air adjustment shutters for' the broil and oven burners regulate the flow of air to the flame ._L_ Loosen Ai, _'±-... , adju,tmen, [_ shutter // The air adjustment shutter for the top burner is on the rear wal! of the oven Loosen .
Questions? Use This Prob]lem Solver PROBLEM POSSIBLE CAUSE AND REMEDY TOP BURNERS DO NOT LIGHT * Make sure the electrical * Gas supply not connected plug is plugged into a live, properly grounded power' outlet. or not turned on. - Check tbr power outage_ * Pan sitting on burner grate may be pm"tially blocldng combustion. Remove pan and try again.
Problem Solver (continued) PROBLEM POSSIBLE CAUSE AND REMEDY OVEN WILL NOT SELF-CLEAN o STOP TIME must be more than 31/zhours later than START TIME. STRONG ODOR . Improper *Oven temperature is too high to Set self-clean room temperature and reset the Controls. operation° Allow the rmage to cool to air/gas ratio in oven.
Range Toe Space Filler ]h structions for Countertop Heights up to 38" The range height must be adjusted to the countertop height. For' countertop heights greater than 37", additional steps may need to be taken as detailed below, When the range is elevated to its maximum height, there is a large space between the bottom of the range and the floor, referred to as the toe space. This may be visually objectionable The legs should not be extended any thrther than to provide a maximum of 3" toe space.
Anti-Tip Device h staRafion Instructions for Kit No. 045 (344119) Fig. 1 [Fig.
Notes ! _a < 29
Notes 30
YOUR WA GE GAS RANGE RANTY Save proof of original purchase date such as your sales slip or cancelled check to estabfish warranty period WHAT IS COVERED FULL ONE-YEAR WARRANTY For one year from date of original purchase, we will provide, free of charge, parts and service labor in your home to repair or replace any part of the range that fails because of a manufacturing defect.