WALL OVEN Built-In Electric SAFETY INFORMATION . . . . . . . . . .3 OWNER’S MANUAL USING THE OVEN JRP20 JRP28 JRS06 Oven Controls . . . . . . . . . . . . . . . . . . . . . . . . . . 6 Clock and Timer . . . . . . . . . . . . . . . . . . . . . . . . 7 Special Features . . . . . . . . . . . . . . . . . . . . . . . . 8 Sabbath . . . . . . . . . . . . . . . . . . . . . . . . . . . . . . 10 Baking . . . . . . . . . . . . . . . . . . . . . . . . . . . . . . . 11 Baking and Roasting . . . . . . . . . . . . .
THANK YOU FOR MAKING GE APPLIANCES A PART OF YOUR HOME. Whether you grew up with GE Appliances, or this is your first, we’re happy to have you in the family. We take pride in the craftsmanship, innovation and design that goes into every GE Appliances product, and we think you will too. Among other things, registration of your appliance ensures that we can deliver important product information and warranty details when you need them. Register your GE appliance now online.
READ ALL INSTRUCTIONS BEFORE USING THE APPLIANCE WARNING Read all safety instructions before using the product. Failure to follow these instructions may result in fire, electrical shock, serious injury or death. WARNING GENERAL SAFETY INSTRUCTIONS Ŷ 'R QRW DWWHPSW WR UHSDLU RU UHSODFH DQ\ SDUW RI \RXU oven unless it is specifically recommended in this manual. All other servicing should be performed by a qualified technician. Ŷ ' R QRW WRXFK WKH KHDWLQJ HOHPHQWV RU WKH LQWHULRU surface of the oven.
SAFETY INFORMATION IMPORTANT SAFETY INFORMATION READ ALL INSTRUCTIONS BEFORE USING THE APPLIANCE WARNING IN THE EVENT OF A FIRE, TAKE THE FOLLOWING STEPS TO PREVENT INJURY AND FIRE SPREADING Ŷ ' R QRW XVH ZDWHU RQ JUHDVH ILUHV 1HYHU SLFN XS D flaming pan. Ŷ , I WKHUH LV D ILUH LQ WKH RYHQ GXULQJ EDNLQJ VPRWKHU the fire by closing the oven door and turning the oven off or by using a multi-purpose dry chemical or foam-type fire extinguisher.
READ ALL INSTRUCTIONS BEFORE USING THE APPLIANCE WARNING SELF-CLEANING OVEN SAFETY INSTRUCTIONS (Cont.) Ŷ , I WKH VHOI FOHDQLQJ PRGH PDOIXQFWLRQV WXUQ WKH oven off and disconnect the power supply. Have it serviced by a qualified technician. Ŷ ' R QRW XVH D SURWHFWLYH FRDWLQJ WR OLQH WKH RYHQ DQG do not use commercial oven cleaner unless certified for use in a self-cleaning oven. Ŷ ' R QRW FOHDQ WKH GRRU JDVNHW 7KH GRRU JDVNHW LV essential for a good seal.
USING THE OVEN: Oven Controls Oven Controls 1. BAKE: Touch this pad to select the bake function. Bake Light: )ODVKHV ZKLOH LQ HGLW PRGH²\RX FDQ change the oven temperature at this point. Glows when the oven is in bake mode. 2. BROIL HI/LO: Touch this pad to select the broil function. See the Cooking Modes section for more information. Broil Light: )ODVKHV ZKLOH LQ HGLW PRGH²\RX FDQ VZLWFK IURP +, WR /2 %52,/ DW WKLV SRLQW *ORZV when the oven is in bake mode. 3.
1RW DOO IHDWXUHV DUH RQ DOO PRGHOV To Set the Clock The clock must be set to the correct time of day for the automatic oven timing functions to work properly. The time of day cannot be changed during a delayed cooking or a delayed self-cleaning cycle. 1. Touch the TIMER/CLOCK pad twice. 3. Touch the START pad until the time of day shows in the display. This enters the time and starts the clock. To check the time of day when the display is showing other information, simply touch the CLOCK pad.
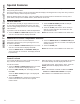
USING THE OVEN: Special Features Special Features Your new touch pad control has additional features that you may choose to use. The following are the features and how you may activate them. The special feature modes can only be activated while the display is showing the time of day clock. They remain in the control’s memory until the steps are repeated. When the display shows your choice, touch the START pad.
Tones at the End of a Timed Cycle At the end of a timed cycle, 3 short beeps will sound followed by one beep every 6 seconds, until the CLEAR/ OFF pad is touched. This continuous 6-second beep may be canceled. 2. Touch the BROIL HI/LO pad. The display shows CON BEEP (continuous beep). Touch the BROIL HI/LO pad again. The display shows BEEP. (This cancels the one beep every 6 seconds.) 7R FDQFHO WKH VHFRQG EHHS 3. Touch the START parestored. 1.
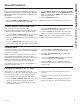
USING THE OVEN: Sabbath Feature Sabbath Feature (This feature is not available for the lower oven. Designed for use on the Jewish Sabbath and Holidays.) (on some models) 7KH 6DEEDWK IHDWXUH FDQ EH XVHG IRU EDNLQJ URDVWLQJ RQO\ ,W FDQQRW EH XVHG IRU EURLOLQJ VHOI FOHDQLQJ RU 'HOD\ 6WDUW cooking. NOTE: The oven light comes on automatically (on some models) when the door is opened and goes off when the GRRU LV FORVHG 7KH EXOE PD\ EH UHPRYHG 6HH WKH 2YHQ /LJKW %XOE VHFWLRQ 2Q PRGHOV ZLWK D OLJKW VZLWFK
To avoid possible burns, place the racks in the desired position before you turn the oven on. Before you begin: Preheating and Pan Placement 1. The racks have stop-locks, so that when placed correctly on the supports, they will stop before coming completely out, and will not tilt. 2. When placing and removing cookware, pull the rack out to the bump on the rack support. 3. To remove a rack, pull it toward you, tilt the front end up and pull it out. 4.
USING THE OVEN: %DNLQJ DQG 5RDVWLQJ )HDWXUH Baking and Roasting Feature (These features are not available for the lower oven.)(on some models) NOTE: )RRGV WKDW VSRLO HDVLO\²VXFK DV PLON HJJV ILVK VWXIILQJV SRXOWU\ DQG SRUN²VKRXOG QRW EH DOORZHG WR VLW IRU PRUH WKDQ KRXU EHIRUH RU DIWHU FRRNLQJ 5RRP WHPSHUDWXUH SURPRWHV WKH JURZWK RI KDUPIXO EDFWHULD %H VXUH WKDW the oven light is off because heat from the bulb will speed harmful bacteria growth.
USING THE OVEN: %URLOLQJ )HDWXUH Broiling Feature How to Set the Oven for Broiling: 1. Place the meat or fish on a broiler grid in a broiler pan designed for broiling. 2. Follow suggested rack positions in the %URLOLQJ *XLGH ,I \RXU RYHQ LV FRQQHFWHG WR volts, rare steaks may be broiled by preheating the broiler and positioning the oven rack one position higher 3. Touch the BROIL HI/LO pad once for +, %URLO 7R FKDQJH WR /2 %URLO WRXFK WKH BROIL HI/LO pad again Food 4.
(This feature is not available for the lower oven.)(on some models) The oven door must be closed and all controls must be set correctly for the cycle to work properly. Before a Clean Cycle: The oven must be cool in order to set the self-clean cycle. We recommend venting your kitchen with an open window or using a ventilation fan or hood during the first self-clean cycle. Remove broiler pan, broiler grid, all cookware and any aluminum foil from the oven.
CARE AND CLEANING: 2YHQ 'RRU Oven Door %H VXUH HOHFWULFDO SRZHU LV RII DQG DOO VXUIDFHV DUH FRRO EHIRUH FOHDQLQJ DQ\ SDUW RI WKH RYHQ How to Remove Protective Shipping Film and Packaging Tape Carefully grasp a corner of the protective shipping film with your fingers and slowly peel it from the appliance VXUIDFH 'R QRW XVH DQ\ VKDUS LWHPV WR UHPRYH WKH ILOP Remove all of the film before using the appliance for the first time.
%H VXUH HOHFWULFDO SRZHU LV RII DQG DOO VXUIDFHV DUH FRRO EHIRUH FOHDQLQJ DQ\ SDUW RI WKH RYHQ Oven Racks Clean the oven racks with an abrasive cleanser or steel wool. After cleaning, rinse the racks with clean water and dry with a clean cloth. Racks may become difficult to slide, especially after a self-clean. Put some vegetable oil on a soft cloth or paper towel and rub onto the left and right edges. NOTE: The shiny, silver-colored oven racks (on some models) may be cleaned in the self-cleaning oven.
CARE AND CLEANING: 2YHQ /LJKW Oven Light Non-Self-Clean Oven Interior (on standard clean models or on lower oven) With proper care, the porcelain enamel finish on the LQVLGH RI WKH RYHQ²WRS ERWWRP VLGHV EDFN DQG LQVLGH RI WKH GRRU²ZLOO VWD\ QHZ ORRNLQJ IRU \HDUV /HW WKH RYHQ FRRO EHIRUH FOHDQLQJ :H UHFRPPHQG WKDW you wear rubber gloves when cleaning the oven. Soap and water will normally do the job. Heavy spattering or spillovers may require cleaning with a mild abrasive cleaner.
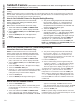
Save time and money! Review the charts on the following pages first and you may not need to call for service. Problem Possible Cause What To Do Control signals after entering cooking time or delay start You forgot to enter a bake temperature or cleaning time Touch the BAKE pad and desired temperature or the SELF CLEAN pad and desired clean time. Food does not bake or roast properly Oven controls improperly set. 6HH WKH 8VLQJ WKH RYHQ VHFWLRQ Rack position is incorrect or the rack is not level.
TROUBLESHOOTING TIPS 20 Troubleshooting tips ... %HIRUH \RX FDOO IRU VHUYLFH Problem Possible Cause What To Do Oven not clean after a clean cycle Oven controls improperly set. See the Self-cleaning oven section. Oven was heavily soiled. Clean up heavy spillovers before starting the clean cycle. Heavily soiled ovens may need to self-clean again or for a longer period of time. "LOCK DOOR" flashes in the display The self-clean cycle has been selected but the door is not closed. Close the oven door.
Notes 49-2000958 Rev.
LIMITED WARRANTY GE Appliances Limited Warranty GEAppliances.com $OO ZDUUDQW\ VHUYLFH LV SURYLGHG E\ RXU )DFWRU\ 6HUYLFH &HQWHUV RU DQ DXWKRUL]HG &XVWRPHU &DUH® technician. To schedule service online, visit us at GEAppliances.com/service, or call GE Appliances at 800.GE.CARES (800.432.2737). Please have your serial number and your model number available when calling for service. Servicing your appliance may require the use of the onboard data port for diagnostics.
Looking For Something More? GE Appliances offers a variety of accessories to improve your cooking and maintenance experiences! Refer to the Consumer Support page for phone numbers and website information. 7KH IROORZLQJ SURGXFWV DQG PRUH DUH DYDLODEOH Accessories ACCESSORIES Accessories Grates 6XUIDFH %XUQHU +HDGV DQG &DSV 6XUIDFH (OHPHQWV DQG 'ULS 3DQV .
CONSUMER SUPPORT Consumer Support GE Appliances Website Have a question or need assistance with your appliance? Try the GE Appliances Website 24 hours a day, any day of the year! You can also shop for more great GE Appliances products and take advantage of all our on-line support VHUYLFHV GHVLJQHG IRU \RXU FRQYHQLHQFH ,Q WKH 86 GEAppliances.