
Installation Guide

31-2000912 Rev. 0
3
Installation Instructions
IMPORTANT: Remove all packing material and
literature from the oven before connecting any
electrical supplies.
ELECTRICAL CONNECTION
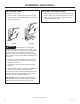
1. De-energize oven branch circuit.
2. With oven in front of cabinet opening, connect
flexible power cable to the junction box in such
a manner that it will hang down in a natural loop
against the left side of the back wall when the
oven is installed. Do not shorten this flexible
power cable. The flexible conduit connector must
be securely attached to the junction box and the
flexible conduit must be securely attached to the
connector. If the flexible conduit will not fit within
the connector, do not install the oven until a
connector of the proper size is obtained.
All new construction, mobile homes, recreational
vehicles and installations where local codes do
not allow grounding through neutral require a four-
conductor branch circuit. For existing construction, a
three-conductor branch circuit connection may be used.
NEW CONSTRUCTION AND FOUR
CONDUCTOR BRANCH CIRCUIT
CONNECTION
• When installing in a new construction, or
• When installing oven in a mobile home or
recreational vehicle, or
• When local codes do not permit grounding through
neutral:
NOTE: If residence leads or ground are aluminum
conductors, see WARNING note.
When connecting to a four-conductor branch circuit, if
local codes permit:
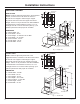
1. Free the neutral
(white) lead from being
restrained to any other
wires. If necessary,
cut the neutral (white)
lead and then re-strip
it to expose the proper
length of conductor.
2. Attach the appliance
grounding lead (green or
bare copper) in accordance with local codes.
3. Connect the oven neutral (white) lead to the
branch circuit neutral (white or gray) in accordance
with local codes, using a wire nut.
NOTE: If using a GFI breaker, the ground wire
must be installed correctly to prevent breaker from
tripping. Refer to latest edition of the NEC, NFPA
No. 70, available from the National Fire Protection
Association.
NEW CONSTRUCTION AND FOUR
CONDUCTOR BRANCH CIRCUIT
CONNECTION (Cont.)
4. Connect the oven red lead to the branch circuit
red lead, and the oven black lead to the branch
circuit black lead in accordance with local codes,
using wire nuts.
5. Install proper strain relief clamp.
6. Install junction box cover.
THREE CONDUCTOR BRANCH
CIRCUIT CONNECTION
NOTE: If residence leads are aluminum conductors,
see WARNING note.
When connecting to a three-conductor branch circuit,
if local codes permit:
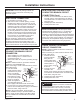
1. Connect the oven
ground conductor
along with the
neutral (white) lead
to the branch circuit
neutral (white or
gray in color), using
a wire nut.
2. Connect the oven
red lead to the
branch circuit red lead, and the oven black lead
to the branch circuit black lead in accordance with
local codes, using wire nuts.
3. Install proper strain relief clamp.
4. Install junction box cover.
NOTE TO ELECTRICIAN: The three power leads
supplied with this appliance are U.L. recognized for
connection to larger gauge household wiring. The
insulation of these three leads is rated at temperatures
much higher than the temperature rating of household
wiring. The current carrying capacity of a conductor is
governed by the temperature rating of the insulation
around the wire rather than the wire gauge alone.
WARNING
Improper connection of aluminum
house wiring to these copper leads can result in
an electrical hazard or fire. Use only connectors
designed for joining copper to aluminum and follow
the manufacturer’s recommended procedure closely.
Ground and
neutral wires (white)
Tape or Crimp
Neutral wire
connection
Black
Red
Branch
circuit
Alternate
knockout
Range
conduit
snaps
into box
Junction Box Cover
Junction Box Cover
White
Black
Red
Branch
circuit
Ground
wires
Alternate
knockout
Range
conduit
snaps
into box