RANGES Electric Front Control SAFETY INFORMATION .......... 3 USING THE RANGE Surface Units . . . . . . . . . . . . . . . . . . . . . . . . . . . 7 Cookware for Radiant Glass Cooktop. . . . . .10 Oven Controls . . . . . . . . . . . . . . . . . . . . . . . . . . 11 Special Features . . . . . . . . . . . . . . . . . . . . . . . . 12 Sabbath Mode . . . . . . . . . . . . . . . . . . . . . . . . . .13 Oven Racks . . . . . . . . . . . . . . . . . . . . . . . . . . . .14 Aluminum Foil and Oven Liners. . . . .
THANK YOU FOR MAKING GE APPLIANCES A PART OF YOUR HOME. Whether you grew up with GE Appliances, or this is your first, we’re happy to have you in the family. We take pride in the craftsmanship, innovation and design that goes into every GE Appliances product, and we think you will too. Among other things, registration of your appliance ensures that we can deliver important product information and warranty details when you need them. Register your GE appliance now online.
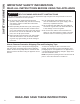
READ ALL INSTRUCTIONS BEFORE USING THE APPLIANCE WARNING Read all safety instructions before using the product. Failure to follow these instructions may result in fire, electrical shock, serious injury or death. ANTI-TIP DEVICE Anti-Tip Bracket WARNING Tip-Over Hazard • A child or adult can tip the range and be killed. • Install the anti-tip bracket to the wall or floor. • Engage the range to the anti-tip bracket by sliding the range back such that the foot is engaged.
SAFETY INFORMATION IMPORTANT SAFETY INFORMATION READ ALL INSTRUCTIONS BEFORE USING THE APPLIANCE WARNING GENERAL SAFETY INSTRUCTIONS (Cont.) Ŷ 'R QRW XVH DQ\ W\SH RI IRLO RU OLQHU WR FRYHU WKH oven bottom or anywhere in the oven, except as described in this manual. Oven liners can trap heat or melt, resulting in damage to the product and risk of shock, smoke or fire. Ŷ &RRN IRRG WKRURXJKO\ WR KHOS SURWHFW DJDLQVW foodborne illness.
READ ALL INSTRUCTIONS BEFORE USING THE APPLIANCE WARNING COOKTOP SAFETY INSTRUCTIONS (Cont.) Ŷ :KHQ XVLQJ JODVV FHUDPLF FRRNZDUH PDNH VXUH LW is suitable for cooktop service; others may break because of sudden change in temperature. Ŷ 7R PLQLPL]H WKH SRVVLELOLW\ RI EXUQV LJQLWLRQ RI flammable materials and spillage, the handle of a container should be turned toward the center of the range without extending over nearby surface units. Ŷ :KHQ SUHSDULQJ IODPLQJ IRRGV XQGHU D KRRG WXUQ the fan on.
SAFETY INFORMATION IMPORTANT SAFETY INFORMATION READ ALL INSTRUCTIONS BEFORE USING THE APPLIANCE WARNING SELF-CLEANING OVEN SAFETY INSTRUCTIONS The self-cleaning feature operates the oven at temperatures high enough to burn away food soils in the oven. Follow these instructions for safe operation. Ŷ 'R QRW WRXFK RYHQ VXUIDFHV GXULQJ VHOI FOHDQ RSHUDWLRQ .HHS FKLOGUHQ DZD\ IURP WKH RYHQ GXULQJ self-cleaning. Failure to follow these instructions may cause burns. Ŷ %HIRUH RSHUDWLQJ WKH VHOI FOHDQ F\FOH
WARNING FIRE HAZARD: Never leave the range unattended with the cooktop on medium or high settings. .HHS IODPPDEOH LWHPV DZD\ IURP WKH FRRNWRS 7XUQ RII DOO FRQWUROV ZKHQ GRQH FRRNLQJ )DLOXUH WR follow these instructions can result in fire, serious injury or death. Throughout this manual, features and appearance may vary from your model. NOTE: Before using the cooktop for the first time, clean it with ceramic cooktop cleaner. This helps protect the top and makes cleanup easier.
USING THE RANGE: 6XUIDFH 8QLWV Surface Units (Cont.) Using the Warming Zone WARNING FOOD POISON HAZARD: Bacteria may grow in food at temperatures below 140°F. Ŷ $OZD\V VWDUW ZLWK KRW IRRG 'R QRW XVH ZDUP VHWWLQJ WR heat cold food. Ŷ 'R QRW XVH ZDUP VHWWLQJ IRU PRUH WKDQ KRXUV The WARMING ZONE, located in the back center of the glass surface, will keep hot, cooked food at serving WHPSHUDWXUH $OZD\V VWDUW ZLWK KRW IRRG 'R QRW XVH WR heat cold food.
Home Canning Tips Be sure the canner is centered over the surface unit. Make sure the canner is flat on the bottom. To prevent burns from steam or heat, use caution when canning. 8VH UHFLSHV DQG SURFHGXUHV IURP UHSXWDEOH VRXUFHV These are available from manufacturers such as Ball® DQG .HUU® DQG WKH 'HSDUWPHQW RI $JULFXOWXUH ([WHQVLRQ Service. )ODW ERWWRPHG FDQQHUV DUH UHFRPPHQGHG 8VH RI ZDWHU bath canners with rippled bottoms may extend the time required to bring the water to a boil.
USING THE RANGE: Cookware for Radiant Glass Cooktop Cookware for Radiant Glass Cooktop The following information will help you choose cookware which will give good performance on glass cooktops. NOTE: Follow all cookware manufacturer’s recommendations when using any type of cookware on the ceramic cooktop. Recommended Avoid/Not Recommended Stainless Steel Enamel (painted) on Steel: Aluminum: heavy weight recommended Good conductivity.
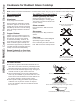
12 14 2 7 1 10 6 1. Convection Cooking (on some models): Convection cooking modes use increased air circulation to improve performance. See the Cooking Modes section for more information. 2. Traditional Cooking Modes: Your oven has the following traditional cooking modes: Bake and %URLO +L /R 6HH WKH &RRNLQJ 0RGHV VHFWLRQ IRU PRUH information. 3. Clean: Your oven has two cleaning modes: Self Clean and Steam Clean. See the Cleaning the Oven section for important information about using these modes.
USING THE RANGE: Special Features Special Features There are several different special features on your range. Ŷ 7R HQWHU WKH 6SHFLDO )HDWXUHV PHQX SUHVV WKH Bake and Broil pads at the same time and hold for three seconds. "OFFSEt" will appear in the display. Ŷ 6 FUROO WKURXJK 6SHFLDO )HDWXUHV PHQX XVLQJ WKH 8 pad for down and the 3 pad for up. Ŷ 7R VHOHFW D IHDWXUH WR FKDQJH RU WR FRQILUP D FKDQJH SUHVV WKH 0 pad. Ŷ 7R FDQFHO D FKDQJH DQG UHWXUQ WR WKH 6SHFLDO )HDWXUHV PHQX SUHVV WKH 6 pad.
7KH 6DEEDWK PRGH IHDWXUH FRPSOLHV ZLWK VWDQGDUGV VHW IRUWK E\ 6WDU . 6RPH RI WKHVH VWDQGDUGV WKDW ZLOO EH QRWLFHG by the consumer include the disabling of tones, disabling of oven lights, and delays of about 30 seconds to one minute on display changes. Only continuous baking or timed baking is allowed in the Sabbath mode. Cooking in the Sabbath mode is a two-step process, first the Sabbath mode must be set and then the bake mode must be set. Setting the Sabbath Mode Adjusting the Temperature 1.
USING THE RANGE: 2YHQ 5DFNV $OXPLQXP )RLO DQG 2YHQ /LQHUV &RRNZDUH 14 Oven Racks Recommended rack positions for various types of foods are provided in the Cooking Guide. Adjusting rack position is one way to impact cooking results. For example, if you would prefer darker tops on cakes, muffins, or cookies, try moving food one rack position higher. If you find foods are too brown on top try moving them down next time.
Your new oven has a variety of cooking modes to help you get the best results. These modes are described below. Refer to the Cooking Guide section for recommendations for specific foods. Remember, your new oven may perform differently than the oven it is replacing. NOTE: Remove unused racks when using the oven for faster preheat, improved efficiency and optimal performance.
USING THE RANGE: Cooking Guide Cooking Guide RECOMMENDED MODE(S) RECOMMENDED RACK POSITION(S) ADDITIONAL SUGGESTIONS Bake 3 8VH VKLQ\ FRRNZDUH Bake Convection Bake 2 and 4 8VH VKLQ\ FRRNZDUH (QVXUH DGHTXDWH DLUIORZ (see illustration below). Chiffon cakes (angel food) Bake 1 8VH VKLQ\ FRRNZDUH Cookies, biscuits, scones on a Single Rack Bake 3 8VH VKLQ\ FRRNZDUH Cookies, biscuits, scones on Multiple Racks Convection Bake 2 and 4 8VH VKLQ\ FRRNZDUH (QVXUH DGHTXDWH DLUIORZ Hamburgers
Be sure all controls are off and all surfaces are cool before cleaning any part of the range. WARNING If your range is removed for cleaning, servicing or any reason, be sure the anti-tip device is reengaged properly when the range is replaced. Failure to take this precaution could result in tipping of the range and can result in death or serious burns to children or adults. Control Knobs The control knobs may be removed for easier cleaning.
CARE AND CLEANING: Cleaning the Range – Interior Cleaning the Range – Interior Be sure all controls are off and all surfaces are cool before cleaning any part of the range. The interior of your new oven can be cleaned manually or by using Steam Clean or Self Clean modes. Spillage of marinades, fruit juices, tomato sauces and basting liquids containing acids may cause discoloration and should be wiped up immediately. Let hot surfaces cool, then clean and rinse.
To maintain and protect the surface of your glass cooktop, follow these steps: NOTE: ,W LV YHU\ LPSRUWDQW WKDW \RX '2 127 KHDW WKH cooktop until it has been cleaned thoroughly. 1. Before using the cooktop for the first time, clean it with a ceramic cooktop cleaner. This helps protect the top and makes cleanup easier. 2. Regular use of ceramic cooktop cleaner will help keep the cooktop looking new. 3. Shake the cleaning cream well. Apply a few drops of ceramic cooktop cleaner directly to the cooktop.
CARE AND CLEANING: &OHDQLQJ WKH *ODVV &RRNWRS 2YHU /LJKW Cleaning the Glass Cooktop (Cont.) Cooktop Seal To clean the cooktop seal around the edges of the glass, lay a wet cloth on it for a few minutes, then wipe clean with nonabrasive cleaners. Damage from Sugary Spills and Melted Plastic Special care should be taken when removing hot substances to avoid permanent damage of the glass surface.
Oven Light Replacement (on some models) To remove: 7XUQ WKH JODVV FRYHU FRXQWHUFORFNZLVH WXUQ XQWLO the tabs of the glass cover clear the grooves of the socket. Wearing latex gloves may offer a better grip. 2. Remove the bulb by turning it counter-clockwise. To replace: 1. Replace bulb with a new 40-watt appliance bulb. Insert the bulb and turn it clockwise until it is tight. 2.
CARE AND CLEANING: 5HPRYDEOH 6WRUDJH 'UDZHU Removable Storage Drawer 7KH VWRUDJH GUDZHU LV D JRRG SODFH WR VWRUH FRRNZDUH DQG EDNHZDUH 'R QRW VWRUH SODVWLFV RU IODPPDEOH PDWHULDO LQ the drawer. The storage drawer may be removed for cleaning under the range. Clean the storage drawer with a damp cloth or sponge. Never use harsh abrasives or scouring pads. Removing the Storage Drawer (for models that have release tabs): 1. Pull the drawer straight out until it stops.
Save time and money! Review the charts on the following pages first and you may not need to call for service. Problem Possible Cause What To Do Surface units will not maintain a rolling boil or cooking is not fast enough Improper cookware being used. 8VH SDQV ZKLFK DUH IODW DQG PDWFK WKH GLDPHWHU RI WKH surface unit selected. In some areas, the power (voltage) may be low. Cover pan with a lid until desired heat is obtained.
TROUBLESHOOTING TIPS Troubleshooting Tips ... Before you call for service Problem Possible Cause What To Do Oven does not work or appears not to work A fuse in your home may be blown or the circuit breaker tripped. Replace the fuse or reset the circuit breaker. Oven controls improperly set. 6HH WKH 8VLQJ WKH 2YHQ VHFWLRQ Oven is in Sabbath Mode. Verify that the oven is not in Sabbath Mode. See the Special Features section.
Problem Possible Cause What To Do Display goes blank A fuse in your home may be blown or the circuit breaker tripped. Replace the fuse or reset the circuit breaker. The clock is turned off. See the Special features section. Power outage, clock flashes Power outage or surge Reset the clock. If the oven was in use, you must reset it by pressing the Cancel/Off pad, setting the clock and resetting any cooking function.
LIMITED WARRANTY GE Appliances Electric Range Limited Warranty GEAppliances.com All warranty service is provided by our Factory Service Centers, or an authorized Customer Care® technician. To schedule service online, visit us at GEAppliances.com/service, or call GE Appliances at 800.GE.CARES (800.432.2737). Please have your serial number and your model number available when calling for service. Servicing your appliance may require the use of the onboard data port for diagnostics.
Looking For Something More? GE Appliances offers a variety of accessories to improve your cooking and maintenance experiences! Refer to the Consumer Support page for phone numbers and website information.
CONSUMER SUPPORT Consumer Support GE Appliances Website Have a question or need assistance with your appliance? Try the GE Appliances Website 24 hours a day, any day of the year! You can also shop for more great GE Appliances products and take advantage of all our on-line support VHUYLFHV GHVLJQHG IRU \RXU FRQYHQLHQFH ,Q WKH 86 GEAppliances.
Control Eléctrico Frontal COCINAS INFORMACIÓN DE SEGURIDAD . . . 3 USO DE LA COCINA Unidades de superficie . . . . . . . . . . . . . . . . . . . . . 7 Utensilio para Placa de Cocción para Vidrio Radiante . . . . . . . . . . . . . . . . . . . . .10 Controles del Horno. . . . . . . . . . . . . . . . . . . . . . . . 11 Funciones Especiales . . . . . . . . . . . . . . . . . . . . . . . 12 Modo Sabático . . . . . . . . . . . . . . . . . . . . . . . . . . . . 13 Estantes del Horno . . . . . . . . . . . . . .
GRACIAS POR HACER QUE GE APPLIANCES SEA PARTE DE SU HOGAR. Ya sea que haya crecido usando GE Appliances, o que ésta es su primera vez, nos complace tenerlo en la familia. Sentimos orgullo por el nivel de arte, innovación y diseño de cada uno de los electrodomésticos de GE Appliances, y creemos que usted también. Entre otras cosas, el registro de su electrodoméstico asegura que podamos entregarle información importante del producto y detalles de la garantía cuando los necesite.
LEA TODAS LAS INSTRUCCIONES ANTES DE USAR ESTE ELECTRODOMÉSTICO ADVERTENCIA Lea todas las instrucciones de seguridad antes de utilizar este producto. No seguir estas instrucciones puede generar un incendio, una descarga eléctrica, lesiones corporales o la muerte. DISPOSITIVO ANTI-VOLCADURAS ADVERTENCIA • • • • • Riesgo de Caída Un niño o adulto pueden volcar la cocina y morir. Instale el soporte anti-volcaduras sobre la pared o el piso.
INFORMACIÓN DE SEGURIDAD INFORMACIÓN IMPORTANTE DE SEGURIDAD LEA TODAS LAS INSTRUCCIONES ANTES DE USAR ESTE ELECTRODOMÉSTICO ADVERTENCIA INSTRUCCIONES GENERALES DE SEGURIDAD (Cont.) Ŷ 1R XVH QLQJ~Q WLSR GH DOXPLQLR R FREHUWRU SDUD FXEULU HO fondo del horno o cualquier parte del horno, excepto como se describe en este manual. Los cobertores de horno pueden atrapar el calor o derretirse, ocasionando daños sobre el producto y el riesgo de descargas, humo o incendios. Ŷ 7UDWH GH QR UD\DU R JROSHDU ODV SXHUW
LEA TODAS LAS INSTRUCCIONES ANTES DE USAR ESTE ELECTRODOMÉSTICO ADVERTENCIA INSTRUCCIONES DE SEGURIDAD DE LA ESTUFA (Cont.) Ŷ $O XVDU XWHQVLOLRV GH YLGULR FHUiPLFD DVHJ~UHVH GH TXH VHDQ DGHFXDGRV SDUD HO VHUYLFLR GH FRFLQD RWURV se podrán romper debido a un cambio repentino de temperatura.
INFORMACIÓN DE SEGURIDAD INFORMACIÓN IMPORTANTE DE SEGURIDAD LEA TODAS LAS INSTRUCCIONES ANTES DE USAR ESTE ELECTRODOMÉSTICO ADVERTENCIA INSTRUCCIONES DE SEGURIDAD DEL HORNO CON LIMPIEZA AUTOMÁTICA La función de limpieza automática usa el horno en temperaturas lo suficientemente altas como para consumir la suciedad de comida que haya dentro del horno. Para un funcionamiento seguro, siga estas instrucciones. Ŷ 1R WRTXH ODV VXSHUILFLHV GHO KRUQR GXUDQWH HO FLFOR GH limpieza automática.
ADVERTENCIA RIESGO DE INCENDIO: Nunca pierda de vista la cocina cuando la estufa esté en las configuraciones medio o alto.Mantenga los ítems inflamables alejados de la estufa. Apague todos los controles cuando finalice la cocción. Si no se siguen estas instrucciones se podrá producir incendios, lesiones graves o la muerte. Es posible que las funciones y apariencias varíen con relación a su modelo a lo largo del manual.
USO DE LA COCINA: 8QLGDGHV GH VXSHUILFLH Unidades de superficie (Continúa) Uso del Área para Calentar ADVERTENCIA RIESGO DE ENVENENAMIENTO CON COMIDA: Se pueden desarrollar bacterias cuando la comida esté a una temperatura inferior a los 140º. Ŷ 6LHPSUH FRPLHQFH FRQ FRPLGD FDOLHQWH 1R XVH OD configuración caliente para calentar comida fría.
Consejos para Productos Enlatados en el Hogar Asegúrese que el producto enlatado se encuentre sobre la unidad superficial. Asegúrese de que el producto enlatado sea plano en su parte inferior. Para evitar quemadoras de vapor o calor, tenga cuidado al enlatar el producto. 8VH UHFHWDV \ SURFHGLPLHQWRV GH IXHQWHV FRQILDEOHV (VWRV se encuentran disponibles a través de fabricantes como Ball® y Kerr® y el Department of Agriculture Extension Service (Servicio del Departamento de Agricultura).
USO DE LA COCINA: 8WHQVLOLR SDUD 3ODFD GH &RFFLyQ SDUD 9LGULR 5DGLDQWH Utensilio para Placa de Cocción para Vidrio Radiante La siguiente información lo ayudará a elegir los recipientes de cocción que brindan un buen desempeño en estufas de vidrio. Ver el folleto sobre recipientes para usar con estufas de inducción. NOTA: Siga todas las recomendaciones del fabricante de recipientes cuando utilice cualquier clase de recipiente de cocción sobre la estufa cerámica.
12 14 2 7 1 1. 10 6 Convection Cooking Modes (Modos de Cocción por Convección) (en algunos modelos): Los modos de cocción por convección utilizan una circulación de aire incrementada para mejorar el rendimiento. Para más información, consulte la sección de Modos de Cocción. 2. Traditional Cooking Modes (Modos de Cocción Tradicionales): Su horno cuenta con los siguientes modos GH FRFFLyQ WUDGLFLRQDOHV %DNH +RUQHDU \ %URLO +L 3DUD PiV información, consulte la sección de Modos de Cocción. 3.
USO DE LA COCINA: Funciones Especiales 12 Funciones Especiales Su cocina cuenta con varias funciones especiales diferentes. Ŷ 3DUD LQJUHVDU DO PHQ~ 6SHFLDO )HDWXUHV )XQFLRQHV (VSHFLDOHV PDQWHQJD SUHVLRQDGDV ODV WHFODV Bake (Hornear) y Broil (Asar) al mismo tiempo durante tres segundos. "OFFSEt" aparecerá en la pantalla. Ŷ 3DVH D WUDYpV GHO PHQ~ 6SHFLDO )HDWXUHV )XQFLRQHV (VSHFLDOHV XVDQGR OD WHFOD 8 para ir hacia abajo y la tecla 3 para ir hacia arriba.
/D IXQFLyQ GH PRGR VDEiWLFR FXPSOH FRQ ORV HVWiQGDUHV HVWDEOHFLGRV SRU 6WDUN . $OJXQRV GH HVWRV HVWiQGDUHV TXH VHUiQ observados por el consumidor incluyen la desactivación de los tonos, la desactivación de las luces del horno, y retrasos de aproximadamente 30 segundos a un minuto en relación a los cambios en la pantalla.
USO DE LA COCINA: (VWDQWHV GHO +RUQR 3DSHO GH $OXPLQLR \ &REHUWRUHV GHO +RUQR 8WHQVLOLRV 14 Estantes del Horno El horno cuenta con seis posiciones de estantes. En la Guía de Cocción, se brindan recomendaciones de posiciones de los estantes para diferentes tipos de comidas. Se ajusta un estante en una dirección para afectar los resultados de cocción.
Su nuevo horno posee una variedad de modos de cocción para que pueda obtener los mejores resultados. Estos modos se describen a continuación. Para acceder a recomendaciones para comidas específicas, consulte la sección de la Guía de Cocción. Recuerde que es posible que su nuevo horno funcione de manera diferente que aquel que está reemplazando. NOTA: Retire aquellos estantes que se encuentren en desuso al usar el horno para un precalentamiento más rápido, mayor eficiencia y óptimo rendimiento.
USO DE LA COCINA: Guía de Cocción Guía de Cocción MODO(S) RECOMENDADO(S) POSICIÓN(ES) DE ESTANTES RECOMENDADA SUGERENCIAS ADICIONALES Hornear 3 8VH XWHQVLOLRV EULOODQWHV Hornear Horneado por Convección 2y4 8VH XWHQVLOLRV EULOODQWHV $VHJ~UHVH GH TXH KD\D XQ IOXMR GH DLUH adecuado (Vea la ilustración).
Asegúrese de que todos los controles estén apagados y que las superficies estén frías antes de limpiar cualquier parte de la cocina. ADVERTENCIA Si se quita la cocina para efectuar una limpieza, reparaciones o cualquier otra razón, verifique que el dispositivo anti-volcaduras se coloque de manera adecuada cuando vuelva a instalarse la cocina. Si no toma esta precaución, la cocina puede volcarse y provocar lesiones. Perillas de control Las perillas de control se pueden retirar para facilitar la limpieza.
CUIDADO Y LIMPIEZA: Limpieza de la Cocina - Interior Limpieza de la Cocina - Interior Asegúrese de que todos los controles estén apagados y que las superficies estén frías antes de limpiar cualquier parte de la cocina. El interior de su nuevo horno puede ser limpiado de forma manual o utilizando los modos Steam Clean (Limpieza con Vapor) o Self Clean (Limpieza Automática).
Para mantener y proteger la superficie de su estufa de vidrio, siga estos pasos: NOTA: Es muy importante que NO CALIENTE la estufa hasta que la haya limpiado por completo. 1. Antes de usar la estufa por primera vez, límpiela con el limpiador de estufas cerámicas. Esto ayuda a proteger la estufa y hace la limpieza más sencilla. 2. El uso diario del limpiador de estufas cerámicas ayudará a que la estufa quede como nueva. 3. Agite bien la crema de limpieza.
CUIDADO Y LIMPIEZA: Limpieza de la Placa de Cocción de Vidrio / Luz Del Horno 20 Limpieza de la Placa de Cocción de Vidrio (Continúa) Sellado de la estufa (en algunos modelos) Para limpiar el sellado de la estufa alrededor de los bordes de vidrio, coloque un paño húmedo sobre los mismos durante unos minutos y luego limpie con limpiadores no abrasivos.
Reemplazo de la bombilla del horno (en algunos modelos) Para quitar la tapa: 1. Dé a la tapa de vidrio un cuarto de giro en contra de las agujas del reloj hasta que las lengüetas de la tapa de vidrio limpien las ranuras de la ficha. Si usa guantes de látex tendrá un mejor agarre. 2. Retire la lámpara girando la misma en dirección contraria a las agujas del reloj. Para volver a colocar la tapa: 1. Reemplace la lámpara por una para electrodoméstico de 40 ZDWWV ,QVHUWH OD OiPSDUD \ JLUH OD PLVPD HQ GLUHFFLyQ
CUIDADO Y LIMPIEZA: Cajón de Almacenamiento Extraíble Cajón de Almacenamiento Extraíble El cajón de almacenamiento es un buen lugar para guardar utensilios de cocina y panadería. No guarde plásticos ni materiales inflamables en el cajón. El cajón de almacenamiento se podrá retirar para limpiar debajo de la cocina. Limpie el cajón de almacenamiento con una tela o esponja húmeda. Nunca use abrasivos duros ni almohadillas para fregar.
¡Ahorre tiempo y dinero! Primero revise los cuadros que aparecen en las siguientes páginas y es posible que no necesite solicitar reparaciones. Problema Causa Posible Qué Hacer Las unidades de superficie no mantienen un hervor constante o la cocción es lenta Se están utilizando recipientes de cocción inadecuados. 8VH UHFLSLHQWHV GH EDVH SODQD \ TXH VH DMXVWHQ DO GLiPHWUR GH la unidad de superficie elegida. En algunas regiones la energía (voltaje) puede ser baja.
CONSEJOS PARA LA SOLUCIÓN DE PROBLEMAS 24 Consejos para la Solución de Problemas... Antes de solicitar el servicio técnico Problema Causa Posible Qué Hacer La temperatura del horno es demasiado caliente o demasiado fría La temperatura del horno debe ser ajustada. Consulte la sección Funciones Especiales. El horno no funciona o parece no funcionar Es posible que un fusible de su hogar se haya quemado o que el disyuntor se haya desconectado. Reemplace el fusible o reinicie el disyuntor.
Problema Causa Posible Qué Hacer La pantalla queda en blanco Es posible que un fusible de su hogar se haya quemado o que el disyuntor se haya desconectado. Reemplace el fusible o reinicie el disyuntor. El reloj está apagado. Consulte la sección Funciones Especiales. Corte de corriente, el reloj titila Corte o exceso de corriente Reinicie el reloj.
GARANTÍA LIMITADA Garantía limitada de la cocina eléctrica GE Appliances GEAppliances.com Todo el servicio de garantía es provisto por nuestros Centros de Servicio de Fabricación, o un técnico autorizado de Customer Care®. Para programar una visita del servicio técnico a través de Internet, visítenos en GEAppliances.com/service, o llame a GE Appliances al 800.GE.CARES. Cuando llame para solicitar el servicio, tenga los números de serie y modelo disponibles.
¿Busca Algo Más? ¡GE Appliances ofrece una variedad de accesorios para mejorar sus experiencias de cocción y mantenimiento! Para acceder a números telefónicos e información de sitios Web, consulte la página de Soporte para el Consumidor.
SOPORTE PARA EL CONSUMIDOR Soporte para el Consumidor Sitio Web de GE Appliances ¿Desea realizar una consulta o necesita ayuda con su electrodoméstico? ¡Intente a través del Sitio Web de GE Appliances las KRUDV GHO GtD FXDOTXLHU GtD GHO DxR 8VWHG WDPELpQ SXHGH FRPSUDU PiV HOHFWURGRPpVWLFRV PDUDYLOORVRV GH *( $SSOLDQFHV \ aprovechar todos nuestros servicios de soporte a través de Internet, diseñados para su conveniencia. (Q (( 88 GEAppliances.