www. GEAppliances.com Safety Information .......... 3 Operating/Care and Cleaning Instructions Charcoal Filters .............. Grease Filters ................ 5 4 iV5 55 Hood Lights ................ Hood Surfaces ............... Stainless Steel Surfaces ........ Vent Controls ............... 5 5 5 4 JV565 JV536 JV566 JV655 J17636 Installation Customer Instructions ...6-14 J17666 Service Product Registration Consumer Support... VVarrantv .................. 3q!665 ..........
GE& You,A Service Partnership. ,0 IMPORTANT! Fill out the Consumer Product Registration Card. Two easy ways to register your appliance/. Through Complete the internet and mail at _v.geappliances.com the enclosed Product Registration Card FORYOURRECORDS Write the model and serial numbers here: ,0 # # You can find them on a label on the back wall oI the hood. Staple sales slip or cancelled check here. Proof date is needed of the original imrchase to obtain service m_(ler the warranty.
IMPORTANTSAFETYINFORMATION. READALLINSTRUCTIONSBEFOREUSING. SAFETY PRECAUtiONS WARNING - To REDUCETHERISKOF FIRE,ELECTRIC SHOCKORINJURY TOPERSONS, OBSERVETHEFOLLOWING: A. Use this unit only in the rammer intended b) the manufacturer. If )ou have questions, contact the manufl_ctmer. B. Be%re servicing or cleaning unit, switch power off at service panel and lock the service disconnecting means to pre_nt power flom being switched on accidentally.
Usingthe hood controls. Throughout this manual, features and appearance may vary from your model. _!i_ i )i_i_i:_i_i_i_i_i_i_i_i_i_i_i_i_i_i _!ii_i_ _(_!_i I Yourmodel will have one of the above type of controls. 0 FAN Control Turn or press speed control LIGHT Control Turn or press (according to your model) the LIGHTcontrol to BRIGHTtor bright light while cooking. Ttu'n or press to NITEfln" use as a night light. (according to your model) the FAN to LO, MED, HI or BOOST, as needed. Cont.
Charcoal Filters (onsomemodels) The charcOai filters cannotbe The cnarcoal filters are chooed inside of each reusable metal grease filter If the model The charcoal is not cleaned. They vented to the outside, mustbe replaced, For 3O hOod mOdels, Order air will be recirculated thr°ugh disl_°sable For36 hOM models, Order Kit no. wBO2Xl07Oa, remme odors. the tilt.-s th.thelp depending usage).
RangeHood Models JV535 JV635 JV536 JV636 JV565 JV665 JV566 JV666 Ilnstallation nstruct,ons Questions?visitour_vVebsite at: www.geappliances.com orCarlGEAnswer Center at 800.626.2000 [ BEFORE YOU BEGIN DUCTWORK Read NOTE: these instructions completely • IMPORTANT instHwtions fi)r local - S.,ethese inspector's • IMPORTANT governing • use. - Obse,,e.ll ordinances. Note to Installer - Be sure to leave instHwtions with the Consmner. • Note codes mad carefully.
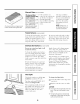
Installation Follow the guidelines DUCTING fin" proper duct sizing in the ducting CHARTmJV5 Instructions charts. Series Models EquivalentLengthin Feet 0 25 50 75 100 125 150 250 Z L.L- 200 7" Round E o 150 31//' x 10" Rectangular 100 3¼" x 10" RectangularTransitionto 6" Round= 4£ ft. 7" Round90° Elbow= 8 ft. 7" RoofCap= 30 ft. DUCTING CHARTmJV6 Series Models EquivalentLengthin Feet 0 25 50 75 100 125 4OO 350 Z 7" Round L.
Installation WORKSHEET--CALCULATE DUCT PIECES Instructions TOTAL EQUIVALENT EQUIVALENT NUMBER LENGTH x USED = TOTAL 3¼"x 10" Rect., straight 1Ft. x ( 7" Round, straight 1Ft. 6" Round, straight 1Ft. O 3¼"x 10" Rect.90° elbow 8.5Ft. x ( ) = Ft. O 3¼"x 10" Rect.45° elbow 7Ft. x ( ) = Ft. 3¼"x 10" Rect.90° flat elbow 24 Ft. x ( ) = Ft. 3¼"x 10" Rect. wall cap with damper 45 Ft. (7ft. w/o damper) x ( ) = Ft. x ( ) = Ft. 3¼"x 10" Rect.to 6" round transition 4.5Ft.
Installation Instructions TOOLS YOU WILL NEED DAMAGE---SHIPMENT/INSTALLATION • If the unit store is dmnaged in which • If the unit is dmnaged replacement • If the tile in shipment, it was bought is tile customer), must customer to tile or Flatbladeand Phillips screwdrivers customer; (if other or replacement between unit repair of tile by the installer repair tile or replacement.
Installation Instructions [] CHOOSE VENT OPTION The outside requires will use. _ent exhaust will determine option the hood that Outside exhaust " x 10" (Horizontalrearduct_31A Rectangular) yore" installation knockouts that you If the hood is to be hlstaJled in a recirculath_g, nonvented ductless rammer, do not knock out any vent opelfings in the hood. Only ml electrical access hole will be knocked out of the hood. NOTE: Only,IV5 Series models may be recirculated.
Installation [] REMOVE EXHAUST I),emo_e tile the hood. 7" round Set ADAPTOR exhaust it aside along Instructions adaptor with fl'om the its m o/mting [] REMOVE OTHER EXHAUST ADAPTOR top ot ReI/love screws. from tile inside mounting Inodel, lett [] REMOVE ReIllOve tile FILTERS shipping tape holding filters ill place. Pull down on tile tile filters out. Set theln aside. tile filter metal tabs 3¼" tile x 10" rectaaagulaJr hood.
Installation [] REMOVE Instructions [] DUCT KNOCKOUT(S) FOR 31/4" X 10" RECTANGULAR DUCTED DISCHARGE INSTALLATIONS ONLY: If recirctdath_g, non-vented ductless (Ol_tional for ,IV5 Series models only), see uote below and skip to Step 12 D and proceed. We do not recommend the recirculated configuration for JV6 Series models. Mtach exhaust adaptor/da_aper over knockout opening with two exhaust adaptor screws. Make sure damper pivot is nearest to top/back edge of hood. Remove tape ti'om damper flap.
Installation [] MARK HOLES Select the xent option that _our installation require and proceed to that section: A.Outside top (Vertical Instructions D.Recirculating (non-vented ductless-Available on JV5 Series models only) will • Use the hood as a template and mark rite locations on the cabinet for the electrical wiring and keyhole screw slots.
Installation [] Instructions [] SECURE HOOD CONNECT WIRING Connect house black to hood black wire, house white to hood white wire, and house grotmd trader green ground screw. Securely tighten the strain relief clamp onto the house wiring. Slide the hood back against the wall. Tighten the mounting screws. Be sure the screw heads are in the narrow neck of the keyhole slot. ir0und screw (4) Keyhole(4) NOTE: DO NOT PUSH ON E__N BI,ADE.
GERange Hood Warranty. All warranty service provided by our Factory Service Centers or an authorized Customer Care® technician. For service, call 800.GE.CARES. GE Will Replace: One Ybar From the date of the original purchase Service trips to your Anypattof the range hood which tifils due to a (leiect in materials or workananship.
ConsumerSupport. gEAppliancesWebsite www.GEAppliances.co Have a question or need assistance with your appliance? Try the GE Appliances _,Vebsite 24 hom_ a (la_; any day of the year! For greater convenience and faster se_Mce, you can now download Owner's Manuals, order parts, catalogs, or even schedule service onqine. You can also "_sk Our Team of Experts ..... yo/tI" questions, and so tIl/tch tilOl'e,,, ScheduleService Expert (;E repair your comenience business hom_. www.GEAppliances.