Range Hoods Vented GEAppliances.com Printed in Mexico Safety Information . . . . . . . . 2, 3 Operating/Care and Cleaning Instructions Charcoal Filters . . . . . . . . . . . . . . . . . . Grease Filters . . . . . . . . . . . . . . . . . . . . Hood Lights . . . . . . . . . . . . . . . . . . . . . . Hood Surfaces . . . . . . . . . . . . . . . . . . . Stainless Steel Surfaces . . . . . . . . . . Vent Controls . . . . . . . . . . . . . . . . . . . . 5 4 5 5 5 4 Installation Instructions . . .
IMPORTANT SAFETY INFORMATION. READ ALL INSTRUCTIONS BEFORE USING. SAFETY PRECAUTIONS WARNING – TO REDUCE THE RISK OF FIRE, ELECTRIC SHOCK OR INJURY TO PERSONS, OBSERVE THE FOLLOWING: A. Use this unit only in the manner intended by the manufacturer. If you have questions, contact the manufacturer. B. Before servicing or cleaning unit, switch power off at service panel and lock the service disconnecting means to prevent power from being switched on accidentally.
INSTRUCTIONS DE SÉCURITÉ IMPORTANTES. LISEZ TOUTES LES INSTRUCTIONS AVANT D’UTILISER. GEAppliances.com PRÉCAUTIONS EN MATIÈRE DE SÉCURITÉ AVERTISSEMENT – POUR RÉDUIRE AVERTISSEMENT – RÉDUISEZ LE RISQUE D’INCENDIE, DE SECOUSSE ÉLECTRIQUE OU DE BLESSURE CORPORELLE, OBSERVEZ LES PRÉCAUTIONS SUIVANTES : A. N’utilisez cet appareil que de la manière prévue par le fabricant. Si vous avez des questions, appelez le fabricant. B.
Using the hood controls. Throughout this manual, features and appearance may vary from your model. Rocker Switch Controls (on some models) Control Knobs (on some models) OFF OFF LO MED MAX HI HI NITE FAN HI HI OFF OFF LOW LIGHT FAN NITE LIGHT FAN Control FAN Control Turn to LO, MED, HI or MAX as needed. Continuous use of the fan system while cooking helps keep the kitchen comfortable and less humid. It also reduces cooking odors and soiling moisture that create a frequent need for cleaning.
Care and cleaning of the vent hood. GEAppliances.com Charcoal Filters (on some models) The charcoal filters are clipped inside of each reusable metal grease filter. The charcoal filters cannot be cleaned. They must be replaced. For 30 ” hood models, order Kit no. WB02X10707. For 36 ” hood models, order Kit no. WB02X10708 . These kits can be ordered from your GE supplier. NOTE: Charcoal filters are not included with the hood. They must be ordered from your GE supplier.
Installation Instructions Range Hood Questions? Call 800.GE.CARES (800.432.2737) RU 9LVLW RXU :HEVLWH DW GEAppliances.com DUCTWORK REQUIREMENTS BEFORE YOU BEGIN NOTE: Read the ductwork sections only if you do not have H[LVWLQJ GXFWZRUN ,I \RX KDYH H[LVWLQJ GXFWZRUN VNLS WR WKH “Damage” section and proceed. Read these instructions completely and carefully. IMPORTANT – Save these instructions for WARNING – local inspector’s use.
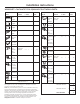
Installation Instructions :25.6+((7³&$/&8/$7( 727$/ (48,9$/(17 '8&7:25. /(1*7+ DUCT PIECES EQUIVALENT NUMBER LENGTH x USED 31ø4” [ ” Rect., straight )W [ DUCT PIECES = TOTAL [ 6” 5RXQG )W straight [ 31ø4” [ ” Rect. 90° elbow )W [ )W 31ø4” [ ” Rect. 45° elbow )W [ )W 31ø4” [ ” Rect. 90° flat elbow )W [ )W 31ø4” [ ” Rect. wall cap with damper )W (18 ft.
Installation Instructions TOOLS YOU WILL NEED '$0$*(³6+,30(17 ,167$//$7,21 ,I WKH XQLW LV GDPDJHG LQ VKLSPHQW UHWXUQ WKH XQLW WR WKH store in which it was bought for repair or replacement. ,I WKH XQLW LV GDPDJHG E\ WKH FXVWRPHU UHSDLU RU replacement is the responsibility of the customer. ,I WKH XQLW LV GDPDJHG E\ WKH LQVWDOOHU LI RWKHU WKDQ the customer), repair or replacement must be made by arrangement between customer and installer.
Installation Instructions 1 CHOOSE VENT OPTION NOTE: Only JV5 Series models may be recirculated. The JV6 Series models cannot be recirculated. IMPORTANT: If the hood is to be installed in a recirculating, non-vented ductless manner, do not knock out any vent openings in the hood. Only an electrical access hole will be knocked out of the hood. Determine the vent option that your installation will require IURP WKH IROORZLQJ FKRLFHV 7KH RXWVLGH YHQW H[KDXVW RSWLRQ WKDW \RXU LQVWDOODWLRQ requires will determ
Installation Instructions 2 REMOVE EXHAUST ADAPTOR 4 REMOVE WIRING COVER FROM THE JUNCTION BOX 5HPRYH WKH ” URXQG H[KDXVW DGDSWRU IURP WKH WRS RI the hood. Set it aside along with its mounting screws. NOTE: Save the screws for 3-1/4” [ ” rectangular ducted installation, if that is your chosen venting option. Remove the wiring cover from inside the hood. Set the cover and its mounting screw aside.
Installation Instructions FOR 31ø4” x 10” RECTANGULAR 6 REMOVE DUCT KNOCKOUT(S) DUCTED DISCHARGE INSTALLATIONS ONLY: If recirculating, non-vented ductless (optional for JV5 Series models only), see note below and skip to Step 9 D and proceed. The JV6 Series models cannot be recirculated. Using a flat blade screwdriver, remove the appropriate duct knockout(s) from the top or back of the hood. 31ø4” x 10” Rectangular vertical discharge. Remove top rectangular duct knockout only.
Installation Instructions D. Recirculating (non-vented ductless– Available on JV5 Series models only) 9 MARK HOLES Select the vent option that your installation will require DQG SURFHHG WR WKDW VHFWLRQ 8VH WKH KRRG DV D WHPSODWH DQG PDUN WKH ORFDWLRQV on the cabinet for the electrical wiring and keyhole screw slots. 6LQFH WKH KRRG LV WR EH UHFLUFXODWHG QRW WR EH YHQWHG outside), do not cut out any vent openings in the wall or cabinet bottom. A.
Installation Instructions 13 RUN WIRES 11 FOR RECESSED-BOTTOM CABINETS Run the electrical wires through the wall or cabinet according to National Electrical Code and applicable local codes. NOTE: DO NOT turn the power on until installation is complete. ONLY 14 SCREW IN PARTWAY Wood shims Drive a mounting screw (from the hardware packet) partway into each center of the narrow neck of the keyhole slots marked on the cabinet bottom.
Installation Instructions 20 CONNECT WIRING CONNECT DUCTWORK Connect house black to hood black wire, house white to hood white wire, and house ground to hood green/ yellow wire. Securely tighten the strain relief clamp onto the house wiring. TO HOOD Use duct tape to make joints secure and air tight. Duct tape 18 INSTALL LIGHT BULBS 21 REPLACE WIRING COVER 3XUFKDVH DQG LQVWDOO WZR 3$5 : PD[LPXP halogen bulbs. Light bulbs are not included with the hood. Replace the wiring cover.
Before you call for service… Troubleshooting Tips Save time and money! Review the following chart first and you may not need to call for service. Problem Possible Causes What To Do Fan does not operate when the switch is on A fuse may be blown or a circuit breaker may be tripped. 5HSODFH IXVH RU UHVHW FLUFXLW EUHDNHU Fan fails to circulate air or moves air more slowly than normal Excessively soiled filter. :DVK DQG UHSODFH WKH ILOWHUV 6HH WKH Reusable Metal Grease Filters section.
Notes.
Notes.
Notes.
GE Range Hood Warranty. All warranty service provided by our Factory Service Centers, or an authorized Customer Care® technician. To schedule service on-line, visit us at GEAppliances.com, or call 800.GE.CARES (800.432.2737). Please have serial number and model number available when calling for service. Staple your receipt here. Proof of the original purchase date is needed to obtain service under the warranty.
Consumer Support. GE Appliances Website GEAppliances.com Have a question or need assistance with your appliance? Try the GE Appliances Website 24 hours a day, any day of the year! For greater convenience and faster service, you can now download Owner’s Manuals, order parts or even schedule service on-line. Schedule Service GEAppliances.com ([SHUW *( UHSDLU VHUYLFH LV RQO\ RQH VWHS DZD\ IURP \RXU GRRU *HW RQ OLQH DQG VFKHGXOH \RXU VHUYLFH DW \RXU FRQYHQLHQFH DQ\ GD\ RI WKH \HDU 2U FDOO *( &$5(6
con ventilación Campanas de estufas GEAppliances.com Impreso en México Información de seguridad. . . 2 Instrucciones de operación / Cuidado y limpieza Controles de ventilación . . . . . . . . . . Filtros de carbón . . . . . . . . . . . . . . . . . Filtros para la grasa . . . . . . . . . . . . . . Luces de la campana . . . . . . . . . . . . Superficies de acero inoxidable . . . . . . . . . . . . . . . . . Superficies de la campana . . . . . . . 3 4 3 4 4 4 Instrucciones de instalación. . . . . . . . .
INSTRUCCIONES DE SEGURIDAD IMPORTANTES. LEA TODAS LAS INSTRUCCIONES ANTES DE USAR. PRECAUCIONES DE SEGURIDAD ADVERTENCIA – PARA REDUCIR ADVERTENCIA – PARA REDUCIR EL RIESGO DE INCENDIOS, DESCARGAS ELÉCTRICAS EL RIESGO DE UN FUEGO DE GRASA DE ESTUFA: O LESIONES PERSONALES, OBSERVE LO SIGUIENTE: A. Use este unidad solamente de la manera que el fabricante lo indique. Si usted tiene preguntas, póngase en contacto con el fabricante. B.
Uso de los controles de la campana. GEAppliances.com A lo largo de este manual, las funciones y el aspecto pueden ser diferentes a los de su modelo. Controles interruptores de presión (en algunos modelos) Perillas de control (en algunos modelos) OFF OFF LO MED MAX HI HI NITE FAN HI HI OFF OFF LOW LIGHT FAN NITE LIGHT Control del VENTILADOR Control del VENTILADOR Gire a LO (bajo), MED (medio), HI (alto) o MAX (máximo) sea necesario.
Cuidado y limpieza de la campana de ventilación. Filtros de carbón (en algunos modelos) Los filtros de carbón están unidos al interior de cada filtro metálico para la grasa. Los filtros de carbón no se pueden limpiar, sino que se deben reemplazar. Para los modelos de campana de 30 ,ļ ordene el kit No. WB02X10707 . Para los modelos de campana de 36,ļ ordene el kit No. WB02X10708. Estos kits se pueden ordenar a través de su proveedor GE. NOTA: Los filtros de carbón no están incluidos con la campana.
Instrucciones de instalación Campana para estufa Preguntas? Llame al 800.GE.CARES (800.432.2737) o Visite nuestro sitio Web: GEAppliances.com ANTES DE EMPEZAR El sistema de ventilación debe tener salida al exterior. Esta campana se puede ventilar verticalmente a través de los gabinetes superiores u horizontalmente a través de una pared exterior. La instalación de los ductos no está incluida.
Instrucciones de instalación +2-$ '( 75$%$-2³CALCULE LA LONGITUD TOTAL EQUIVALENTE DEL DUCTO PIEZAS DEL DUCTO LONGITUD EQUIV. NÚMERO x USADO = TOTAL Rectangular, 1 pie recta de 31ø4” x 10” x ( = Circular, recta de 7” 1 pie x ( Circular, recta de 6” 1 pie ) ) = PIEZAS DEL DUCTO pies ) = pies Codo de 90° 14 pies rectangular de 31ø4” x 10” x ( ) = pies Codo de 45° 8 pies rectangular de 31ø4” x 10” x ( ) = pies Codo plano de 33 pies 90° rect.
Instrucciones de instalación HERRAMIENTAS QUE NECESITA '$³26³(19ËO/INSTALACIÓN Si la unidad se daña en el envío, devuelva la unidad a la tienda donde se compró para reparación o cambio. Si el cliente daña la unidad, la reparación o el cambio es responsabilidad del ciente. Si el instalador daña la unidad (alguien diferente al cliente), la reparación o el cambio se debe hacer en un arreglo entre el cliente y el instalador. ESPACIO PARA INSTALACIÓN 30” ó 36” Mín.
Instrucciones de instalación 1 SELECCIONE LA OPCIÓN DE VENTILACIÓN NOTA: Únicamente los modelos de la serie JV5 pueden ser recirculados. Los modelos de la serie JV6 no pueden ser recirculados. IMPORTANTE: Si la campana se va a instalar de forma recirculante, sin ductos, sin ventilación, no perfore ninguna abertura de ventilación en la campana. Únicamente un orificio de acceso eléctrico se requiere en la campana.
Instrucciones de instalación 2 RETIRE EL ADAPTADOR DEL ESCAPE 4 RETIRE LA TAPA DEL CABLEADO DE Retire el adaptador del escape circular de 7” de la parte superior de la campana. Colóquelo a un lado junto con los tornillos correspondientes. NOTA: Guarde los tornillos para la instalación del ducto rectangular de 3-1/4” x 10” si esa es su opción de ventilación seleccionada. LA CAJA DE EMPALME Retire la tapa del cableado del interior de la campana. Coloque la tapa y el tornillo de montaje a un lado.
Instrucciones de instalación PARA INSTALACIONES DE SALIDA 6 DESTAPE LOS ORIFICIOS CIEGOS RECTANGULAR CON DUCTO DE 31ø4” x 10” ÚNICAMENTE: DEL DUCTO Para un sistema recirculante, sin ducto y sin escape (opcional para los modelos de la serie JV5, únicamente), vea la nota más abajo y siga con el paso 9 D. Los modelos de la serie JV6 no pueden ser recirculantes.
Instrucciones de instalación D. Recirculante (sin ducto y sin escape– disponibles en los modelos de la serie JV5 únicamente) 9 MARQUE LOS ORIFICIOS Seleccione la opción de ventilación que su instalación requiere y siga con esa sección: 8VH HO GLDJUDPD R OD FDPSDQD FRPR XQD SODQWLOOD \ marque la localización en el gabinete para el cableado eléctrico y las ranuras del tornillo de bocallave.
Instrucciones de instalación 13 CORRA LOS CABLES 11 PARA GABINETES CON MUESCA Corra los cables eléctricos a través de la pared o gabinete de acuerdo al Código Eléctrico Nacional y los códigos locales correspondientes. NOTA: NO conecte el suministro eléctrico hasta que la instalación esté completa.
Instrucciones de instalación 20 CONECTE EL CABLEADO CONECTE EL DUCTO Conecte el cable negro de la casa al cable negro de la campana, el cable blanco de la casa al cable blanco de la campana y el cable a tierra de la casa al cable verde/amarillo de la campana. Firmemente apriete la abrazadera de liberación de presión en el cableado de la casa. A LA CAMPANA Use cinta para ductos para asegurar los empalmes y la hermeticidad.
Antes de llamar a solicitar servicio… GEAppliances.com Consejos para la solución de problemas ¡Ahorre tiempo y dinero! Revise la siguiente tabla primero y quizás no necesite llamar a solicitar servicio. Problema Posibles Causas Qué hacer El ventilador no opera cuando el interruptor se enciende Quizás se haya quemado un fusible o se haya saltado el interruptor de circuitos. 5HHPSODFH HO IXVLEOH R UHLQLFLDOLFH HO LQWHUUXSWRU de circuitos.
Garantía de GE para su campana para ventilación de estufa. Todos los servicios de garantía los proporcionan nuestros Centros de Reparación de Fábrica o nuestros técnicos Customer Care® autorizados. Para concertar una cita de reparación en línea, visítenos en GEAppliances.com, o llame al 800.GE.CARES (800.432.2737). Cuando llame para solicitar servicio, por favor tenga a mano el número de serie y el número de modelo. Pegue aquí su recibo.
Soporte al Consumidor. Página Web de GE Appliances GEAppliances.com ¿Tiene alguna pregunta sobre su electrodoméstico? ¡Pruebe la página Web de GE Appliances 24 horas al día, cualquier día del año! Para mayor conveniencia y servicio más rápido, ya puede descargar los Manuales de los Propietarios, pedir piezas o incluso hacer una cita en línea para que vengan a realizar una reparación. Solicite una reparación GEAppliances.com El servicio de expertos GE está a tan sólo un paso de su puerta.