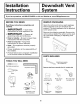
www.GEAppliances.com Safety Ins_u_ions ....... 2, 3, 7 OperatingI_ C_king Tips ................ Raise/Dower Switch ........... Using tile Cookmp Using tile Downdr_t T ........... System Advance JVB37 4 JVB67 ...4 Care and Cleaning Grease Filters ................ Painted or Metal Surfaces ...... Stainless Steel Surfaces ........ Insta//ation 5 4 5 5 5 Instructions Planning .......... 8, 9 Belbre You Begin ............. 6 30" Cookmp/Downdr_t UnitJVB37 .................
IMPORTANTSAFETYINFORMATION. READALLINSTRUCTIONSBEFOREUSING. PLEASENOTE: The downdraft vent system you have purchased was designed to be used with GE, GE Profile and GE Profile Performance cooktops listed in this manual A WARNING! For your safety, the information in this manual must be followed to minimize the risk of fire or explosion, electric shock, or to prevent property damage, personal injury, or loss of life. A WARNING:TOREDUCETHERISKOFFIRE, ELECTRIC SHOCK,ORINJURYTOPERSONS, OBSERVETHEFOLLOWING: A.
ww_.GEAppliances.com i SAFETYPRECAUTIONS WARNING! To REB.CE T.E RISK OE ,4,N..RY TOERSONS INT.E EVENT OE ,4 RANGE TOP GRE,4SEF/RE, OBSERVE THE FOLLOW/NG:* A. SMOTHER FLAMES with a close-fitting lid, cookie sheet, or metal tray, then turn offthe burnm: BE _FUL TO PREVENT BURNS. If the flanaes do not go out immediately, EVACULATE ,aND C_LL THE FIRE DEPARTMENT. B. NEVER PICK UP A FLAMING PAN be burned. CAUTION:For ge,eralve,tilati, guse onl_ Donot useto exhausthazardous or explosivematerials and vapors.
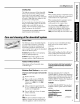
Usingthe downdraft system. Raise/Lower Switch (30" models only) Turn tile downdraft blower ON by pressing tile raise/lower switch located at the top right of the vent. Place your finger on tile "center" of the switch and hold until you observe the vent moving, then release. The air vent will rise. Use the selector switch NOTE:Formostconvenientoperation,set the blowerto thespeedyouusemostoften.The blowerwill comeon to thisspeedwhenever theunitis raised.
ww_.GEAppliances.com Cooking Tips The high air movement of this downdra/'t system can increase the cooking times for some fbods. It may take longer m reach high cooking temperatures if tile downdra/'t is turned to high right away. Adjust tile fan speed for best cooking resuhs. For best results when heating oil for deep fining or when boiling water, use tile front surface units or ,a_t until the water is boiling or tile oil is at frying temperatures before turning on the downd_t.
Downdraft System Installation Instructions I If you have questions, call 800.GE.CARES or visit our Website BEFORE YOU BEGIN Read these carefully. instructions and for local • IMPORTANT governing codes inspector's PACKAGING Open the carton and remove parts package. Check contents to be sure all pieces are present. (The parts package may be attached to the power cord.) • IMPORTANT - Savethese instructions at: www.GEAppliances.com REMOVE completely Vent use. Remove the shipping materials.
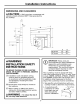
Installation DIMENSIONS Instructions AND CLEARANCES / CAUTION cabinets should any cooktop. -Wall withstand coverings, countertops 200°F. heat generated j _B and by A j_ _ 27 r" . 7V8'c 101/2 ,, &WARNING! INSTALLATION SAFETY INSTRUCTIONS Installation work and electric wiring must be done by qualified person(s) in accordance with all applicable codes and standards, including fire-rated construction. [] Ducted fans must the outdoors.
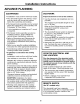
Installation Instructions ADVANCE PLANNING CLEARANCES • Installation must DUCTWORK conform with local codes. Prepare • The downdraft system with blower, motor and duct work will occupy the cabinet below the countertop and cooktop. a transition and Clearances • Ductwork for • If cabinetry surface: must Use cabinets Maintain conform no more with than 30" minimum local cooktop and unprotected above cooktop. codes.
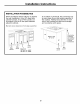
Installation INSTALLATION Instructions POSSIBILITIES When the kitchen design calls for an against the wall installation, move 24" deep base cabinet forward, 3" to 5'.' Filler panels can be angled or flat to fill the space between adjacent cabinets. Maintain cutout clearances In an island or peninsula, the countertop can be extra deep to provide seating opposite of the cooktop. Adding base cabinets on each side of the cooktop provides extra storage and countertop work space.
Installation Instructions INSTALLING THE DOWNDRAFT VENT SYSTEM 30" COOKTOP/DOWNDRAFT UNIT JVB37 NOTE: Before you begin, measure and mark Dimension 3 to ensure that adequate flat countertop surface is available. Identify the cutout illustration model you are installing with vent system. for the cooktop this downdraft • Draw lines on the countertop as a cutting guide. to follow J • Make sure sides of the opening are parallel and rear and front cuts are exactly perpendicular (right angle) to sides.
Installation Instructions 36" COOKTOP/DOWNDRAFT UNIT JVB67 NOTE: Before you begin, measure and mark Dimension 3 to ensure that adequate flat countertop surface is available. Identify the cutout illustration model you are installing with vent system. for the cooktop this downdraft • Draw lines on the countertop as a cutting guide. to follow J • Make sure sides of the opening are parallel and rear and front cuts are exactly perpendicular to sides. |l_J]ll_l,l.l|_H I |l_l_.l [] [] Model No.
Installation Instructions INSTALLING THE DOWNDRAFT POWER SUPPLY This downdraft vent must be supplied with 120V, 60Hz., and connected to an individual, properly grounded branch circuit, protected by a 15 or 20 ampere circuit breaker or time delay fuse. Gas Cooktops If this vent is installed in combination gas cooktop, it may operate duplex outlet. Electric Cooktops If this vent is installed from in combination electric cooktop, the vent must a separate 120V outlet.
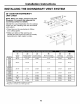
Installation DUCTWORK NOTE: Instructions LENGTH AND DUCT FITTINGS Do not exceed 150 foot maximum permissible equivalent lengths! Flexible ducting: If flexible metal ducting is used, all equivalent feet values in the table should be doubled. The flexible metal duct should be straight and smooth and extended as much as possible. (_DO NOT use flexible plastic Add equivalent lengths for all duct exceed the maximum 150 feet. im m I_]f_i i _ ducting.
Installation Instructions INSTALLING THE DOWNDRAFT VENTING OPTIONS Side-to-Side Adjustments VENT SYSTEM To Change [] The entire blower mounting plate can be adjusted 31/2" to the left or right. This will help to align vent discharge to house ductwork. Discharge Remove the 4 screws holding the blower to the mounting plate assembly. Retain screws. [] Loosen screws to adjust blower left to ri j_\ Remove the blower assembly, turn it over to access the 4 nuts holding the blower to the mounting plate.
Installation [] Instructions INSTALL THE DOWNDRAFT VENT [] INSTALL THE DUCTWORK Use minimum 26" gauge galvanized or 24 gauge aluminum duct 31/4" x 10" or 6" round. PVC duct should be used if installing O Preferred method Secure the upper brackets with screws located on the side of case and attach to back of cabinet countertop [] [] [] cutout, concrete DO NOT USE flexible slab. ducting. Use the straightest duct run possible.
Installation Instructions INSTALLING THE DOWNDRAFT [] VENT SYSTEM [] INSTALL THE RAISE/LOWER SWITCH [] NOTE: Step 3 is for 36" models only. Skip this step if installing a 30" model. WARNING - Disconnect electrical power from the unit before beginning switch installation. Failure to do so could result in personal injury or damage to the electrical controls. NOTE: Determine Raise/Lower 68" long. the location switch.
Installation [] Instructions OPTIONAL CONNECT THE POWER Plug power cord into a properly receptacle. KITS JXRB67 optional accessory for indoor remote location of the blower/motor assembly. Use this kit when the blower and motor assembly will be located below the cabinet floor. grounded INSTALL THE COOKTOP • With the downdraft in the "down" place the cooktop into the cutout.
Before youcall for service... Troubleshooting tips Save time and money! Review the chart below first and you may not need to call for sen/ice, Possible Causes What To Do The vent • Press the Raise/Lower is not fully extended. The blower control switch may be in the 0FFposition. • Slide Vent not plugged • Plug vent into Raise/Lower switch engage llft motor, an outlet. did not Circuit breaker tripped.
GEDowndraft System Warranty. All warranty service provided by our Factory Service Centers, or an authorized Customer Care® technician. To schedule service, on-line, 24 hours a day, visit us at www.GEAppliances.com, or call 800.GE.CARES (800.432.2737). _'_ Staple your receipt here. Proof of the original purchase date is needed to obtain service under the warrant_ GE Will Replace: Any part of the downdraft system which fails due to a delect in materials or workmanship.
ConsumerSupport. GEAppliancesWebsite www.GEAppliances.com Have a question or need assistance with your appliance? Try the GE Appliances Website 24 hom.-s a day, any day of the year! For greater convenience and faster service, you can now download Owner's Manuals, order parts, catalogs, or even schedule service on-line. You can also "Ask Our Team of Experts''" your questions, and so much more... ScheduleService www.GEAppliances.com Expert GE repair service is only one step away fl'om your door.