MICROWAVE OVEN OWNER’S MANUAL SAFETY INFORMATION. . . . . . . . . .3 OPERATING INSTRUCTIONS Controls . . . . . . . . . . . . . . . . . . . . . . . . . . . . . .6 Features . . . . . . . . . . . . . . . . . . . . . . . . . . . . . .8 Power Levels . . . . . . . . . . . . . . . . . . . . . . . . . .8 Time Features . . . . . . . . . . . . . . . . . . . . . . . . .8 Convenience Features . . . . . . . . . . . . . . . . . 11 Other Features . . . . . . . . . . . . . . . . . . . . . . . 12 Microwave Terms . . . . .
THANK YOU FOR MAKING GE APPLIANCES A PART OF YOUR HOME. Whether you grew up with GE Appliances, or this is your first, we’re happy to have you in the family. We take pride in the craftsmanship, innovation and design that goes into every GE Appliances product, and we think you will too. Among other things, registration of your appliance ensures that we can deliver important product information and warranty details when you need them. Register your GE appliance now online.
READ ALL INSTRUCTIONS BEFORE USING THE APPLIANCE WARNING To reduce the risk of burns, electric shock, fire, injury to persons, or exposure to excessive microwave energy: When using electrical appliances, basic safety precautions should be followed, including the following: Ŷ 5HDG DOO LQVWUXFWLRQV EHIRUH XVLQJ WKLV DSSOLDQFH Ŷ 5 HDG DQG IROORZ WKH VSHFLILF SUHFDXWLRQV LQ WKH PRECAUTIONS TO AVOID POSSIBLE EXPOSURE TO EXCESSIVE MICROWAVE ENERGY section on page 5. Ŷ 8 VH WKLV DSSOLDQFH RQO\ IRU LWV L
SAFETY INFORMATION IMPORTANT SAFETY INSTRUCTIONS READ ALL INSTRUCTIONS BEFORE USING THE APPLIANCE WARNING Continued OPERATING CLEANING Ŷ ' R QRW RSHUDWH WKH RYHQ ZLWKRXW WKH WXUQWDEOH LQ place. The turntable must be unrestricted so it can turn. Ŷ .HHS WKH RYHQ IUHH IURP JUHDVH EXLOGXS Ŷ 0 DNH VXUH DOO FRRNZDUH XVHG LQ \RXU PLFURZDYH oven is suitable for microwaving.
READ ALL INSTRUCTIONS BEFORE USING THE APPLIANCE PRECAUTIONS TO AVOID POSSIBLE EXPOSURE TO EXCESSIVE MICROWAVE ENERGY (a) Do Not Attempt to operate this oven with the door open since open-door operation can result in harmful exposure to microwave energy. It is important not to defeat or tamper with the safety interlocks. (b) Do Not Place any object between the oven front face and the door or allow soil or cleaner residue to accumulate on sealing surfaces. (c) Do Not Operate the oven if it is damaged.
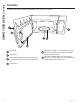
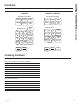
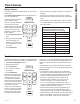
USING YOUR OVEN: Controls Controls Throughout this manual, features and appearance may vary from your model. Door Handle. Door Latches. Window with Metal Shield. Screen allows cooking to be viewed while keeping microwaves confined in the oven. Removable Turntable. Do not operate the oven in the microwave mode without the turntable and turntable support seated and in place. Removable Turntable Support.
You can microwave by time or with the sensor features. Not all features on all models.
USING YOUR OVEN Features Changing the Power Level The power level may be entered or changed immediately after entering the feature time for Cook Time, Time 'HIURVW $GG 6HF RU ([SUHVV &RRN 7KH SRZHU OHYHO may also be changed during the time countdown. 1. Press Cook Time. Power Level 2. Enter cooking or defrosting time 3. Press Power Level. Express Cook 4. Select desired power OHYHO 1 2 3 4 5 6 7 8 9 5. Press Start/Pause.
Weight Defrost The Defrost Weight/Time feature gives you two ways to defrost food. Remove meat from package and place on microwavesafe dish. Press Defrost Weight/Time once for weight defrost or twice for Time Defrost. Defrost Use Weight Defrost for meat, Weight/Time SRXOWU\ DQG ILVK XS WR pounds. Use Time Defrost for Express Cook most other frozen foods. • When the oven signals, turn the food over. Remove defrosted meat or shield warm areas with small pieces of foil.
USING YOUR OVEN Time Features Defrosting Guide )RRG 7LPH &RPPHQWV 1 min. 3 to 5 min. Rearrange after half of time. Breads, Cakes Bread, buns or rolls (1 piece) Sweet rolls (approx. 12 oz.) )LVK DQG 6HDIRRG )LOOHWV IUR]HQ OE Shellfish, small pieces (1 lb.) WR PLQ 5 to 7 min. Place block in casserole. Turn over and break up after first half of time. )UXLW 3ODVWLF SRXFK² RU R] SDFNDJH WR PLQ Meat Bacon (1 lb.) 2 to 5 min.
Popcorn Popcorn To use the Popcorn feature: Press Popcorn RQFH IRU RXQFH EDJ WZLFH IRU RXQFH EDJ RU WKUHH WLPHV IRU D RXQFH bag. &RRNLQJ VWDUWV LPPHGLDWHO\
USING YOUR OVEN: 2WKHU )HDWXUHV Other Features Cooking Complete Reminder 7R UHPLQG \RX WKDW \RX KDYH IRRG LQ WKH RYHQ WKH RYHQ ZLOO GLVSOD\ ³)RRG LV 5HDG\´ DQG EHHS once a minute until you either open the oven door or press Cancel/Off. Set Clock Set Clock To change the time of day: 1. Press Set Clock. (The microwave should not be running.) 2. Enter the appropriate time of day. Clock is on a 12-hour scale by default.
Vent Fan Vent Fan Surface Light 0 MuteHold 3 Sec The vent fan removes steam and other vapors from surface cooking. Surface Light Press Surface Light once for bright light, twice for the night light or a third time to turn the light off. Sound On/Off (JVM3162/JNM3163 only) 3UHVV DQG KROG ³ ´ IRU VHFRQGV WR VZLWFK WKH VRXQG RQ RU RII )DXOW EHHS VLJQDOV FDQQRW EH turned off. Automatic Fan An automatic fan feature protects the microwave from too much heat rising from the cooktop below it.
USING YOUR OVEN Microwave terms Arcing Arcing is the microwave term for sparks in the oven. Arcing is caused by: • the metal shelf being installed incorrectly and touching the microwave walls. • metal or foil touching the side of the oven. • foil that is not molded to food (upturned edges act like antennas). • metal such as twist-ties, poultry pins, goldrimmed dishes. • recycled paper towels containing small metal pieces. • the turntable ring support being installed incorrectly.
Helpful Hints An occasional thorough wiping with a solution of baking soda and water keeps the inside fresh. Be sure the power is off before cleaning any part of this oven. How to Clean the Inside Walls, Floor, Inside Window, Metal and Plastic Parts on the Door Some spatters can be removed with a paper towel; RWKHUV PD\ UHTXLUH D GDPS FORWK 5HPRYH JUHDV\ spatters with a sudsy cloth, then rinse with a damp cloth. Do not use abrasive cleaners or sharp utensils on oven walls.
Cooktop Light/Nite Light Replace with a 120 volt, 50 watt (max.) halogen bulb. See back cover for ordering online at GEAppliances.com. 1. To replace the cooktop light/nite light, first disconnect the power at the main fuse or circuit breaker panel, or pull the plug. 2. Remove the screw from the side of the light compartment cover and lower the cover until it stops. 3. Be sure the bulb is cool before removing. Break the adhesive seal by gently unscrewing the bulb. 4.
Charcoal Filter The charcoal filter cannot be cleaned. It must be replaced. See back cover for ordering online at GEAppliances.com. If the model is not vented to the outside, the air will be recirculated through a disposable charcoal filter that helps remove smoke and odors. The charcoal filter should be replaced when it is QRWLFHDEO\ GLUW\ RU GLVFRORUHG XVXDOO\ DIWHU WR months, depending on usage). See Optional Kits page 22, for more information. CHARCOAL FILTER REPLACEMENT 1.
TROUBLESHOOTING TIPS 18 Troubleshooting Tips Problem Possible Causes What To Do Oven will not start A fuse in your home may be blown or the circuit breaker tripped. • Replace fuse or reset circuit breaker. Power surge. • Unplug the microwave oven, then plug it back in. Plug not fully inserted into wall outlet. • Make sure the 3-prong plug on the oven is fully inserted into wall outlet. Door not securely closed. • Open the door and close securely.
Things That Are Normal With Your Microwave Oven Steam or vapor escaping from around the door. Light reflection around door or outer case. Dimming oven light and change in the blower sound at power levels other than high. Dull thumping sound while oven is operating. FCC Statement FEDERAL COMMUNICATIONS COMMISSION (U.S.A.) RADIO FREQUENCY INTERFERENCE STATEMENT 7KLV HTXLSPHQW JHQHUDWHV DQG XVHV ,60 IUHTXHQF\ energy and if not installed and used properly, that is in strict accordance with the manufa
LIMITED WARRANTY Microwave Oven Limited Warranty GEAppliances.com $OO ZDUUDQW\ VHUYLFH LV SURYLGHG E\ RXU )DFWRU\ 6HUYLFH &HQWHUV RU DQ DXWKRUL]HG VHUYLFH WHFKQLFLDQ 7R VFKHGXOH service online, visit us at GEAppliances.com/service RU FDOO *( &$5(6 GXULQJ QRUPDO EXVLQHVV KRXUV For the period of GE Appliances will replace One year )URP WKH GDWH of the original purchase Any part of the oven which fails due to a defect in materials or workmanship.
Filler Panel Kits JX36BSS – Stainless JX36BWW – White JX36BBB – Black JX36BES – Slate :KHQ UHSODFLQJ D ´ UDQJH KRRG ILOOHU SDQHO NLWV ILOO in the additional width to provide a custom built-in appearance. )RU LQVWDOODWLRQ EHWZHHQ FDELQHWV RQO\ QRW IRU HQG RI cabinet installation. Each kit contains two 3” wide filler panels. )LOOHU 3DQHO .LWV OPTIONAL KITS Optional Kits Recirculating Charcoal Filter Kit )LOWHU NLWV DUH XVHG ZKHQ WKH PLFURZDYH RYHQ FDQQRW EH vented to the outside.
CONSUMER SUPPORT Consumer Support GE Appliances Website +DYH D TXHVWLRQ RU QHHG DVVLVWDQFH ZLWK \RXU DSSOLDQFH" 7U\ WKH GE $SSOLDQFHV :HEVLWH KRXUV D GD\ DQ\ GD\ RI WKH \HDU You can also shop for more great GE Appliances products and take advantage of all our on-line support services designed for your convenience. GEAppliances.com Register Your Appliance 5HJLVWHU \RXU QHZ DSSOLDQFH RQ OLQH DW \RXU FRQYHQLHQFH 7LPHO\ SURGXFW UHJLVWUDWLRQ ZLOO DOORZ IRU HQKDQFHG FRPPXQLFDWLRQ DQG prompt service unde
HORNO MICROONDAS INFORMACIÓN DE SEGURIDAD . . . . . . .3 INSTRUCCIONES DE FUNCTIONAMIENTO MANUAL DEL PROPIETARIO JVM3160 JVM3162 JNM3163 Controles . . . . . . . . . . . . . . . . . . . . . . . . . . . . .6 Funciones del Horno . . . . . . . . . . . . . . . . . . .8 Funciones del Temporizador . . . . . . . . . . . .8 Funciones de convenientes . . . . . . . . . . . . 11 Otras Funciones . . . . . . . . . . . . . . . . . . . . . . 12 Términos del Microondas . . . . . . . . . . . . . . 16 CUIDADO Y LIMPIEZA .
GRACIAS POR HACER QUE GE APPLIANCES SEA PARTE DE SU HOGAR. Ya sea que haya crecido usando GE Appliances, o que ésta es su primera vez, nos complace tenerlo en la familia. Sentimos orgullo por el nivel de arte, innovación y diseño de cada uno de los electrodomésticos de GE Appliances, y creemos que usted también. Entre otras cosas, el registro de su electrodoméstico asegura que podamos entregarle información importante del producto y detalles de la garantía cuando los necesite.
INFORMACIÓN DE SEGURIDAD INFORMACIÓN IMPORTANTE DE SEGURIDAD LEA TODAS LAS INSTRUCCIONES ANTES DE USAR ADVERTENCIA Para reducir el riesgo de quemaduras, descargas eléctricas, incendio, lesiones o exposición a energía de microondas excesiva: Cuando utilice aparatos eléctricos, se deben seguir las precauciones de seguridad básicas, entre las que se incluyen las siguientes: PARA REDUCIR EL RIESGO DE INCENDIO DENTRO DEL Ŷ /HD WRGDV ODV LQVWUXFFLRQHV DQWHV GH XWLOL]DU HVWH DSDUDWR HORNO: Ŷ /HD \ VLJD ODV
INFORMACIÓN DE SEGURIDAD INFORMACIÓN IMPORTANTE DE SEGURIDAD LEA TODAS LAS INSTRUCCIONES ANTES DE USAR ADVERTENCIA USO LIMPIEZA Ŷ 1R XVH HO KRUQR VLQ HO SODWR JLUDWRULR HQ VX SRVLFLyQ (O plato giratorio no deberá tener restricciones, de modo que pueda girar. Ŷ 0DQWHQJD HO KRUQR OLEUH GH DFXPXODFLyQ GH JUDVD Ŷ $VHJ~UHVH GH TXH WRGRV ORV XWHQVLOLRV XVDGRV HQ HO KRUQR microondas sean para uso en el mismo.
INFORMACIÓN DE SEGURIDAD INFORMACIÓN IMPORTANTE DE SEGURIDAD LEA TODAS LAS INSTRUCCIONES ANTES DE USAR PRECAUCIONES PARA EVITAR LA POSIBLE EXPOSICIÓN A ENERGÍA DE MICROONDAS EXCESIVA (a) No intente hacer funcionar el horno con la compuerta abierta ya que ésto puede provocar exposición peligrosa a la energía de microondas. Es importante no forzar ni dañar los seguros.
USO DE LA HORNO Funciones Es posible que las funciones y apariencias varíen con relación a su modelo a lo largo del manual. 1. Tirador. 2. Enganches de puerta. 9HQWDQD FRQ HVFXGR PHWiOLFR /D YHQWDQD SHUPLWH YHU FRPR se cocinan los alimentos y evita que salgan microondas del horno. 5. Dispositivo giratorio extraíble No ponga en marcha el horno en el modo microondas sin que estén la base y el soporte de la base colocados en su lugar. 6. Soporte del plato giratorio extraíble.
Puede usar el horno microondas por tiempo o con funciones sensor. No todos los modelos cuentan con todas las funciones.
USO DE LA HORNO Funciones Cómo Modificar el Nivel de Potencia El nivel de potencia se podrá ingresar o modificar de forma LQPHGLDWD OXHJR GH LQJUHVDU HO WLHPSR SDUD 7LPH &RRN 7LHPSR GH &RFFLyQ 7LPH 'HIURVW 7LHPSR GH 'HVFRQJHODFLyQ $GG 6HF $JUHJDU 6HJXQGRV R ([SUHVV &RRN &RFFLyQ ([SUHVV El nivel de potencia también se puede modificar durante la cuenta regresiva. 1. Presione Cook Time &RFFLyQ SRU 7LHPSR 2. Ingrese el tiempo de cocción o descongelación. 3.
USO DE LA HORNO Funciones del temporizador Descongelación por Peso /D IXQFLyQ 'HIURVW :HLJKW 7LPH 'HVFRQJHODFLyQ SRU 3HVR 7LHPSR OH EULQGD GRV IRUPDV GH GHVFRQJHODU ODV FRPLGDV • Retire la carne del paquete y coloque la misma en el plato de cocción segura en el microondas. Presione Defrost Weight/Time (Descongelar por Peso/ Tiempo) una vez para descongelar por peso o dos veces para descongelar por tiempo • Cuando el horno dé la señal, dé vuelta la comida.
USO DE LA HORNO Funciones del temporizador Guía de Descongelación Comida Tiempo Comentarios Panes, Tortas 3DQHV EXxXHORV R SDQHFLOORV WUR]R PLQ 3DVWHOLWRV R] DSUR[ D PLQ 5HRUGHQH OXHJR GH OD PLWDG GHO WLHPSR Pescado y Mariscos /RPRV FRQJHODGRV OE 0DULVFRV WUR]RV SHTXHxRV OE &RORTXH HO EORTXH HQ OD FDFHUROD &RORTXH HO EORTXH HQ OD FDFHUROD Fruta %ROVD GH SOiVWLFR² R SDTXHWH GH R] D PLQ D PLQ D PLQ Carne 7RFLQR O
Palomitas de Maíz Popcorn 3DUD XVDU OD IXQFLyQ GH 3RSFRUQ 3DORPLWDV GH 0Dt] 3UHVLRQH HO ERWyQ 3RSFRUQ 3DORPLWDV GH 0Dt] XQD YH] para una bolsa de 2.0 onzas, dos veces para una bolsa de 2.5 onzas, o tres veces para una bolsa de 3.0 onzas. El horno empieza a funcionar inmediatamente. Puede modificar la selección durante los 30 segundos iniciales.
USO DE LA HORNO Otras funciones Recordatorio de Cocción Completa 3DUD UHFRUGDUOH TXH FRORFy FRPLGD HQ HO KRUQR HVWH ~OWLPR PRVWUDUi ³(QG´ )LQ \ HPLWLUi XQ SLWLGR XQD YH] SRU minuto hasta que abra el horno o presione el botón Cancel/ Off &DQFHODU $SDJDU Set Clock Reloj Para cambiar la hora del día. 3UHVLRQH HO ERWyQ 6HW &ORFN &RQILJXUDFLyQ GHO 5HORM (O KRUQR PLFURRQGDV QR GHEHUtD HVWDU HQ IXQFLRQDPLHQWR 2. Ingrese la hora del día correcta. El reloj está en una escala de 12 horas.
Ventilación Vent Fan Surface Light 0 MuteHold 3 Sec El ventilador de la ventilación elimina el vapor y otros vapores de la cocción superficial. 3UHVLRQH 9HQW )DQ 9HQWLODGRU XQD YH] SDUD DFWLYDU HO ventilador en velocidad alta, dos veces para activarlo en velocidad baja o tres veces para apagar el mismo. Luz Superficial 3UHVLRQH 6XUIDFH /LJKW /X] 6XSHUILFLDO XQD YH] SDUD DFWLYDU OD OX] EULOODQWH GRV YHFHV SDUD DFWLYDU OD OX] QRFWXUQD o una tercera vez para apagar la luz.
USO DE LA HORNO Términos del Microondas Arco Eléctrico Arco eléctrico es el término que se usa para definir la producción de chispas en el KRUQR PLFURRQGDV /RV DUFRV HOpFWULFRV VRQ producidos por: • Metal o papel de aluminio en contacto con el costado del horno. • Papel de aluminio no moldeado a la comida ORV H[WUHPRV GREODGRV DFW~DQ FRPR DQWHQDV • Metales, tales como precintos, pinchos de ave, o platos con rebordes dorados. • Toallas de papel reciclable que contengan pequeños trozos de metal.
Consejos Útiles Una limpieza completa de forma ocasional con una solución de bicarbonato y agua mantiene el interior fresco. Desenchufe el cable antes de limpiar cualquier parte del horno. Cómo Limpiar el Interior Paredes, Piso, Ventana Interior, Partes Metálicas y Plásticas de la Puerta Algunas salpicaduras se pueden eliminar con una toalla de papel; otras pueden requerir una tela húmeda. Elimine salpicaduras de grasa con una tela con jabón, y luego enjuague con una tela húmeda.
Luz de la Cocina/ Luz Nocturna Reemplace por lámparas halógenas de 120 voltios y 20 watts (máximo). Vea la contraportada para ordenar en línea en GEAppliances.com. 4. Enrosque la nueva lámpara, luego levante la tapa de la luz y vuelva a colocar el tornillo. Conecte el cable de electricidad del horno. 3DUD UHHPSOD]DU OD OX] GH OD FRFLQD OX] QRFWXUQD SULPHUR desconecte el encendido del fusible principal o del panel del disyuntor, o desenchufe el cable. 2.
Filtros de carbón vegeta El filtro de carbón vegetal no puede limpiarse. Debe cambiarse por otro. Vea la contraportada para ordenar en línea en GEAppliances.com. REEMPLAZO DEL FILTRO DE CARBÓN Si el modelo no realiza la extracción al exterior, el aire recirculará a través de un filtro de carbón vegetal no reutilizable que ayuda a quitar olores y humos. 2. Retire los tornillos de montaje de la rejilla de ventilación.
RESOLUCIÓN DE PROBLEMAS Resolución de Problemas Problema Posibles causas Qué hacer El horno no se pone en marcha Puede que se haya fundido un fusible de su casa o que haya saltado el diferencial. • Cambie el fusible o reconecte el diferencial. Apagón de corriente. • Desenchufe el horno microondas de la corriente y vuélvalo a enchufar.
Cosas que son Normales de su Horno Microondas &RVDV TXH VRQ 1RUPDOHV GH VX +RUQR 0LFURRQGDV Reflejo de luz alrededor de la puerta o la cubierta exterior. /X] GHO KRUQR WHQXH \ FDPELR GHO VRQLGR GHO SLWLGR HQ niveles de potencia que no son altos. Ruido de golpes secos mientras el horno está en funcionamiento. COMISIÓN DE COMUNICACIONES FEDERALES (EE.UU.
GARANTÍA LIMITADA Garantía Limitada de Horno Microondas GE Appliances GEAppliances.com Todo el servicio de garantía es provisto por nuestros Centros de Servicio de Fabricación, o un técnico autorizado de Servicio. Para programar una visita del servicio técnico a través de Internet, visítenos en GEappliances.com/service o de forma telefónica al 800.432.2737 durante el horario de atención comercial.
Kits del Panel de Relleno JX36BSS - Inoxidable JX36BWW - Blanco JX36BBB – Negro JX36BES – Slate Al reemplazar una campana de estufa de 36”, los kits del panel de relleno completan el ancho adicional a fin de brindar un aspecto de construcción a medida. Sólo para instalación entre gabinetes; no apto para la instalación al final del gabinete. Cada kit cuenta con dos paneles de relleno de 3” de ancho. .
SOPORTE PARA EL CONSUMIDOR Soporte para el Consumidor Sitio Web de GE Appliances ¿Desea realizar una consulta o necesita ayuda con su electrodoméstico? ¡Intente a través del Sitio Web de GE Appliances las 24 horas del día, cualquier día del año! Usted también puede comprar más electrodomésticos maravillosos de GE Appliances y aprovechar todos nuestros servicios de soporte a través de Internet, diseñados para su conveniencia. En EE.UU.: GEAppliances.