Microwave Oven Safety Instructions . . . . . . . .2–7 Operating Instructions Oven Features . . . . . . . . . . . . . . . 8-11 Time Features . . . . . . . . . . . . . . .12-16 Auto Features . . . . . . . . . . . . . . . . . . 19 Convenience Features . . . . . . .17-19 Other Features . . . . . . . . . . . . . .20-21 Microwave Terms . . . . . . . . . . . . . . 22 Owner’s Manual JVM6175 Care and Cleaning . . . . . .23-25 Troubleshooting Tips . . . . . . 26 Things That Are Normal . . . . . . . .
IMPORTANT SAFETY INSTRUCTIONS. READ ALL INSTRUCTIONS BEFORE USING. SAFETY INFORMATION This is the safety alert symbol. This symbol alerts you to potential hazards that can kill or hurt you and others. All safety messages will follow the safety alert symbol and the word “DANGER”, “WARNING”, or “CAUTION”. These words are defined as: DANGER Indicates a hazardous situation which, if not avoided, will result in death or serious injury.
IMPORTANT SAFETY INSTRUCTIONS. READ ALL INSTRUCTIONS BEFORE USING. OPERATING AND CLEANING (Continued) ³ 6RPH SURGXFWV VXFK DV ZKROH HJJV DQG VHDOHG FRQWDLQHUV³IRU H[DPSOH FORVHG MDUV³DUH DEOH WR H[SORGH and should not be heated in this microwave oven. ³ 'R QRW FRYHU DQ\ SDUW RI WKH PLFURZDYH ZLWK PHWDO IRLO This will cause overheating of the microwave. ³ &RRN PHDW DQG SRXOWU\ WKRURXJKO\³PHDW WR DW OHDVW DQ INTERNAL temperature of 160°F and poultry to at least an INTERNAL temperature of 180°F.
IMPORTANT SAFETY INSTRUCTIONS. READ ALL INSTRUCTIONS BEFORE USING. PRECAUTIONS TO AVOID POSSIBLE EXPOSURE TO EXCESSIVE MICROWAVE ENERGY • Do Not Attempt to operate this oven with the door open since open-door operation can result in harmful exposure to microwave energy. It is important not to defeat or tamper with the safety interlocks. • Do Not Place any object between the oven front face and the door or allow soil or cleaner residue to accumulate on sealing surfaces.
INSTRUCCIONES IMPORTANTES DE SEGURIDAD. LEA PRIMERO TODA LAS INSTRUCCIONES. INFORMACIÓN DE SEGURIDAD eVWH HV HO VtPEROR GH DOHUWD GH VHJXULGDG (O PLVPR DOHUWD VREUH SRWHQFLDOHV ULHVJRV GH PXHUWH R OHVLRQHV WDQWR SDUD XVWHG FRQ SDUD RWUDV SHUVRQDV 7RGRV ORV PHQVDMHV GH VHJXULGDG HVWDUiQ D FRQWLQXDFLyQ GHO VtPEROR GH DOHUWD GH VHJXULGDG \ FRQ OD palabra “PELIGRO”, “ADVERTENCIA” o “PRECAUCIÓN”.
INSTRUCCIONES IMPORTANTES DE SEGURIDAD. LEA PRIMERO TODA LAS INSTRUCCIONES. FUNCIONAMIENTO Y LIMPIEZA (Continúa) AGUA SOBRECALENTADA ³ $OJXQRV SURGXFWRV WDOHV FRPR KXHYRV HQWHURV \ HQYDVHV sellados – por ejemplo: tarros de vidrio cerrados – pueden explotar y por esto no se deben calentar en el horno microondas. ³ 1R FXEUD HO HVWDQWH GHO PLFURRQGDV R FXDOTXLHU SDUWH GHO KRUQR con papel de aluminio.
INSTRUCCIONES IMPORTANTES DE SEGURIDAD. LEA PRIMERO TODA LAS INSTRUCCIONES. PRECAUCIONES PARA EVITAR POSIBLE EXPOSICIÓN A UNA EXCESIVA ENERGÍA DE MICROONDAS. (a) No Intente operar este horno con la puerta abierta ya TXH HVWR SRGUtD UHVXOWDU HQ XQD H[SRVLFLyQ D HQHUJtD microondas dañina. Es importante no cancelar ni manipular de forma indebida los dispositivos de seguridad.
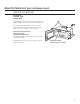
About the features of your microwave oven. Throughout this manual, features and appearance may vary from your model. 1000 Watts Features of the Oven 1 Door Handle. Pull to open the door. The door must be securely latched for the microwave to operate. 2 Door Latches. 3 Window with Metal Shield. Screen allows cooking to be viewed while keeping microwaves confined in the oven. 4 Charcoal Filter Door. Push down two button to open the door. You can change charcoal filter easily. 5 Touch Control Panel.
About the features of your microwave oven. Optional Accessories Filler Panel Kits JX36CWW - White JX36CBB - Black When replacing a 36” range hood, filler panel kits fill in the additional width to provide a custom built-in appearance. JX36 For installation between cabinets only; not for end-of cabinet installation. Each kit contains two 3” wide filler panels. Two kits are needed for a 36” opening.
About the features of your microwave oven. You can microwave by time or with the convenience features. Not all features on all models. Microwave Features Sensor Microwave Cook Time Timer On/Off Add 30 Sec Popcorn Beverage Potato Power Level Display On/Off Set Clock Melt Reheat Weight/Time Hold 3 Sec Lock Control Hold 3 Sec Cooking Controls Check the Convenience Guide before you begin.
Power Level 1 2 3 4 5 6 7 8 9 0 Start Pause The power level may be entered or changed immediately after entering the feature time for Cook Time, Time Defrost, Add 30 Sec or Express Cook. The power level may also be changed during the time countdown. Rest periods (when the microwave energy cycles RII JLYH WLPH IRU WKH IRRG WR ´HTXDOL]Hµ RU WUDQVIHU heat to the inside of the food.
About the time features. Cook Time I Cook Time 1 2 3 4 5 6 7 8 9 0 Start Pause Allows you to microwave for any time up to 99 minutes and 99 seconds. Power level 10 (high) is automatically set, but you may change it for more flexibility. 1. Press Cook Time. 2. Enter cooking time. 3. Change power level if you don’t want full power. (Press Power Level. Select a desired power level 1–10.) 4. Press Start/Pause. You may open the door during Cook Time to check the food.
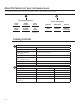
Cooking Guide for Cook Time NOTE: Use power level 10 unless otherwise noted. Vegetable Amount Time Comments Asparagus (fresh spears) 1 lb. 6 to 9 min., IUR]HQ VSHDUV R] SDFNDJH WR PLQ In 1 1/2 TW REORQJ JODVV EDNLQJ GLVK SODFH FXS ZDWHU Rotate dish after half of time. ,Q TW FDVVHUROH Beans (fresh green) (frozen green) IUR]HQ OLPD 1 lb. cut in half 10-oz. package R] SDFNDJH 9 to 11 min. 6 to 8 min.
About the time features. 1 2 3 4 5 Time Defrost allows you to defrost for a selected length of time. See the Defrosting Guide for suggested times. (Weight Defrost is explained in the Auto Feature section.) 6 7 8 9 0 1. Press Defrost Weight/Time twice. Defrost Weight/Time Start Pause 2. Enter defrosting time. 3. Press Start/Pause. 4. Turn food over when the oven signal. 5. Press Start/Pause. When the oven signals, turn food over and break apart or rearrange pieces for more even defrosting.
Defrosting Guide Food Time Comments 1 min. 3 to 5 min. Rearrange after half of time. Breads, Cakes Bread, buns or rolls (1 piece) Sweet rolls (approx. 12 oz.) Fish and Seafood Fillets, frozen (1 lb.) Shellfish, small pieces (1 lb.) 6 to 8 min. 5 to 7 min. Place block in casserole. Turn over and break up after first half of time. Fruit 3ODVWLF SRXFK³ RU (10-oz. package) WR PLQ Meat Bacon (1 lb.) Franks (1 lb.) 2 to 5 min. 2 to 5 min. Ground meat (1 lb.
About the time features. Express Cook 1 2 3 4 5 This is a quick way to set cooking time for 1–5 minutes. Press one of the Express Cook pads (from 1 to 5) for 1 to 5 minutes of cooking at power level 10. For example, press the 2 pad for 2 minutes of cooking time. The power level can be changed as time is counting down. Press POWER LEVEL and enter 1–10. Add 30 Sec Add 30 Sec You can use this feature two ways: It will add 30 seconds to the time counting down each time the pad is pressed.
About the auto features. Weight Defrost Defrost Weight/Time 1 2 3 4 5 6 7 8 9 0 Start Pause Weight defrost automatically sets the defrosting times and power levels to give even defrosting results for meats, poultry and fish weighing up to six pounds. 1. Press Defrost Weight/Time once. 2. Using the conversion guide, enter food weight. For example, press pads 1 and 2 for 1.2 pounds (1 pound, 3 ounces). 3. Press Start/Pause. (Time Defrost is explained in the Time Features section.
About the sensor features. Covered Vented The Sensor Features detect the increasing humidity released during cooking. The oven automatically adjusts the cooking time to various types and amounts of food. Do not use the Sensor Features twice in VXFFHVVLRQ RQ WKH VDPH IRRG SRUWLRQ³LW may result in severely overcooked or burnt food. Be sure to let the oven cool down for 5-10 minutes before starting the next sensor cook. If food is undercooked after the countdown, use Cook Time for additional cooking time.
Reheat How to Change the Automatic Settings To reduce time by 10%: Press 1 after the feature pad. To add 10% to cooking time: Press 9 after the feature pad. NOTE: Do not use this feature twice in succession RQ WKH VDPH IRRG SRUWLRQ³ it may result in severely overcooked or burnt food. Potato To use the Reheat feature: The Reheat feature reheats single servings of previously cooked foods or a plate of leftovers. 1. Place covered food in the oven. Press Reheat. 2.
About other features. Cooking Complete Reminder To remind you that you have food in the oven, the oven will display “Food is Ready” and beep once a minute until you either open the oven door or press Cancel/Off. Set Clock Lock Control Hold 3 Sec Set Clock Child Lock-Out Press to enter the time of day or to check the time of day while microwaving. You may lock the control panel to prevent the microwave from being accidentally started or used by children. 1. Press Set Clock. 2. Enter time of day. 3.
Vent Fan Vent Fan The vent fan removes steam and other vapors from surface cooking. Press Vent Fan once for high fan speed, twice for low fan speed or a third time to turn the fan off. Surface Light Mute On/Off Surface Light On some models, there is a night light option. Press to turn the surface light on or off. Press Surface Light once for bright light, twice for the night light or three times to turn the light off. Mute The beeper sound level can be muted. Press Mute On/Off.
Microwave terms. Arcing Arcing is the microwave term for sparks in the oven. Arcing is caused by: • Metal such as twist-ties, poultry pins, goldrimmed dishes. • Metal or foil touching the side of the oven. • Recycled paper towels containing small metal pieces. • Foil that is not molded to food (upturned edges act like antennas). • Plates or dishes with a metallic trim or glaze with a metallic sheen. Covering Covers hold in moisture, allow for more even heating and reduce cooking time.
Care and cleaning of the microwave oven. Helpful Hints An occasional thorough wiping with a solution of baking soda and water keeps the inside fresh. Unplug the cord before cleaning any part of this oven.
Care and cleaning of the microwave oven. Cooktop Light/Night Light Replacement Replace the burned-out bulb with a 120 volt, 20-watt halogen bulb (WB36X10213), available from your GE supplier. Remove Screw. Screws. Filter Housing. Light Cover. Charcoal Filter 1 To replace the bulb(s), first disconnect the power at the main fuse or circuit breaker panel or pull the plug. 2 Remove the screw at the left of the light cover and lower the cover.
Care and cleaning of the microwave oven. Removing and Cleaning the Filter To remove, slide it to the side using the tab. Pull it down and out. To clean the grease filter, soak it and then swish it around in hot water and detergent. Don’t use ammonia or ammonia products because it will darken the metal. Light brushing can be used to remove embedded dirt. Filter should be cleaned every 6 months. Rinse, shake and let it dry before replacing.
Troubleshooting Tips. Problem Possible Cause What to Do Oven will not start A fuse in your home may be blown or the circuit breaker tripped. • Replace fuse or reset circuit breaker. Power surge. • Unplug the microwave oven, then plug it back in. Plug not fully inserted wall outlet. • Make sure the 3-prong plug on the into oven is fully inserted into wall outlet. Door not securely closed. • Open the door and close securely. Floor of the oven is warm, even when the oven has not been used ´/2&.
GE Microwave Oven Warranty. All warranty service provided by our Factory Service Centers, or an authorized Customer Care® technician during normal working hours. To schedule service, on-line, 24 hours a day, visit us at GEAppliances. com, or call 800.GE.CARES (800.432.2737). Please have serial and model numbers available when calling for service. Staple your receipt here. Proof of the original purchase date is needed to obtain service under the warranty.
Consumer Support. GE Appliances Website GEAppliances.com +DYH D TXHVWLRQ RU QHHG DVVLVWDQFH ZLWK \RXU DSSOLDQFH" 7U\ WKH *( $SSOLDQFHV :HEVLWH KRXUV D GD\ any day of the year! For greater convenience and faster service, you can now download Owner’s Manuals, order parts, catalogs, or even schedule service on-line. You can also “Ask Our Team of Experts™” \RXU TXHVWLRQV DQG VR PXFK PRUH« Real Life Design Studio GEAppliances.
Horno Microondas Instrucciones de Seguridad . . . . . . . . . . . . .2–4 Instrucciones de Funcionamiento Manual del propietario JVM6175 Funciones Automáticas. . . . . . . . . 14 Términos del Microondas . . . . . . . 19 Funciones del Horno . . . . . . . . . . 5-8 Otras Funciones. . . . . . . . . . . . 17, 18 Funciones del Sensor . . . . . . 15, 16 Funciones del Temporizador. . . . . . . . . . . . . . 9-13 Cuidado y Limpieza . . . . .20-22 Consejos para Solucionar Problemas . . . . . . . . . . . . . . . .
INSTRUCCIONES IMPORTANTES DE SEGURIDAD. LEA PRIMERO TODA LAS INSTRUCCIONES.
INSTRUCCIONES IMPORTANTES DE SEGURIDAD. LEA PRIMERO TODA LAS INSTRUCCIONES. FUNCIONAMIENTO Y LIMPIEZA (Continúa) AGUA SOBRECALENTADA ³ $OJXQRV SURGXFWRV WDOHV FRPR KXHYRV HQWHURV \ HQYDVHV VHOODGRV ² SRU HMHPSOR WDUURV GH YLGULR FHUUDGRV ² SXHGHQ H[SORWDU \ SRU HVWR QR VH GHEHQ FDOHQWDU HQ HO KRUQR microondas. ³ 1R FXEUD HO HVWDQWH GHO PLFURRQGDV R FXDOTXLHU SDUWH GHO KRUQR con papel de aluminio.
INSTRUCCIONES IMPORTANTES DE SEGURIDAD. LEA PRIMERO TODA LAS INSTRUCCIONES. PRECAUCIONES PARA EVITAR POSIBLE EXPOSICIÓN A UNA EXCESIVA ENERGÍA DE MICROONDAS. (a) No Intente operar este horno con la puerta abierta ya TXH HVWR SRGUtD UHVXOWDU HQ XQD H[SRVLFLyQ D HQHUJtD microondas dañina.
Acerca de las funciones de su horno microondas Es posible que las funciones y apariencias varíen con relación a su modelo a lo largo del manual. 1000 Watts Funciones del Horno 1. Manija de la Puerta. (PSXMH SDUD DEULU OD SXHUWD /D SXHUWD GHEHUi HVWDU DVHJXUDGD FRQ OD WUDED SDUD TXH ODV PLFURRQGDV VH DFWLYHQ 2. Pestillos de la Puerta. 3. Ventana con Protector Metálico. SLa pantalla SHUPLWH TXH OD FRFFLyQ SXHGD VHU REVHUYDGD mientras se mantienen las microondas dentro del horno.
Accesorios Opcionales Kits del Panel de Relleno JX36CWW - Blanco JX36CBB - Negro $O UHHPSOD]DU XQD FDPSDQD GH HVWXID GH µ ORV NLWV GHO SDQHO GH UHOOHQR FRPSOHWDQ HO DQFKR DGLFLRQDO D ILQ GH EULQGDU XQ DVSHFWR GH FRQVWUXFFLyQ D PHGLGD JX36 6yOR SDUD LQVWDODFLyQ HQWUH JDELQHWHV QR DSWR SDUD OD LQVWDODFLyQ DO ILQDO GHO JDELQHWH &DGD NLW FXHQWD FRQ GRV SDQHOHV GH UHOOHQR GH µ GH DQFKR 6RQ QHFHVDULRV GRV NLWV SDUD XQD DEHUWXUD GH µ Kit del Filtro de Carbón con Recirculación JX81J (número de ven
Acerca de las funciones de su horno microondas. Puede usar el horno microondas por tiempo o con funciones convenientes. No todos los modelos cuentan con todas las funciones. Microwave Features Sensor Microwave Cook Time Timer On/Off Add 30 Sec Popcorn Beverage Potato Power Level Display On/Off Set Clock Melt Reheat Weight/Time Hold 3 Sec Lock Control Hold 3 Sec Defrost Controles de Cocción Consulte la Guía de Acciones Convenientes antes de comenzar.
Acerca de las funciones de su horno microondas.
Acerca de las funciones del temporizador. Tiempo de Cocción I Cook Time 1 2 3 4 5 6 7 8 9 0 Start Pause Le permite cocinar en el horno microondas por cualquier tiempo hasta 99 minutos y 99 VHJXQGRV 3RZHU OHYHO 1LYHO GH SRWHQFLD VH FRQILJXUD GH IRUPD DXWRPiWLFD SHUR OR SXHGH PRGLILFDU SDUD XQD PD\RU IOH[LELOLGDG 1. Presione Cook Time (Tiempo de Cocción).
Acerca de las funciones del temporizador. Guía de Cocción para la Cocción por Tiempo NOTA: Use el nivel de potencia 10 (Alto) a menos que se indique lo contrario.
Acerca de las funciones del temporizador. Defrost Weight/Time 1 2 3 4 5 6 7 8 9 0 Start Pause 7LPH 'HIURVW 'HVFRQJHODFLyQ SRU 7LHPSR OH SHUPLWH GHVFRQJHODU GXUDQWH XQ SHUtRGR GH tiempo seleccionado. Consulte los tiempos VXJHULGRV HQ OD *XtD GH 'HVFRQJHODFLyQ :HLJKW 'HIURVW 'HVFRQJHODFLyQ SRU 3HVR VH H[SOLFD HQ OD VHFFLyQ $XWR )HDWXUH )XQFLyQ $XWRPiWLFD 1. Presione Defrost Weight/ Time (Descongelación por Peso/ Tiempo) dos YHFHV ,QJUHVH HO WLHPSR GH GHVFRQJHODFLyQ 3.
Acerca de las funciones del temporizador.
Acerca de las funciones del temporizador. Cocción Express 1 2 3 4 5 Ésta es una forma rápida de configurar el tiempo de cocción entre 1 y 6 minutos.
Acerca de la función automática. Descongelación por Peso Defrost Weight/Time 1 2 3 4 5 6 7 8 9 0 Start Pause /D IXQFLyQ GH GHVFRQJHODFLyQ SRU WLHPSR FRQILJXUD DXWRPiWLFDPHQWH ORV WLHPSRV GH GHVFRQJHODFLyQ \ ORV QLYHOHV GH SRWHQFLD SDUD SURGXFLU UHVXOWDGRV SDUHMRV GH GHVFRQJHODFLyQ FRQ FDUQHV DYHV \ pescados que pesen hasta seis libras. 1.
Acerca de las funciones del Sensor. Cubierto Ventilado Seque los platos de modo que no DOWHUHQ HO IXQFLRQDPLHQWR GHO VHQVRU Popcorn NOTA: 1R XVH HVWD IXQFLyQ GRV YHFHV VHJXLGDV HQ OD PLVPD SRUFLyQ GH FRPLGD esto podrá hacer que la comida se sobrecaliente GH IRUPD H[FHVLYD R TXH VH queme.
Acerca de las funciones del Sensor. Reheat Cómo Cambiar las Configuraciones Automáticas Para reducir el tiempo en un 10%: Presione 1 OXHJR GH OD WHFOD GH IXQFLyQ Para sumar un 10% al tiempo de cocción: Presione 9 OXHJR GH OD WHFOD GH IXQFLyQ NOTA: 1R XVH HVWD IXQFLyQ GRV YHFHV VHJXLGDV HQ OD PLVPD SRUFLyQ GH FRPLGD esto podrá hacer que la comida se sobrecaliente GH IRUPD H[FHVLYD R TXH VH queme.
Acerca de otras funciones. Recordatorio de Cocción Completa 3DUD UHFRUGDUOH TXH FRORFy FRPLGD HQ HO KRUQR HVWH ~OWLPR PRVWUDUi ´(QGµ )LQ \ HPLWLUi XQ SLWLGR XQD YH] SRU PLQXWR KDVWD TXH DEUD HO KRUQR R SUHVLRQH HO ERWyQ Cancel/ Off (Cancelar/ Apagar). Set Clock Lock Control Hold 3 Sec Configurar el Reloj Bloqueo para Niños 3UHVLRQH SDUD LQJUHVDU OD KRUD GHO GtD R SDUD YHU OD KRUD GHO GtD PLHQWUDV FRFLQD FRQ HO KRUQR microondas. 1. Presione Set Clock (Configurar el Reloj).
Acerca de otras funciones. Vent Fan Ventilador Extractor (O YHQWLODGRU H[WUDFWRU HOLPLQD HO YDSRU \ RWURV YDSRUHV GH OD FRFFLyQ VREUH OD VXSHUILFLH 3UHVLRQH 9HQW )DQ 9HQWLODGRU ([WUDFWRU XQD YH] SDUD DFWLYDU HO YHQWLODGRU HQ YHORFLGDG DOWD GRV YHFHV SDUD DFWLYDUOR HQ YHORFLGDG EDMD R WUHV YHFHV SDUD DSDJDU HO PLVPR Surface Light Mute On/Off Luz de la Superficie 3UHVLRQH HVWD WHFOD SDUD HQFHQGHU R DSDJDU OD OX] GHO horno. $OJXQRV PRGHORV FXHQWDQ FRQ OD RSFLyQ GH OX] nocturna.
Términos del Microondas. Arco Eléctrico Arco eléctrico es el término que se usa para definir la producción de chispas en el horno microondas. Los arcos eléctricos son producidos por: • Metal o papel de aluminio en contacto con el costado del horno. • Papel de aluminio no moldeado a la comida (los extremos doblados actúan como antenas). • Metales, tales como precintos, pinchos de ave, o platos con rebordes dorados. • Toallas de papel reciclable que contengan pequeños trozos de metal.
Cuidado y limpieza del horno microondas. Consejos Útiles 8QD OLPSLH]D FRPSOHWD GH IRUPD RFDVLRQDO FRQ XQD VROXFLyQ GH ELFDUERQDWR \ DJXD PDQWLHQH HO LQWHULRU IUHVFR Desenchufe el cable antes de limpiar cualquier parte del horno.
Cuidado y limpieza del horno microondas. Retire el tornillo Tornillos Carcasa del Filtro Tapa de la Luz )LOWUR GH &DUEyQ HQ DOJXQRV PRGHORV Luz de la Placa de Cocción/ Reemplazo de la Luz Nocturna Reemplace la lámpara quemada por una lámpara incandescente de 120 YROWLRV OiPSDUD KDOyJHQD GH ZDWWV :% ; GLVSRQLEOH D WUDYpV GH VX SURYHHGRU GH *( 3DUD UHHPSOD]DU OD OiPSDUD V SULPHUR GHVFRQHFWH OD FRUULHQWH GHVGH HO IXVLEOH SULQFLSDO R GLV\XQWRU R GHVHQFKXIH HO cable.
Cuidado y limpieza del horno microondas. Retiro y Limpieza del Filtro limpiado cada 6 meses. Para retirar, deslice el mismo sobre la (QMXDJXH VDFXGD \ GHMH VHFDU DQWHV GH SDUWH ODWHUDO XVDQGR OD OHQJHWD (PSXMH realizar el reemplazo. KDFLD DEDMR \ DIXHUD Para reemplazar, GHVOLFH HO ILOWUR HQ OD ranura de la estructura sobre el lado Para limpiar el filtro de grasa, PRMH \ izquierdo de la abertura.
Consejos para Solucionar Problemas. Problema Causa Posible Qué Hacer Es posible que un fusible de su hogar se haya quemado o que el disyuntor se haya desconectado. 5HHPSODFH HO IXVLEOH R UHLQLFLH HO GLV\XQWRU Pico de tensión. 'HVHQFKXIH HO KRUQR PLFURRQGDV OXHJR YXHOYD D HQFKXIDUOR El enchufe no está totalmente insertado en el tomacorriente. $VHJ~UHVH GH TXH HO FDEOH GH SDWDV GHO KRUQR esté completamente insertado en el tomacorriente. La puerta no está cerrada de forma segura.
Nota.
Garantía del Horno Microondas de GE. Todo el servicio de garantía es provisto por nuestros Centros de Servicio de Fabricación, o un técnico autorizado de Customer Care® durante el horario comercial. Para programar una consulta del servicio técnico a través del Internet, las 24 horas, visítenos en GEAppliances. com, o llame al 800. GE.CARES (800.432.2737). Cuando llame para solicitar el servicio, tenga los números de serie y modelo disponibles. Abroche su recibo aquí.
Soporte al Cliente. Sitio Web de Electrodomésticos de GE GEAppliances.