Microwave Oven GEAppliances.ca Safety Instructions . . . . . . . .2–5 Operating Instructions Auto Features . . . . . . . . . . . . . . . . . . 15 Microwave Terms . . . . . . . . . . . . . . 22 Oven Features . . . . . . . . . . . . . . . . 6-8 Other Features . . . . . . . . . . . . . .18-22 Power Levels . . . . . . . . . . . . . . . . . . . . 9 Sensor Features . . . . . . . . . . . . .16-18 Time Features . . . . . . . . . . . . . . .10-14 Owner’s Manual JVM6175 Care and Cleaning . . . . . .
IMPORTANT SAFETY INSTRUCTIONS. READ ALL INSTRUCTIONS BEFORE USING. WARNING! To reduce risk of burns, electric shock, fire, personal injury or exposure to excessive microwave energy. PRECAUTIONS TO AVOID POSSIBLE EXPOSURE TO EXCESSIVE MICROWAVE ENERGY (a) Do Not Attempt to operate this oven with the door open since open-door operation can result in harmful H[SRVXUH WR PLFURZDYH HQHUJ\ ,W LV LPSRUWDQW QRW WR defeat or tamper with the safety interlocks.
GEAppliances.ca WARNING! IMPORTANT SAFETY INSTRUCTIONS. Do not clean with metal scouring pads. Pieces can burn off the pad and touch electrical parts involving risk of electric shock. This microwave oven is cUL listed for installation over both gas (less than 60,000BTU) and electric ranges. This over-the-range oven is designed for use over ranges no wider than 36” (91.4 cm). It may be installed over both gas and electric cooking equipment. .
IMPORTANT SAFETY INSTRUCTIONS. READ ALL INSTRUCTIONS BEFORE USING. WARNING! Make sure all cookware used in your microwave oven is suitable for microwaving. Most glass casseroles, cooking dishes, measuring cups, custard cups, pottery or china dinnerware which does not have metallic trim or glaze with a metallic sheen can be used. Some cookware is labeled “suitable for microwaving.
GEAppliances.ca GROUNDING INSTRUCTIONS WARNING³,PSURSHU XVH RI WKH JURXQGLQJ SOXJ FDQ UHVXOW LQ D ULVN RI HOHFWULF VKRFN This appliance must be grounded. In the event of an electrical short circuit, grounding reduces the risk of electric shock by providing an escape wire for the electric current. If the outlet is a standard 2-prong wall outlet, it is your personal responsibility and obligation to have it replaced with a properly grounded 3-prong wall outlet.
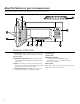
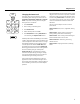
About the features of your microwave oven. Throughout this manual, features and appearance may vary from your model. Features of the Oven 1 Door Handle. Pull to open the door. The door must be securely latched for the microwave to operate. 2 Door Latches. 3 Window with Metal Shield. Screen allows cooking to be viewed while keeping microwaves confined in the oven. 4 Shelf (some models). Lets you microwave several foods at once. Food microwaves best when placed directly on the oven floor or turntable.
About the features of your microwave oven. GEAppliances.ca Optional Accessories Filler Panel Kits JX48WH - White JX48BL - Black JX81J (sales number) WB02X1124 (service number) When replacing a 36” (91.4 cm) range hood, filler panel kits fill in the additional width to provide a custom built-in appearance. For installation between cabinets only; not for end-of cabinet installation. Each kit contains two 3” (7.6 cm) wide filler panels. Two kits are needed for a 36” 91.4 cm) opening.
About the features of your microwave oven. You can microwave by time or with the convenience features. Not all features on all models. Express Cook Sensor Microwave 1 2 3 Add 30 Sec Popcorn Beverage Potato 4 5 6 Timer On/Off Vegetable Reheat Weight/Time 7 8 9 Cook Time Power Level 0 Set Clock Help Clock Display Hold 3 Sec Cooking Controls Check the Convenience Guide before you begin.
GEAppliances.ca Changing the Power Level Cook Time 1 2 3 The power level may be entered or changed immediately after entering the feature time for Cook Time, Time Defrost, Add 30 Sec or Express Cook. The power level may also be changed during the time countdown. 4 5 6 1. Press Cook Time. 7 8 9 Power Level 0 Set Clock Power Level Clock Display Start Pause 2. Enter cooking or defrosting time 3. Press Power Level. 4. Select desired power level 1-10. 3. Press Start/Pause.
About the time features. Cook Time I Cook Time Allows you to microwave for any time up to 99 minutes and 99 seconds. 1 2 3 4 5 6 7 8 9 Power Level 0 Set Clock Clock Display Start Pause Power level 10 (high) is automatically set, but \RX PD\ FKDQJH LW IRU PRUH IOH[LELOLW\ 1. Press Cook Time. 2. Enter cooking time. 3. Change power level if you don’t want full power. (Press Power Level. Select a desired power level 1–10.) 4. Press Start/Pause.
GEAppliances.ca Cooking Guide for Cook Time NOTE: Use power level 10 (High) unless otherwise noted. Vegetable Amount Time Comments Asparagus (fresh spears) 1 lb. (454 g) In 1½-qt. (1½ l) oblong glass baking dish, place 1/4 cup water. Rotate dish after half of time. In 1-qt. (1 l) casserole. (frozen spears) 10-oz. (283 g) package 6 to 9 min., Med-High (7) 5 to 7 min. Beans (fresh green) (frozen green) (frozen lima) 1 lb. (454 g) cut in half 10-oz. (283 g) package 10-oz.
About the time features. Defrost Weight/Time 1 2 3 4 5 6 7 8 9 Power Level 0 Set Clock Clock Display Start Pause Time Defrost allows you to defrost for a selected length of time. See the Defrosting Guide for suggested times. (Weight Defrost is H[SODLQHG LQ WKH $XWR )HDWXUH VHFWLRQ 1. Press Defrost Weight/Time twice. 2. Enter defrosting time. 3. Press Start/Pause. 4. Turn food over when the oven signal. 5. Press Start/Pause.
GEAppliances.ca Defrosting Guide Food Time Comments Breads, Cakes Bread, buns or rolls (1 piece) 1 min. 6ZHHW UROOV DSSUR[ R] J WR PLQ 5HDUUDQJH DIWHU KDOI RI WLPH Fish and Seafood Fillets, frozen (1 lb./454 g) Shellfish, small pieces (1 lb./454 g) 6 to 8 min. 5 to 7 min. Place block in casserole. Turn over and break up after first half of time. Fruit 3ODVWLF SRXFK³ RU (10-oz. package/283 g) WR PLQ Meat Bacon (1 lb./454 g) )UDQNV OE J 2 to 5 min.
About the time features. Express Cook 1 2 3 4 5 6 This is a quick way to set cooking time for 1–6 minutes. Press one of the Express Cook pads (from 1 to 6) for 1 to 6 minutes of cooking at power level 10. For H[DPSOH SUHVV WKH 2 pad for 2 minutes of cooking time. The power level can be changed as time is counting down. Press POWER LEVEL and enter 1–10. Add 30 Sec You can use this feature two ways: Add 30 Sec 14 It will add 30 seconds to the time counting down each time the pad is pressed.
About the auto features. Weight Defrost Defrost 1 2 3 Weight defrost automatically sets the defrosting times and power levels to give even defrosting results for meats, poultry DQG ILVK ZHLJKLQJ XS WR VL[ SRXQGV 4 5 6 1. Press Defrost Weight/Time once. Weight/Time 7 8 9 Power Level 0 Set Clock Clock Display Start Pause GEAppliances.ca Conversion Guide If the weight of food is stated in pounds and ounces, the ounces must be converted to tenths (.1) of a pound.
About the sensor features. The Sensor Features detect the increasing humidity released during cooking. The oven DXWRPDWLFDOO\ DGMXVWV WKH FRRNLQJ WLPH WR various types and amounts of food. Do not use the Sensor Features twice in VXFFHVVLRQ RQ WKH VDPH IRRG SRUWLRQ³LW may result in severely overcooked or burnt food. Be sure to let the oven cool down IRU PLQXWHV EHIRUH VWDUWLQJ WKH QH[W sensor cook. If food is undercooked after the countdown, use Cook Time for additional cooking time.
GEAppliances.ca Reheat 1 9 (less time) (more time) How to Change the Automatic Settings To reduce time by 10%: Press 1 after the feature pad. To add 10% to cooking time: Press 9 after the feature pad. NOTE: Do not use the metal shelf when using the Reheat feature. NOTE: Do not use this feature twice in succession RQ WKH VDPH IRRG SRUWLRQ³ it may result in severely overcooked or burnt food.
About the sensor features. Vegetable 1 9 (less time) (more time) How to Change the Automatic Settings To reduce time by 10%: Press 1 after the feature pad. To add 10% to cooking time: Press 9 after the feature pad. NOTE: Do not use the metal shelf when using the Reheat feature. NOTE: Do not use this feature twice in succession RQ WKH VDPH IRRG SRUWLRQ³ it may result in severely overcooked or burnt food. Vegetable 1. Place covered food in the oven. Press Vegetable.
About other features. Set Clock GEAppliances.ca Set Clock 1 2 3 4 5 6 7 8 9 0 Clock Display Press to enter the time of day or to check the time of day while microwaving. 1. Press Set Clock. 2. Enter time of day. 2. Select AM/PM. 3. Press Start or Set Clock. To check the time of day while microwaving, press Set Clock.
About other features. Surface Light Surface Light On some models, there is a night light option. Press to turn the surface light on or off. Press Surface Light once for bright light, twice for the night light or three times to turn the light off. Sound 7KH EHHSHU VRXQG OHYHO FDQ EH DGMXVWHG 3UHVV Sound. Choose 0-3 for mute to loud.
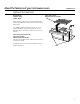
GEAppliances.ca Shelf (on some models) How to Use the Shelf when Microwaving Food microwaves best when placed on the turntable or on the shelf in the lower position. NOTICE: Only use microwave sehf when reheating on more than one level. DO NOT store the oven shelf in the microwave. WARNING ARCING: If you see arcing, press the Cancel/Off button and correct the problem. 0DNH VXUH WKH VKHOI LV positioned properly inside the microwave to prevent damage to the oven from arcing.
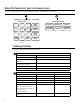
About other features. Switch places after 1/2 time. Switch places after 1/2 time. Shelf and Reheating To reheat on 2 levels or To reheat 2 dishes on the lower level: 1 Multiply reheat time by 1½. 2 Switch places after 1/2 the time. To reheat on 3 levels (on some models) 1 Double the reheating time. 2 Switch places twice and give the dishes a 1/2 turn during reheating. (Place dense foods, or those that require a longer cook time, on the upper shelf first.) Switch places twice Microwave terms.
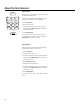
Care and cleaning of the microwave oven. GEAppliances.ca Helpful Hints An occasional thorough wiping with a solution of baking soda and water keeps the inside fresh. Unplug the cord before cleaning any part of this oven.
Care and cleaning of the microwave oven. Remove Screw. Screws. Filter Housing. Light Cover. Charcoal Filter (on some models) Cooktop Light/Night Light Replacement Replace the burned-out bulb with a 120 volt, 40-watt incandescent bulb (WB36X10003), available from your GE supplier. 1 To replace the bulb(s), first disconnect the power at the main fuse or circuit breaker panel or pull the plug. 2 Remove the screw at the left of the light cover and lower the cover.
Care and cleaning of the microwave oven. Removing and Cleaning the Filter To remove, slide it to the side using the tab. Pull it down and out. To clean the grease filter, soak it and then swish it around in hot water and detergent. Don’t use ammonia or ammonia products because it will darken the metal. Light brushing can be used to remove embedded dirt. Charcoal Filter (on some models) The charcoal filter cannot be cleaned. It must be replaced. Order Part No.
Troubleshooting Tips. Problem Possible Cause What to Do Oven will not start A fuse in your home may be blown or the circuit breaker tripped. 5HSODFH IXVH RU UHVHW FLUFXLW EUHDNHU Power surge. 8QSOXJ WKH PLFURZDYH RYHQ WKHQ SOXJ it back in. Plug not fully inserted wall outlet. 0DNH VXUH WKH SURQJ SOXJ RQ WKH into oven is fully inserted into wall outlet. Door not securely closed.
Notes 27
Notes 28
Please place in envelope and mail to: Veuillez mettre dans une enveloppe et envoyez à : OWNERSHIP REGISTRATION P.O.
Pour les consommateurs canadiens 30 CUT ALONG THIS LINE AND RETURN CARD – THANKS DÉCOUPEZ ICI ET ENVOYEZ LA FICHE – MERCI For Canadian Customers OWNERSHIP REGISTRATION CERTIFICATE – FICHE D’INSCRIPTION DU PROPRIÉTAIRE Please register your product to enable us to contact you in Veuillez enregistrer votre produit afin de nous permettre de the remote event a safety notice is issued for this product communiquer avec vous si jamais un avis de sécurité concernant and to allow for efficient communication under
GE Microwave Oven Warranty. All warranty service provided by our Factory Service Centers, or an authorized Customer Care® technician. To schedule service, online, contact us at GEAppliances.ca, or call 1.800.561.3344. Please have serial and model numbers available when calling for service. Staple your receipt here. Proof of the original purchase date is needed to obtain service under the warranty.
Consumer Support. GE Appliances Website GEAppliances.ca Have a question or need assistance with your appliance? Try the GE Appliances Website 24 hours a day, any day of the year! For greater convenience and faster service, you can now download Owner’s Manuals, order parts, catalogs. Schedule Service GEAppliances.ca ([SHUW 0DEH UHSDLU VHUYLFH LV RQO\ RQH VWHS DZD\ IURP \RXU GRRU *HW RQ OLQH DQG VFKHGXOH \RXU VHUYLFH DW your convenience any day of the year! Or call 1.800.561.