Installation Over the Range Instructions Microwave Oven Questions? Call 800.GE.CARES (800.432.2737) or visit our Website ot Noncompliance BEFORE YOU BEGIN read these instructions completely and carefully. + Note to Consumer Keep these CIM PORTENT _ instructions for future reference. acts § Save these « Skill level Installation of this appliance requires basic instructions for local inspector's use. mechanical and electrical skills.
Installation Instructions CONTENTS General information important Safety instructions rr 3 Electrical Requirements... Hood Exhaust. Damage Shipment/installation .. 6 Ports Included 6 Tools You Will Need Mounting Space Step-by-step installation guide Placement of Mounting Plate... on . 8-10 Reproving the Mounting Plate on JUV Finding the Will Studs 8 Determining Wall Plate Location... 9 Aligning the Wall Plate. win 10 installation Types... tsetse. 11223 A | Outside Top Exhaust.
Installation Instructions IMPORTANT SAFETY INSTRUCTIONS oH This is the safety alert symbol. This symbol alerts you to potential hazards that can kill or hurt you and others. All safety messages will follow the safety alert symbol and the ward “DANGER”, “WARNING”, or “CAUTION”. These words are defined as A Maisie | indicates 0 hazardous situation which, if nat avoided, will result in death or serious fr jury.
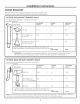
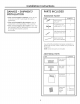
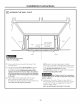
Installation Instructions HOOD EXHAUST NOTE: Read these next two pages only if you plan to vent your exhaust to the outside. If you plan to recirculate the afr back into the room, proceed to page 6. OUTSIDE TOP EXHAUST (EXAMPLE ONLY) The following chart describes an example of one possible duct work installation. EQUIVALENT NUMBER EQUIVALENT DUCT PIECES LENGTH H USED = LENGTH = Roof Cap Straight Duct Round} [2 Rectangular-ta-Round Transition Adaptor® \ SS ed Equivalent lengths of duct pieces ore bused on ac
Installation Instructions NOTE: If you need to install ducts, note that the total duct length of 317 x 107 rectangular or 67 diameter round duct should not exceed 140 equivalent feet. Outside ventilation requires a HOOD EXHAUST DUCT. Read the following carefully NOTE: It is important that venting be installed using the most direct route and with as few elbows as possible This ensures clear venting of exhaust and helps prevent blockages. Also, make sure dampers swing freely and nothing is blocking the ducts.
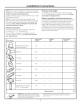
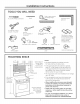
Installation Instructions HARDWARE PACKET » if the unit is damaged in shipment, return the unit to the store in which it was bought for repair or PART QUANTITY replacement. pd Wood Screws 2 » if the unit is mugged by the customer, repair or War x 2m replacement is the responsibility of the customer Toggle Bolts (ond 3 + if the unit is damaged by the installer (if other than pa wing nuts} {ie x 3) the customer], repair or replacement must be made i by arrangement between customer ond installer.
Installation Instructions TOOLS YOU WILL NEED Ruler or tape measure and straight edge ef ED # Land #2 Philips screwdriver pencil Carpenter square {optional Tin snips for cutting dumper, if required cut template, If Electric diff with 6", % and ' 5% drill bits necessary £7 wood pieces, if needed ¥ for top cabinet spacing [used on recessed bottom biretta installations only) Stud finder or Homer optional} S ES Gloves © uct ond masking tape Level MOUNTING SPACE 130 ~ NOTES: Ma Bottom Edge of » The space between
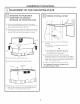
Installation Instructions 1 [PLACEMENT OF THE MOUNTING PLATE A.| REMOVING THE MICROWAVE B OVEN FROM THE CARTON/ REMOVING THE MOUNTING PLATE FINDING THE WALL STUDS 1 Remove the installation instructions, filters, glass “tray and the small hardware bog. Do not remove the foam protecting the front of the oven. | [2 [Fold back all 4 carton flops fully against carton sides / Then carefully roll the oven and carton over onto the top side. The oven should be resting in the foam.
Installation Instructions C. | DETERMINING WALL PLATE LOCATION UNDER YOUR CABINET Plate position beneath flat bottom Plate position ~ beneath framed recessed cabinet cabinet bottom © Tabs Mounting PI : Cabinet Touching th Mounting s \bottom punting Plate Tob Touching the Back Frame 1. 3 to Cookie At least 30°, Plate position beneath recessed bottom Your cabinets may have decorative trim that interferes cabinet with front overhang with the microwave installation.
Installation Instructions ALIGNING THE WALL PLATE Hole C Center line / Notches Law a Vertical Line pn Wall from Center of Top Cabinet Wear gloves to avoid cutting fingers on sharp edges. 1 Ora a vertical line on the wall ot the center of the 30” wide space. | Use the mounting plate as the template for the rear wall. Place the mounting plate on the wall, making sure tho the tabs are touching the bottom of the cabinet or the level line drawn in Step C for cabinets with front overhang.
Installation Instructions This microwave oven is designed for adaptation to the following three types of ventilation: A. Outside Top Exhaust (Vertical Duct) 8. Outside Buck Exhaust {Horizontal Duct) €. Recirculating (Non-Vented Ductless) A | OUTSIDE TOP EXHAUST {VERTICAL DUCT) 2 [INSTALLATION TYPES (choose A, Bor C) NOTE: This microwave is shipped assembled for Outside Top Exhaust {except for non-vented models).
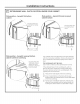
Installation Instructions A | OUTSIDE TOP EXHAUST (vertical Duct) INSTALLATION OVERVIEW Al. Attach Mounting Plate to Wall A. Prepare Tap Cabinet #3. Check Blower Motor Orientation Ad, Adapt Blower for Outside Ventilation AS. Check Damper Operation AB. Mount Microwave Oven A7. Adjust Exhaust Adapter AB. Connect Duct work Al| ATTACH THE MOUNTING PLATE TO THE WALL Attach the plate to the wall using toggle bolts. At least one wooed screw must be used to attach the plate to a wall stud.
Installation Instructions AZ.| USE TOP CABINET TEMPLATE FOR PREPARATION OF TOP CABINET You need to drill holes for the top support screws, a hole large enough for the power cord ta fit through, and a cutout large enough for the exhaust adapter. » Read the instructions on the TOP CABINET TEMPLATE. = Tape it underneath the top cabinet = Drill the holes, following the instructions on the TOP CABINET TEMPLATE. Ty Wear safety goggles when drilling hales in the cabinet bottom, A3.
Installation Instructions Ad. | ADAPTING BLOWER FOR OUTSIDE VENTILATION (Cont) 7 Place the blower unit back into the opening. A CAUTION Do not pull or stretch the blower unit wiring. Mike sure the wires are not pinched. 8 Close the blower door.
Installation Instructions AG. | MOUNT THE MICROWAVE OVEN {cont} Biretta Front / Cabinet Bottom Shelf /4 Lille Block Self-Aligning Screw Microwave Even Top 4 Attach the microwave oven ta the top cabinet 5 Insert 2 self-aligning screws through outer top cabinet holes. Turn two full turns on each screw. re 18 Tighten the outer two screws ta the top of the microwave oven. while tightening screws, hold the microwave oven in place against the wall and the top cabinet} [7 install grease filter.
Installation Instructions B OUTSIDE BACK EXHAUST (Horizontal Duct INSTALLATION OVERVIEW B1. Prepare Rear Wall 82. Attach Mounting Plot to wall 83. Prepare Top Cabinet 84, Adjust Blower BS. Mount the Microwave Oven PREPARING THE REAR WALL FOR OUTSIDE BACK EXHAUST You need ta cut an opening in the rear wall for outside exhaust. Bl. » Read the instructions on the REAR WALL TEMPLATE * Tape it to the rear wall, lining up with the holes previously drilled for holes A and 8 in the wall plate.
Installation Instructions To use toggle bolts: s Spicing for Toggles More weed Thin Wall Thickness Toggle Wings Mounting 7 Blot #l gle =» } Bolt End 3 Place the mounting plate against the wall and insert the toggle wings into the holes in the wall ta mount the plate NOTE: Before tightening toggle bolts and wood screw, make sure the tabs on the mourning plot touch the bottom of the cabinet when pushed flush against the wall and that the plate is properly centered under the cabinet.
Installation Instructions B4. | ADAPTING MICROWAVE BLOWER FOR OUTSIDE BACK EXHAUST (cont. 5 Gently remove the wires from the grooves.
Installation Instructions BS. | MOUNT THE MICROWAVE OVEN iN ab FOR EASIER INSTALLATION AND PERSONAL SAFETY, WE RECOMMEND THAT TWO PEOPLE INSTALL THIS MICROWAVE OVEN. IMPORTANT: Do not grip or use handle during installation. NOTE: If your cabinet is metal, use the nylon grommet around the power cord hole to prevent cutting of the cord.
Installation Instructions Cc RECIRCULATING {Non-Vented Ductless} INSTALLATION OVERVIEW C1. Attach Taunting Plate to wall C2. Prepare Top Cabinet €3. Check Blower Gator Orientation Ch. Adapt Blower for Re circulation €5. Mount the Microwave Oven C6. install Charcoal Filter ATTACH THE MOUNTING PLATE TO THE WALL C1 Attach the plate to the wall using toggle bolts. At least one wood screw must be used to attach the plate to a wall stud.
Installation Instructions C3. CHECK BLOWER MOTOR ORIENTATION 1 The blower fan blade opening should be facing the front of the microwave. If the fan opening is already facing the front of the microwave, skip to Step C5. Otherwise, continue to Step C4 to adjust the blower orientation. C4. ADAPTING MICROWAVE BLOWER FOR RE CIRCULATION 1 | Remove and save screws that holds blower roam 0 microwave oven.
Installation Instructions C4. | ADAPTING MICROWAVE BLOWER FOR RE CIRCULATION {cont.} 6 | Remove the metal vent fan cover on the back of the microwave by sliding Close the blower door. Slide blower shield onto the top of the blower door opening IE | Secure the blower to the microwave using the blower retaining screws from Step 1. Fe a peer Retaining Screw __ Blower . v ~~ Retaining Taf Screws Back of Microwave Oven 22 C5.
Installation Instructions C5.] MOUNT THE MICROWAVE OVEN {cont.} 13 Insert a self-aligning screw through top center cabinet hole. Temporarily secure the oven by turning the screw at least two full turns after the threads have engaged. {It will be completely tightened later} Be sure to keep power cord tight. Be careful not to pinch the cord, especially when mounting flush to bottom of cabinet.
Installation Instructions BEFORE YOU USE YOUR MICROWAVE 1 Make sure the microwave oven has been installed according to instructions. Read the Owner's Marla. 2. | Remove all packing material from the 1 microwave oven KEEP INSTALLATION INSTRUCTIONS FOR THE LOCAL INSPECTORS USE 3 Install turntable and tng in cavity. 4. | Replace house fuse or tarn breaker back on. 5 Plug power cord into a dedicated 15th 20-ump electrical outlet.
Instrucciones | Horno microondas para de instalación colocar encima de la estufa ¢Preguntas? Líame 800.GE.CARES (800.432.2737) o visite nuestra paginé en lu red en: GEAppliances.com ANTES DE EMPEZAR Lea estas instrucciones completa y cuidadosamente. = Nota para el consumidor Guarde estos .
Instrucciones de instalación CONTENIDO información general instrucciones de seguridad importantes. Requisitos eléctricos. Campana de escape. Portes incluidas 3 3 5 Pafios Envió / Instalación oo 6 6 Herramientas que necesitar 7 7 Espacio de Quia de instalación paso por puso Como colocar el late de montaje.. Coma remover el plato de montaje B Como encontrar los postes de viga enn 10 Parad neas 8 Coma determinar la nacionalización de los placas de lo pared...
Instrucciones de instalación INSTRUCCIONES DE SEGURIDAD IMPORTANTES A Este es el simbolice de alerta de seguridad. El mismo alerta sobre potenciales riesgos que le pueden producir lz muerte © lesiones tanto a usted coma a otras personas. Todos los mensajes de seguridad estarán a continuación del cimbalillo de alerta de seguridad y con la palabra “PELIGRO", "ADVERTENCIA" o "PRECAUCION®.
Instrucciones de instalación CAMPANA DE ESCAPE NOTA: Lea lus siguientes dos paginas solamente si planes ventilar el escape hacia el exterior. Si por el contrario planea re circular el aire de vuelta hacia ef sueldan, contunde en la pagina 6.
Instrucciones de instalación NOTA: Si usted necesita instalar conducios, tenga pendiente que fa longitud total del conducta rectangular de 347 x 107 © ef conducto redondo de 6” de diámetro no debe repulsar 140 pies equivalentes. Lu ventilación externa requiere un CONDUCTO DE CAMPANA DE ESCAVE. Lea lo siguiente cuidadosamente.
Instrucciones de instalación HERRAMIENTAS QUE NECESITARA Regla recta y cine métrica ce TEE) ED Tapiz Escrutinio de carpintero excepcional) Destornilladores de estrella Ly #2 Mijeros para cortar floté = {pura cortar ¢f regulador de tro, si es necesario Tijeras apiporra cortar lo tintillo, si es necesaria} Bloques de relleno o pedazos de madera, GT $i 50N Necesarios pura rellenar ei gabinete {usados solamente en lo instalación de gabinetes Detector de apoyaste Guantes Sierra ide sable, agujero, n de postes de
Instrucciones de instalación 1 |COMO COLOCAR EL PLATO DE MONTAJE A.| COMO REMOVER EL HORNO B.| COMO ENCONTRAR LOS POSTES MICROONDAS DEL EMBALAJE / DE VIGA EN LA PARED COMO REMOVER EL PLATO DE MONTAJE 1 Remueva los instrucciones de instalación, las filtres, “la bandeo de cristal, y lo bolsa pequeñita del equipe. No remueva el protector frontal de espuma de poliestireno del moho. 2 Otile totalmente hacia atrás las cuatro tapas de “cartón hacia los dales opuestas de la caja.
Instrucciones de instalación COMO DETERMINAR LA LOCALIZACIÓN DEL PLATO DE MONTAJE DEBAJO DE SU GABINETE Posición del plato debajo de gabinetes Posición del plato debajo de gabinetes de fondo plano de fondo apoyado en un marco Las orillas del plato de eT pire tocan el fondo del gobierne Los arejiffus del plato de montare tocar ef marco posterior J Par lo menos 30", has 36” ' Posición del plato ~ debajo de gabinetes de fondo apoyado con frente saliente Sus gabinetes podrían tener marcos de decoración que inte
Instrucciones de instalación COMO ALINEAR EL PLATO DE MONTAJE CN Enajene guantes de SOBRE LA PARED | | a\ Cuescos | dele { libe del | centro Agüero A pe— del centro del Trace Lino linea TT Gaguera B vertical en la pared ¢ partir Gin protección para evitar cortaduras en sus dedos con los extremos filosos, a 2 Trace una linea vertical en lo pared en el centro del espacio de 30” de ancho. Use el plato de montaje come la plantilla para la pared posterior.
Instrucciones de instalación Este moho microondas estad disentido para adaptarse ¢ los siguientes tres tipos de ventilación: A. Escape superior exterior {Conducto vertical) 8. Escape posterior exterior {Conduce horizontal) C. Relacionero (Sin conducto de ventilador) A | ESCAPE SUPERIOR EXTERIOR {CONDUCTO VERTICAL) 2 |TIPOS DE INSTALACIÓN (escoja a BoC NOTA: Este ore microondas es enviado ya ensamblado para un escape superior exterior {excepto para modelos enviados con escape de circulatorio.
Instrucciones de instalación A [ESCAPE SUPERIOR EXTERIOR (conducto vertical} PERSPECTIVA GENERAL DE LA INSTALACIÓN Al Como adherir el plato de montaje a la pared AZ Prepare el gabinete superior A3. Controle la Orientación del Motor del Calefactor A4. Adapte el Calefactor proa lo Ventilación Externa AS. Inspeccione la proporcione del regulador de tiro A8. Monte ef horno microondas f . A7. Ajuste el adoptador de escape AB.
Instrucciones de instalación USE LA PLANTILLA DEL GABINETE SUPERIOR PARA LA PREPARACIÓN DEL GABINETE Deber perforar agujeros para los tomillos de apoyo superiores, un agujero suficientemente grande para que ef cable eléctrico quepa, y un recorte lo suficientemente grande como para A2. + Leo los instrucciones sobre lo PLANTILLA DEL GABINETE SUPERIOR. » Réguelo debajo del gabinete superior, + Atolondre los agujeros, siguiendo los instrucciones en lo PLANTILLA DEL GABINETE SUPERIOR.
Instrucciones de instalación Ad. ADAPTACIÓN DEL CALEFACTOR PARA LA VENTILACIÓN EXTERNA {Con} I 7 Vuelva a coloco lo unidad del calefactor en la abertura, PRECAUCIÓN No empuje ni extienda el cableado de fo unidad del calefactor. Asegúrese de que los cables no posean cortes. [8] Cierre lu puerta del calefactor, Asegure el maleficios al microondas usada los tornilleros del Paso 1. 7 INSPECCIONE LA OPERACIÓN DEL REGULADOR DE TIRO AS.
Instrucciones de instalación B |[ESCAPE POSTERIOR EXTERNO (conducto horizontal} PERSPECTIVA GENERAL DE LA INSTALACIÓN B1. Prepare la pared posterior 82 Como adherir el plato de contraje o la poder B3. Prepare «f gabinete superior B4. juste el calefactor B5. Monte el horno microondas é i B1.] COMO PREPARAR LA PARED POSTERIOR PARA EL ESCAPE POSTERIOR Necesita cortar uri obertura en lo pared posterior para el escape exterior » Lea las instrucciones en la PLANTILLA PARA LA PARED POSTERIOR.
Instrucciones de instalación Para usar los tornillos basculantes: . Espaciadores para los basculantes efe-wfe motores que el ancho de lo pared i Alas de morisma: Tornillo del Plato de montaje [I af =» Extrema del orillo 3 Coloque el plato de montaje contra la pared e inserte los alas de mariposa en los agujeras de la pared pura montar el plata.
Instrucciones de instalación B84.
Instrucciones de instalación C CIRCUIR LACIO {Sin conducto de ventilación) PERSPECTIVA GENERAL DE LA INSTALACIÓN C1. Como adherir ef plato de montaje ala pared C2. Prepare el gabinete superior C3. Controle lo Orientación del Motor del Calefactor C4. Adapte el Calefactor para la circulatorio C5. Ante el horno microondas C6. instale el filtro de carbonilla C1] COMO ADHERIR LA PLACA mortal orto pero DE MONTAJE A LA PARED de lo pared para morar ef late.
Instrucciones de instalación COMO ADAPTAR EL CALEFACTOR DEL MICROONDAS PARA LA RELACIONERO continuación) 6 Retire la topa metílico del ventilador en la parte trasero del microondas, deslizando lo misma hacia arriba C4. 7 | Cierre la puerta del ventilada. Deslice el escudo del calefactor sobre fa parte superior de la cobertura de fa puerta del calefactor.
Instrucciones de instalación €5.] COMO MONTAR EL HORNO MICROONDAS (continuación) 3 Inserte un terminarle de alineación a través del “agujero central superior del gabinete. Asegure el harbo temporalmente grande el tornillo por le menos dos vueltas completos después de que las toscos vahen agarradero. {luego quedaran totalmente apretadas). Cerciórese de mantener el cable eléctrico estirado. Tengo cuidada de no pellizco ef cable, especialmente cuando se monte of nivel del donde del gabinete.
Instrucciones de instalación ANTES DE COMENZAR A USAR SU HORNO MICROONDAS Cerciórese de que el horno ha sude insto ludo de enchufe el cable eléctrico en un toma corriente exclusivo amperios Cerciórese exilie existe Conexión u tierra apreciada L acuerda con las instrucciones. 2. | Remueva todos los materiales de embalaje del 4 honre microondas. 3 Instale el aro rotatorio y con ruedas en 1 lo cavidad. 4 Reemplace ef fusible de la case o encienda de “i nuevo el interruptor.