
Installation Guide

7
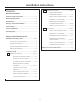
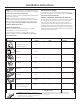
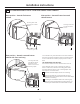
TOOLS YOU WILL NEED
# 1 and #2 Phillips screwdriver
Pencil
Ruler or tape measure
and straight edge
Carpenter square
(optional)
Tin snips (for cutting
damper, if required)
Electric drill with
3
ø16s,
1
ø2s and
5
ø8s drill bits
Hammer (optional)
Stud finder or
Filler blocks or scrap
wood pieces, if needed
for top cabinet spacing
(used on recessed
bottom cabinet
installations only)
Gloves
Saw (saber, hole or keyhole)
Level
Duct and masking tape
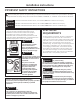
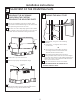
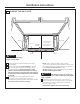
MOUNTING SPACE
NOTES:
• The space between the cabinets must be
30s wide and free of obstructions.
• If the space between the cabinets is greater
than 30s, a Filler Panel Kit may be used to fill
in the gap between the microwave oven and
the cabinets. Your Owner’s Manual contains
the kit number for your model.
• This microwave oven is for installation over ranges
up to 36s wide.
• If you are going to vent your microwave oven
to the outside, see Hood Exhaust Section for
exhaust duct preparation.
• When installing the microwave oven beneath
smooth, flat cabinets, be careful to follow the
instructions on the top cabinet template for
power cord clearance.
• Models with top venting grilles: Do not allow
cabinetry or other objects to block the airflow
of the vent.
* 13” max: for standard installation, 15” cabinet
depth requires additional steps using an
additional installation kit JX15BUMPWW/BB.
Backsplash
66s or More
from the
Floor to the
Top of the
Microwave
30s
2s
30s
min.
16
1
ø2s
Bottom Edge of
Cabinet Needs
to be 30s or
More from the
Cooking Surface
Installation Instructions
Scissors
(to cut template, if
necessary)
Safety goggles
13s
max*
.
Minimum distance
from door hinge
side to adjacent
wall should
equal 3/4”