
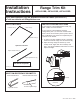
Installation Guide

2 31-11118
Installation Instructions
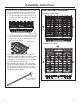
3. Before removing the adhesive backing, dry fit the
trim pieces against the range. The angled front
surface should be in the front for parts 1 and 2.
■ For wall installed ranges, the front edge of the
side trims should line up with the front edge of
the cooktop.
■ For an island installation, center part 3 (has two
angled ends) along the back edge of the range
so that parts 1 and 2 are flush with part 3 for a
continuous appearance.
4. If trim pieces 4 and 5 are used for either wall
installation or island installation, ensure trim starts
at the front edge of the countertop. Trim length
modifications can be made by removing material
from the back end of the trim piece.
5. After determining the location of the trim pieces,
remove the adhesive backing and carefully place
the trim pieces in their previous location. Press
the trim pieces firmly down onto the countertop to
adhere the double sided tape.
FINAL ASSEMBLY REFERENCE
Installation against a wall:
Installation in an island:
Flush appearance
Modify back end of part
4 and 5 in this area
Edge of cooktop
1
1
2
2
3