Bottom-Freezer Refrigerators GEAppliances.com Safety Instructions . . . . . . . .2–4 Operating Instructions Additional Features . . . . . . . . . .8 Automatic Icemaker . . . . . .9, 10 Care and Cleaning . . . . . . .11, 12 Crispers and Pans . . . . . . . . . . .7 Getting Started . . . . . . . . . . . . .5 Replacing the Light Bulbs . . . .12 Shelves, Bins and Water Dispenser . . . . . . . . . . . .
Safety Instructions IMPORTANT SAFETY INFORMATION. READ ALL INSTRUCTIONS BEFORE USING. WARNING! Use this appliance only for its intended purpose as described in this Owner’s Manual. SAFETY PRECAUTIONS When using electrical appliances, basic safety precautions should be followed, including the following: Operating Instructions ■ This refrigerator must be properly installed and located in accordance with the Installation Instructions before it is used.
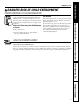
DANGER! RISK OF CHILD ENTRAPMENT PROPER DISPOSAL OF THE REFRIGERATOR Before You Throw Away Your Old Refrigerator or Freezer: ■ Take off the doors. ■ Leave the shelves in place so that children may not easily climb inside. CFC Disposal Your old refrigerator has a cooling system that used CFCs (chlorofluorocarbons). CFCs are believed to harm stratospheric ozone. If you are throwing away your old refrigerator, make sure the CFC refrigerant is removed for proper disposal by a qualified servicer.
WARNING! HOW TO CONNECT ELECTRICITY Do not, under any circumstances, cut or remove the third (ground) prong from the power cord. For personal safety, this appliance must be properly grounded. The power cord of this appliance is equipped with a 3-prong (grounding) plug which mates with a standard 3-prong (grounding) wall outlet to minimize the possibility of electric shock hazard from this appliance. Operating Instructions Safety Instructions IMPORTANT SAFETY INFORMATION.
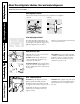
Initially set the refrigerator and freezer controls at 5. For refrigerator and freezer, 5 is normal, 9 is coldest. GEAppliances.com If you want colder or warmer temperatures, adjust the refrigerator temperature first. When satisfied with that setting, adjust the freezer temperature. Safety Instructions Getting started. Operating Instructions Checklist Freezer Control The freezer control maintains the temperature in the freezer compartment.
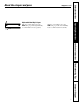
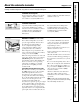
Safety Instructions About the refrigerator shelves, bins and water dispenser. Not all features are on all models. Rearranging the Shelves Glass and wire shelves in the refrigerator compartment are adjustable. To Remove Troubleshooting Tips Installation Instructions Operating Instructions 2 Lift up and out To Replace 1 Tilt up 1 Insert top hook 2 Lower to lock in place Slide-Out Spillproof Shelf The slide-out spillproof shelf allows you to reach items stored behind others.
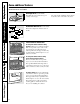
GEAppliances.com Safety Instructions About the crispers and pans. Adjustable Humidity Crispers Operating Instructions Slide the control all the way to the HIGH setting to provide high humidity recommended for most vegetables. Slide the control all the way to the LOW setting to provide lower humidity levels recommended for most fruits.
Not all features are on all models. Beverage Rack (on some models) This slide-out rack provides storage for a variety of beverages. Operating Instructions Safety Instructions Some additional features. Removable Wine Rack (on some models) Installation Instructions Freezer Shelves and Baskets Troubleshooting Tips This rack is designed to hold a bottle on its side. The top full width fixed shelf provides a convenient location to store ice cube trays and ice bucket as well as a variety of foods.
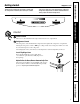
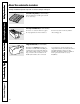
GEAppliances.com A newly-installed refrigerator may take 12–24 hours to begin making ice. Icemaker Accessory Kit If your refrigerator did not come already equipped with an automatic icemaker, an icemaker accessory kit (IM-4 for U.S. models, or IM4-1 for Canadian models) is available at extra cost. Mounting Block Part No. WR2M3604 Screws Part No. WR1M478 A special icemaker mounting block must be used when installing an icemaker.
A newly-installed refrigerator may take 12–24 hours to begin making ice. Ice Cube Tray Shelf (on some models) Some models have a small separate shelf for ice cube trays. Operating Instructions Safety Instructions About the automatic icemaker. Ice Trays and Bucket (on some models) Installation Instructions To remove ice cubes from the tray, place the tray upside down on the bucket as shown. Press down on the tray and the cubes will pop out.
GEAppliances.com Cleaning the Outside The stainless steel panels and door handles (on some models) can be cleaned with a commercially available stainless steel cleaner such as Stainless Steel Magic.™ Do not wipe the refrigerator with a soiled dish cloth or wet towel. These may leave a residue that can erode the paint. Do not use scouring pads, powdered cleaners, bleach or cleaners containing bleach because these products can scratch and weaken the paint finish.
Behind the Refrigerator Be careful when moving the refrigerator away from the wall. All types of floor coverings can be damaged, particularly cushioned coverings and those with embossed surfaces. When pushing the refrigerator back, make sure you don’t roll over the power cord. Pull the refrigerator straight out and return it to position by pushing it straight in. Moving the refrigerator in a side direction may result in damage to the floor covering or refrigerator.
Installation Instructions Refrigerator Model 18 Questions? Call 800.GE.CARES (800.432.2737) or Visit our Website at: GEAppliances.com In Canada, call 1.800.361.3400 or Visit our Website at: geappliances.ca BEFORE YOU BEGIN PACKAGING TAPE Read these instructions completely and carefully. Remove all packaging tape and peel-off films. These tapes were added to secure and protect your refrigerator during shipping. • IMPORTANT – Save these instructions for local inspector’s use.
Installation Instructions REVERSING THE DOOR SWING Read these instructions completely and carefully. IMPORTANT NOTES 1 REMOVE THE REFRIGERATOR DOOR (TOP DOOR) When reversing the door swing: • Read the instructions all the way through before starting. • NOTE: Doors on stainless steel models are not reversible. • Handle parts carefully to avoid scratching paint. • Set screws down by their related parts to avoid using them in the wrong places. • Provide a non-scratching work surface for the doors.
Installation Instructions 4 TRANSFER CENTER HINGE 3 TRANSFER BOTTOM HINGE BRACKET TO THE LEFT BRACKET TO THE LEFT (For freezer swing door models only) Remove the center hinge bracket and shim by removing the three screws. NOTE: Keep these screws with the hinge bracket. They are longer screws and will be used when installing the hinge on the other side. Pull the base grille straight out to gain access to the hinge bracket screws.
Installation Instructions REVERSING THE DOOR SWING (CONT.) 8 TRANSFER REFRIGERATOR 6 TRANSFER DOOR STOPS DOOR HANDLE TO THE RIGHT On each door, remove the metal door stop. Use the center hinge pin as a guide to align the door stop, supplied inside the kit, on the opposite side, after reversing the handles. On freezer drawer models, only the refrigerator door has a door stop. Remove the four handle mounting screws. On some models, you must first remove the screw covers.
Installation Instructions 10 REHANG REFRIGERATOR DOOR 9 REHANG FREEZER DOOR (For freezer swing door models only) Lower bottom socket of the refrigerator door onto center hinge pin. Be sure washer is in place. Tilt door toward cabinet, lifting the top hinge so the pin fits into the socket on top of the door. Tighten the top hinge screws after supporting the door on the handle side and ensuring the gap between the doors is even all across the front. Replace the hinge cover.
Depending on the placement of the refrigerator in your kitchen, you may want to place a piece of rubber backed carpet under the refrigerator to reduce noise. Evaporator Fan. You may hear air being forced through the cabinet by the fan. Evaporator. The flow of refrigerant through the evaporator may create a boiling or gurgling sound. 4 Operating Instructions Safety Instructions Normal operating sounds. Defrost Heater.
What To Do Motor operates for long periods or cycles on and off frequently. (Modern refrigerators with more storage space and a larger freezer require more operating time. They start and stop often to maintain even temperatures.) Normal when refrigerator is first plugged in. • Wait 24 hours for the refrigerator to completely cool down. Often occurs when large amounts of food are placed in refrigerator. • This is normal. Door left open. • Check to see if package is holding door open.
Safety Instructions Operating Instructions Installation Instructions Problem Possible Causes What To Do Moisture forms on outside of refrigerator Not unusual during periods of high humidity. • Wipe surface dry and reset the refrigerator control one setting colder. Moisture collects inside (in humid weather, air carries moisture into refrigerator when doors are opened) Too frequent or too long door openings. Food freezing in the refrigerator Food too close to air vent.
Safety Instructions Notes.
CUSTOMER WARRANTY (for customers in Canada) Your refrigerator is warranted to be free of defects in material and workmanship.
All warranty service provided by our Factory Service Centers, or an authorized Customer Care® technician. To schedule service, on-line, 24 hours a day, visit us at www.GEAppliances.com, or call 800.GE.CARES (800.432.2737). Staple your receipt here. Proof of the original purchase date is needed to obtain service under the warranty. GE Will Replace: One Year From the date of the original purchase Any part of the refrigerator which fails due to a defect in materials or workmanship.
Consumer Support. GE Appliances Website In the U.S.: GEAppliances.com Have a question or need assistance with your appliance? Try the GE Appliances Website 24 hours a day, any day of the year! For greater convenience and faster service, you can now download Owner’s Manuals, order parts, catalogs, or even schedule service on-line. You can also “Ask Our Team of Experts™” your questions, and so much more... In Canada: geappliances.ca Schedule Service In the U.S.: GEAppliances.
Congélateur inférieur Réfrigérateurs electromenagersge.ca Mesures de sécurité . . . . . . .2–4 Fonctionnement Caractéristiques supplémentaires . . . . . . . . . . . .8 Clayettes, balconnets et distributeur d’eau . . . . . . . . . . .6 Mise en marche . . . . . . . . . . . . .5 Compartiments à fruits et légumes et les contenants . . .7 Entretien et nettoyage . . . .11, 12 Machine à glaçons automatique . . . . . . . . . . . . .9, 10 Remplacement des ampoules . . . . . . . . . . . . . . . . .
AVERTISSEMENT! N’utilisez cet électroménager que pour l’usage auquel il est destiné, comme expliqué dans le présent manuel. MESURES DE SÉCURITÉ Lorsque vous utilisez un appareil électrique, observez toujours les mesures de sécurité de base, y compris les suivantes. ■ Installez le réfrigérateur conformément aux directives d’installation avant de l’utiliser. Fonctionnement Mesures de sécurité MESURES DE SÉCURITÉ IMPORTANTES. LISEZ D’ABORD TOUTES LES DIRECTIVES.
DANGER! RISQUES POUR LES ENFANTS COMMENT VOUS DÉBARRASSER CONVENABLEMENT DE VOTRE ANCIEN RÉFRIGÉRATEUR Avant de vous débarrasser de votre ancien réfrigérateur ou congélateur : ■ Démontez les portes. ■ Laissez les clayettes en place afin d’empêcher les enfants de grimper à l’intérieur. Se débarrasser du CFC Votre ancien réfrigérateur a un système de refroidissement qui a utilisé les CFC (chlorofluorocarbones). Les CFC sont jugés nocifs pour l’ozone stratosphérique.
AVERTISSEMENT! RACCORDEMENT ÉLECTRIQUE Ne coupez ni retirez en aucun cas la troisième broche (mise à la terre) de la fiche du cordon d’alimentation. Pour votre sécurité, cet appareil doit être correctement mis à la terre. Le cordon d’alimentation de cet appareil est muni d’une fiche à 3 broches (mise à la terre) qui se branche dans une prise murale ordinaire à 3 alvéoles (mise à la terre) pour réduire au minimum les risques de chocs électriques.
Mise en marche. electromenagersge.ca Liste de contrôle Commande du compartiment congélateur La commande du compartiment congélateur maintient la température dans le congélateur. Commande du compartiment réfrigérateur La commande du compartiment réfrigérateur maintient la température dans le réfrigérateur.
Mesures de sécurité Les clayettes, balconnets et distributeur d’eau. Toutes les caractéristiques ne sont pas disponibles sur tous les modèles. La disposition de vos clayettes Les clayettes de verre et de métal du compartiment réfrigérateur sont réglables.
electromenagersge.ca Bacs à fruits et à légumes Mesures de sécurité Au sujet des compartiments à fruits et légumes et les contenants. Compartiments à humidité réglable Réglez la commande sur LOW pour que le bac conserve le degré d’humidité abaissé recommandé pour la conservation de la plupart des fruits. Fonctionnement Réglez la commande sur HIGH pour que le bac conserve le degré d’humidité élevé recommandé pour la conservation de la plupart des légumes.
Quelques caractéristiques supplémentaires. Toutes les caractéristiques ne sont pas disponibles sur tous les modèles. Support à boissons (sur certains modèles) Ce support coulissant vous permet de ranger un grand nombre de boissons. Le support et la clayette réglable à laquelle il s’attache peuvent être positionnés à n’importe quel niveau. Support à bouteille de vin amovible (sur certains modèles) Le support à bouteille de vin est conçu pour tenir une bouteille couchée.
electromenagersge.ca Un réfrigérateur nouvellement installé prend de 12 à 24 heures pour commencer à produire des glaçons. Ensemble facultatif de machine à glaçons Si votre réfrigérateur n’est pas déjà doté d’une machine à glaçons automatique, vous pouvez vous procurer, moyennant des frais supplémentaires, un ensemble de machine à glaçons facultatif (IM-4 pour les modèles américains ou IM4-1 pour les modèles canadiens.) Mesures de sécurité Machine à glaçons automatique.
Un réfrigérateur nouvellement installé prend de 12 à 24 heures pour commencer à produire des glaçons. Clayette pour bacs à glaçons (sur certains modèles) Certains modèles possèdent une petite clayette séparée pour le rangement des bacs à glaçons. Bacs à glaçons et seau à glace (sur certains modèles) Fonctionnement Mesures de sécurité Machine à glaçons automatique. Pour enlever les glaçons du bac, mettez le bac sur le seau à glace à l’envers, comme illustré.
electromenagersge.ca Nettoyage de l’extérieur Gardez l’extérieur du réfrigérateur propre. Essuyez-le avec un linge propre légèrement humecté d’un détergent liquide doux pour la vaisselle. Séchez et polissez avec un linge doux et propre. Vous trouverez le Stainless Steel Magic chez Ace, True Value, Servistar, HWI et dans d’autres magasins connus. Vous pouvez également le commander en vous adressant au Service de pièces et accessoires GE par téléphone au numéro 800.626.2002 ou à notre site Web GEAppliances.
Derrière le réfrigérateur Prenez un soin particulier lorsque vous éloignez le réfrigérateur du mur. Tous les types de revêtements de sol peuvent être endommagés, particulièrement ceux qui sont coussinés ou dont la surface est gaufrée. Lorsque vous remettez le réfrigérateur en place en le poussant, veillez à ne pas le faire rouler sur le cordon d’alimentation. Tirez le réfrigérateur en ligne droite et, lorsque vous le remettez en place, poussez-le vers le mur en ligne droite.
Instructions d’installation Réfrigérateur Modèle 18 Si vous avez des questions, appelez le 1.800.361.3400 ou visitez notre site Web à l’adresse : electromenagersge.ca RUBAN D’EMBALLAGE AVANT DE COMMENCER Enlevez tout le ruban d’emballage et la pellicule détachable. Nous avons ajouté ces rubans pour protéger et bien fermer votre réfrigérateur pendant le transport. Veuillez lire toutes les directives attentivement. • IMPORTANT – Conservez ces instructions pour l’inspecteur local.
Instructions d’installation INVERSION DES PORTES Veuillez lire toutes les directives attentivement. NOTES IMPORTANTES 1 ENLÈVEMENT DE LA PORTE DU RÉFRIGÉRATEUR (PORTE SUPÉRIEURE) Lorsque vous invertissez le sens d’ouverture des portes : • Lisez toutes les directives avant de commencer. • REMARQUE : Les portes sur les modèles en acier inoxydable ne sont pas réversibles. • Manipulez les pièces avec précaution pour éviter de rayer la peinture.
Instructions d’installation 4 TRANSFERT DE LA CHARNIÈRE 3 TRANSFERT DE LA CHARNIÈRE INTERMÉDIAIRE VERS LE CÔTÉ GAUCHE INFÉRIEURE VERS LE CÔTÉ GAUCHE (Pour les modèles avec porte ordinaire seulement) Dévissez les trois vis et enlevez la charnière intermédiaire. REMARQUE : Gardez ces vis avec la charnière. Ces vis sont longues et seront utilisées pour l’installation de la charnière de l’autre côté de l’appareil. Tirez droit la grille de base afin de pouvoir accéder aux vis de la charnière.
Instructions d’installation INVERSION DES PORTES (SUITE) 8 TRANSFERT DE LA POIGNÉE 6 TRANSFERT DES BUTÉES DE PORTE DU RÉFRIGÉRATEUR À DROITE DE PORTE Enlevez la butée de porte en métal de chaque porte. Utilisez l’axe de charnière intermédiaire comme guide pour aligner la butée de porte, fourni dans la trousse, de l’autre côté, après avoir changé les poignées de côté. Sur les modèles avec congélateur à tiroir, seule la porte du réfrigérateur est munie d’une butée.
Instructions d’installation 10 RÉINSTALLEZ LA PORTE 9 RÉINSTALLEZ LA PORTE DU DU RÉFRIGÉRATEUR CONGÉLATEUR (Pour les modèles avec porte du congélateur ordinaire seulement) Installez la douille inférieure de la porte du réfrigérateur sur l’axe de la charnière intermédiaire. Assurez-vous que la rondelle est bien en place. Inclinez la porte vers la carrosserie et soulevez la charnière supérieure de façon qu’elle s’enfonce dans la douille située à la partie supérieure de la porte du réfrigérateur.
Mesures de sécurité Bruits de fonctionnement normaux. Selon l’emplacement du réfrigérateur dans votre cuisine, vous aurez peut-être envie d’installer celui-ci sur un tapis caoutchouté afin de réduire le bruit de l’appareil. Ventilateur de l’évaporateur. Vous entendrez peut-être de l’air envoyé dans l’appareil par le ventilateur. Évaporateur. Le frigorigène qui circule dans l’évaporateur peut produire un bruit de bouillonnement ou de gargouillement. Fonctionnement Élément de dégivrage.
Causes possibles Le moteur fonctionne pendant de longues périodes périodes ou ou démarre démarre et et s’arrête fréquemment. s’arrête fréquemment. (Les (Les réfrigérateurs réfrigérateurs modernes modernes et et leurs leurs congélateurs étant plus grands, leur moteur doit fonctionner plus longtemps. Ils démarrent congélateurs étant et s’arrêtent afin deplus grands, leur moteur doit maintenir des températures uniformes.) fonctionner plus longtemps.
Mesures de sécurité Fonctionnement Installation Conseils de dépannage Soutien au consommateur Avant d’appeler un réparateur… Problème Causes possibles Correctifs De la condensation s’accumule à l’extérieur Cela n’est pas inhabituel pendant • Essuyez bien la surface extérieure et abaissez la les périodes de forte humidité. commande du réfrigérateur d’une position.
GARANTIE DU CLIENT (pour la clientèle au Canada) Votre réfrigérateur est garanti contre tout défaut de matériau et de fabrication.
Soutien au consommateur Conseils de dépannage Installation Fonctionnement Mesures de sécurité Notes.
Mesures de sécurité Notes.
Service à la clientèle. Site Web appareils électroménagers GE electromenagersge.ca Vous avez une question ou vous avez besoin d’aide pour votre appareil électroménager? Contactez-nous par Internet au site electromenagersge.ca 24 heures par jour, tous les jours de l’année. Service de réparations 1.800.361.3400 Service de réparations GE est tout près de vous. Pour faire réparer votre électroménager GE, il suffit de nous téléphoner.