DISHWASHERS SAFETY INFORMATION . . . . . . . . .4 USING THE DISHWASHER Getting Started . . . . . . . . . . . . . . . . . . . . . . . .6 Dispensers . . . . . . . . . . . . . . . . . . . . . . . . . . . 10 Appliance Communications . . . . . . . . . . . . 12 Loading . . . . . . . . . . . . . . . . . . . . . . . . . . . . . 13 CARE AND CLEANING . . . . . . . . . . . 20 TROUBLESHOOTING TIPS. . . . . .22 LIMITED WARRANTY . . . . . . . . . . .25 CONSUMER SUPPORT . . . . . . . . .
THANK YOU FOR MAKING GE APPLIANCES A PART OF YOUR HOME. Whether you grew up with GE Appliances, or this is your first, we’re happy to have you in the family. We take pride in the craftsmanship, innovation and design that goes into every GE Appliances product, and we think you will too. Among other things, registration of your appliance ensures that we can deliver important product information and warranty details when you need them. Register your GE appliance now online.
49-4000214 Rev 1 WELCOME Notes 3
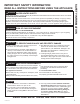
SAFETY INFORMATION IMPORTANT SAFETY INFORMATION READ ALL INSTRUCTIONS BEFORE USING THE APPLIANCE WARNING For your safety, the information in this manual must be followed to minimize the risk of fire, explosion, electric shock, and to prevent property damage, personal injury, or death. WARNING PROPER INSTALLATION AND MAINTENANCE This dishwasher must be properly installed and located in accordance with the Installation Instructions before it is used.
READ ALL INSTRUCTIONS BEFORE USING THE APPLIANCE WARNING WATER HEATER SAFETY Under certain conditions, hydrogen gas may be produced in a water heater that has not been used for two or more weeks. HYDROGEN GAS IS EXPLOSIVE. If the hot water has not been used for two or more weeks, prevent the possibility of damage or injury by turning on all hot water faucets and allowing them to run for several minutes. Do this before using any electrical appliance connected to the hot water system.
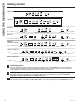
USING THE DISHWASHER Getting started Features and appearance will vary throughout this manual GDF565 GDF645 GDT565 DDT700 GDT665, GDT645, GDP645 PDT715, PDP715 PDT775, PDT785 6 1 Load Dishwasher 2 Add Detergent 3 Add Rinse Agent For best dishwashing results, follow the loading guidelines found in the Loading section. No pre-rinsing of normal food soil is required. Scrape off hard soils, including bones, toothpicks, skins, and seeds.
4 Select Cycle Press the furthest pad on the left for the desired wash cycle. On some models, the light next to the furthest pad on the left will be lit to indicate which wash cycle has been selected. On other models, pressing the furthest pad on the left will show various cycles in the display window. Press the pad until the desired cycle is shown. NOTE: Actual cycle times vary based on soil level, water temperature, and options selected. The cycle may be selected with the door in the open position.
USING THE DISHWASHER 8 Getting started 5 Select Options The light by the selected button will be lit to indicate which Option has been selected. Normal Temp Boost This option is for normally soiled dishes, optimizes wash performance while conserving energy. Steam-Sani, PresoakSani, or Sanitize This option raises the water temperature in the final rinse to sanitize your dishware but may increase cycle time by 60 minutes. The cycle length will vary depending on the temperature of your inlet water.
6 Start Dishwasher Start Press the Start pad and close the door within 4 seconds to start the cycle or begin the Delay Hours countdown. The wash cycle will begin shortly after closing the door. The display will turn off if the door remains open for two minutes. To activate the display, close and open the door or press any pad. Interrupt or To interrupt or pause a dish cycle, slowly open the door. Opening the door will cause the wash Pause cycle to pause.
USING THE DISHWASHER Dispensers Check the Water Temperature The entering water should be at least 120°F (49°C) and not more than 150°F (66°C) for effective cleaning and to prevent dish damage. Check the water temperature with a candy or meat thermometer. Turn on the hot water faucet nearest the dishwasher, place the thermometer in a glass and let the water run continuously into the glass until the temperature stops rising.
Detergent Dispenser The detergent dispenser is located in the center of the dishwasher door. It has two compartments. The main wash compartment is found inside the detergent dispenser. To open, press the button on the side of the dispenser. The pre-wash compartment is on the lid of the detergent dispenser. Use the pre-wash compartment only when your water is extremely hard or when you have a heavy soiled load. The pre-wash compartment is not used when tablet or packet detergents are used.
USING THE DISHWASHER Appliance Communication WiFi Connect (on some models) (for customers in the United States) Your dishwasher is GE Appliances WiFi Connect capable. A WiFi communciation card is built into the product allowing it to communicate with your smartphone for remote monitoring, control and notifications. Please visit www.GEAppliances.com/connect to connect your appliance, learn more about connected appliance features and learn what connected appliance app’s will work with your smartphone.
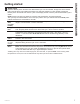
For best dishwashing results, follow these loading guidelines. Features and appearance of racks and silverware baskets may vary from your model. Upper Rack The upper rack is primarily for glasses, cups, and saucers. For best wash performance, tilt cup and glass openings toward the center of the rack. Other items such as pots, pans, and plates may be placed in the upper rack. This is also a secure place for dishwasher-safe plastic items. The upper rack can be used for odd sized utensils.
USING THE DISHWASHER Loading Rail End Hook On some models, the upper rack may be adjusted to accommodate larger items. To adjust the upper rack, fully extend the upper rack and lift the front of the rack so that the rack roller wheels clear the end hooks on the front of the rails. Continue to pull the rack until the remaining rack roller wheels clear the end hook.
12 Place Settings - Upper Rack Models - GDF645, GDP645, GDT645, GDF565, GDT565, PDT775 Models - DDT700, GDT665, PDP715, PDT715 USING THE DISHWASHER Loading Models - PDT785 49-4000214 Rev 1 15
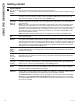
USING THE DISHWASHER Loading For best dishwashing results, follow these loading guidelines. Features and appearance of racks and silverware baskets may vary from your model. Lower Rack The lower rack is best used for plates, saucers and cookware items. Large items, such as broiler pans and baking racks should be placed along the sides of the rack. If necessary, oversized glasses and mugs can be placed in the lower rack to maximize loading flexibility.
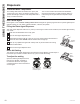
8 Place Settings - Lower Rack Models - GDF565, GDT565, GDF645, GDP645, GDT645 Models - DDT700, GDT665, PDP715, PDT715, PDT775, PDT785 USING THE DISHWASHER Loading 10 Place Settings - Lower Rack Models - GDF565, GDT565, GDF645, GDP645, GDT645 Models - DDT700, GDT665, PDP715, PDT715, PDT775, PDT785 12 Place Settings - Lower Rack Models - GDF645, GDP645, GDT645, GDF565, GDT565, PDT775 49-4000214 Rev 1 Models - DDT700, GDT665, PDT715, PDT785 17
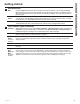
USING THE DISHWASHER Loading For best dishwashing results, follow these loading guidelines. Features and appearance of racks and silverware baskets may vary from your model. 3rd Rack (on some models) The 3rd rack is the recommended location for silverware and large utensils Take care when loading, unloading, or transporting the silverware or utensil tray. The tray may contain sharp or heavy items. If items are dropped from the tray or the tray is dropped, injury could occur.
Silverware/flatware is loaded using the silverware basket lids. This ensures great wash performance of the silverware. Loading in this manner prevents nesting and makes sure all items are washed uniformly. Silverware Basket Place flatware in the removable silverware baskets. Sharp objects, such as forks and knives, may be placed with the handles facing up, in order to protect your hands. For the best wash performance, place other items such as spoons with the handles facing down.
USING THE DISHWASHER Care and cleaning Control Panel To clean the control panel, use a lightly dampened cloth. Then dry thoroughly. Exterior Door Panel Before cleaning the front panel, make sure you know what type of panel you have. Refer to the last two letters of your model number. You can locate your model number on the left-hand tub wall just inside the door. If your model number ends with BB, CC, DS, D1, ES, FS, SA, TS, WW or W2 then you have a painted door panel.
Filters Inspect and clean the filters periodically. This should be done every other month or more depending on usage. If there is a decrease in wash performance or dishes feel gritty, this is also an indication the filters need to be cleaned. Ultra-Fine Filter Assembly Fine Filter To clean the Ultra-Fine Filter assembly, remove the bottom rack. Twist the Ultra-Fine Filter assembly counterclockwise and lift to remove for cleaning.
TROUBLESHOOTING TIPS Troubleshooting Tips... Before you call for service Problem Possible Cause Start status indicator light flashing The door was opened or the cycle was interrupted. Dishwasher BEEPS once every minute This is a reminder that your dishwasher door has been left open during operation. It will continue beeping until you press Start and close the door. This is normal. Dishwasher will beep twice at the end of the cycle.
Problem Suds in the tub Possible Cause What To Do Wrong detergent Use only automatic dishwasher detergents to avoid sudsing. Finish® Quantum® Automatic Dishwashing Detergent has been approved for use in all GE Appliances dishwashers. To remove suds from the tub, open the dishwasher and let suds dissipate. Open the door, press and hold Start for 3 seconds, and close the door. Rinse agent was spilled Always wipe up rinse agent spills immediately.
TROUBLESHOOTING TIPS 24 Troubleshooting Tips... Before you call for service Problem Water standing in the bottom of the tub Possible Cause What To Do Air gap is clogged Clean the air gap. See the Care and Cleaning section. High drain loop or air gap not installed Refer to the Installation Instructions for proper drain line installation. Water won’t pump out of the tub Drain is clogged If you have an air gap, clean it. See the Care and Cleaning section.
GEAppliances.com All warranty service is provided by our Factory Service Centers, or an authorized Customer Care® technician. To schedule service online, visit us at GEAppliances.com/service, or call GE Appliances at 800.GE.CARES (800.432.2737). Please have your serial number and your model number available when calling for service. Servicing your appliance may require the use of the onboard data port for diagnostics.
CONSUMER SUPPORT Consumer Support GE Appliances Website Have a question or need assistance with your appliance? Try the GE Appliances Website 24 hours a day, any day of the year! You can also shop for more great GE Appliances products and take advantage of all our on-line support VHUYLFHV GHVLJQHG IRU \RXU FRQYHQLHQFH ,Q WKH 86 GEAppliances.