
Installation guide

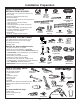
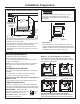
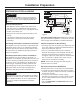
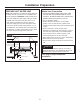
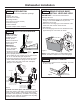
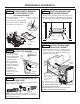
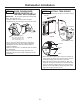
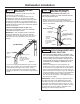
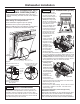

Figure N
STEP 7
INSTALL DRAIN HOSE TO
DRAIN LOOP
Connect drain loop end to drain hose using the screw
clamp as shown in the figure.
NOTE: The high drain loop on the side of the tub is
designed for better wash performance. Do not remove
from the side of the tub.
STEP 8
POSITION WATER LINE
AND HOUSE WIRING
• Position water supply line and house wiring on the
floor of the opening to avoid interference with base
of dishwasher and components under dishwasher.
STEP 9
INSTALL DRAIN HOSE,
THROUGH CABINET
• Position dishwasher in front of cabinet opening.
Insert drain hose into the hole in cabinet side. If
a power cord is used, guide the end through a
separate cabinet opening.
Tip: Prevent unnecessary service call charges for
fill, drain or noise concerns.
Position utility lines so they do not interfere with
anything under or behind the dishwasher.
Dishwasher Installation
STEP 5
IF NECESSARY, REMOVE
FLOOR PROTECT PAN
(On some models)
• Disconnect leak sensor wire
(on some models).
• Pull floor protect pan forward and
slide it from under the dishwasher.
• Set aside for use in Step 21.
STEP 6
INSTALL 90° ELBOW
• Thread 90° elbow
onto the water valve.
Ensure rubber gasket
is located between
valve and elbow.
• Do not overtighten
elbow. Water valve
bracket could bend
or water valve fitting
could break.
• Position the end
of the elbow to
face the rear of the
dishwasher.
Figure O
Water
Line
House
Wiring
4"
4"
6"
6"
7
Figure M
Water
Valve
Bracket
Fill Hose
Front of dishwasher
90° Elbow
Squeeze connector at top
to release snap feature
Floor Protect Pan
Leak Sensor
Figure L
Figure P
House
Wiring
Power Cord
(If used)
Drain
Hose
Water
Line
Insulation
Blanket
Ensure drain hose is not
twisted or pinched
Maximum drain hose
length is 15'
Do not disconnect or remove high
drain loop from left side of dishwasher