GEAppliances.com - ----_are_y Instructions .... 2-7 Operating Instructions Om Aluminum Foil ................. 14 Clock and Timer ............... 15 Lower Oven Drawer ........... 30 Oven ...................... 11-32 Baking and Roasting ......... 14 Control Lockout .............. 24 Convection .............. 18-22 Gas/Control Lockout ......... 24 Oven Control ............. 11, 12 Power Outage ............ 13, 15 Preheating .................. 14 Probe ........................ 17 Racks ....................
IMPORTANT SAFETYINFORMATION. READ ALL INSTRUCTIONS BEFOREUSING. WARNING! For your safety, the information in this manual must be followed to minimize the risk of fire or explosion, electric shock, or to prevent property damage, personal injury, or loss of life. WARNING: If the information in this manual is not followed exactlg, a fire or explosion meg result, causing propertg damage, personal in]urg or death.
GEAppliances.com WARNING! IMPORTANT SAFETY NOTICE The California Safe Drinking Water and Toxic Enforcement Act requires the Governor of California to publish a list of substances known to the state to cause birth defects or other reproductive harm, and requires businesses to warn customers of potential exposure to such substances.
IMPORTANT SAFETYINFORMATION. READ ALL INSTRUCTIONS BEFOREUSING. SAFETY PRECAUTIONS Locate the range out of kitchen traffic path and out of drafty locations to prevent poor air circulation. Be sure all packaging materials are removed from the range before operating it to prevent fire or smoke damage should the packaging material ignite. Be sure your range is correctly adjusted by a qualified service technician or installer for the type of gas (natural or LP)that is to be used.
GEAppliances.com WARNING! SURFACE BURNERS Use proper pan s/zelavoid pans that are unstable or easily tipped. Select cookware having flat bottoms large enough to cover burner grates. To avoid spillovers, make sure cookware is large enough to contain the food properly. This will both save cleaning time and prevent hazardous accumulations of food, since heavy spattering or spillovers left on range can ignite. Use pans with handles that can be easily grasped and remain cool.
IMPORTANT SAFETYINFORMATION. READ ALL INSTRUCTIONS BEFOREUSING. ELECTRICWARMING DRAWER AND LOWEROVENDRAWERCon some models) The purpose of the warming drawer and the WARM ZONE setting of the lower oven drawer is to hold hot cooked foods at serving temperature. Always start with hot food; cold food cannot be heated or cooked in the warming drawer or the WARM ZONE setting of the lower oven drawer. Do not use the drawer to dry newspapers. If overheated, they can catch on fire.
GEAppliances.com UPPER OVEN Stand away from the range when opening the door of a hot oven. The hot air and steam that escape can cause burns to hands, face and eyes. Do not usetheoven fora storagearea. Itemsstoredintheoven can ignite. Do not use your oven to dry newspapers. If overheated, they can catch fire. Keep theoven freefrom greasebuildup. Use only glass cookware that is recommended for use in gas ovens. Placetheoven racksinthedesiredposition whiletheoven iscool.
Using the gas surface burners. Throughout this manual, features and appearance Before Lighting may vary from your model. After Lighting a Gas Burner u Gus Burner Make sureall burners areinplace. Make sureall grateson therangeore properlg placedbeforeusingang burner, IfgourrangehastheGas/Control Lockout feature, make sure it is disabled before attempting to light the surface burners. How to Light u Gus Surfuce Push the control knob in and turn it to the LITE position.
GEAppliances.com Top-of-Range Cookware Aluminum: Medium-weight cookware is recommended because it heats quickly and evenly. Host foods brown evenly in an aluminum skillet. Use saucepans with tightfitting lids when cooking with minimum amounts of water. Cast-Iron: If heated slowly, most skillets will give satisfactory results. Enamelware: Under some conditions, the enamel of some cookware may melt. Follow cookware manufacturer's recommendations for cooking methods.
Using the griddle, ionsome mode/sj Your nonstick coated griddle provides on extra-large cooking surface for meats, pancakes or other food usuallg prepared in o frging pan or skillet. NOTE:Your griddle will discolor over time as it becomes seasoned with use. How to Insert the Griddle CAUTION: place andremove the griddle only when oil grates and griddle ore cool and oil surface units ore turned OFF. The griddle can onlg be used with the center burner.
Using the oven controls. (Throughout this manual, features and appearance may vary from your model.) 'o ncontT, ' GEAppliances.com ) I q T e Con Is _ooi_n_¢Deia_ LTimoJLstorU &oOGQ TrueTemp 2 Hi/Lo Set Warming Proof _rower) 6 7 !oO appearance and pad locutions L offJ 5 bulb. _-Stert] 8 On/iOft Features, 4 3_ Zone o) Co Itrol Locke ut e o may vary. Oven Control, Clock,Timer and Featuresionsome models) 0 Bake Pad Touchto selectthe bakefunction.
Using the oven controls. (Throughout this manual, features and appearance may vary from your model.) NOTE: On models with 8acktit touch pad controls, they wilt remain tit for many minutes after they are last touched. Features, appearance CONTRO and pod locations may vary. Oven Control, Clock, Timer and Features ionsome mode sJ Bake Pad Touchto selectthe bakefunction. 0 Broil Hi/Lo Pod broilfunction.
OEAppliances.com Using the upper oven. To avoid possible bums, _lace the racks in the desired position before you turn the oven on. Before you begin... The rocks hove stop-locks, so that when placed correctlg on the rock supports (A through E),theg will stop before coming completelg out, and will not tilt. When placing and removing cookware, pull the rock out to the bump on the rock support. To remove a rack, pull it toward gou, tilt the front end up and pull it out.
Using the upper oven. If gour model has a door latch, do not lock the oven door with the latch during baking or roasting. The latch is used for self-cleaning only. \ JJ I How to Set the Upper Oven for Baking or Roasting Your oven is not designed for open-door cooking. [_ Touch the BAKE pad. [] Touch the number pads to setthe desired temperature. F31 Touch the STARTpad. The ovenhas a speciallow rack (R) positionjust above the oven bottom.
Using the clockand timer. GEAppliances.com Not all features are on all models. To Set the Clock iiii IiilI l ii Make surethe clock is set to the correct time of day, The clock must be set to the correct time of dag for the automatic oven timing functions to work properlg. The time of dag cannot be changed during a timed baking or selfcleaning cgcle. If number pads are not touched within one minute after gou touch the Clock pad, the displag reverts to the original setting.
Using the timed baking and roastingfeatures,upper oven onU) If gour model has a door latch, do not lock the oven door with the latch during timed cooking. The latch is used for self-cleaning only. NOTE: Foods that spoil easily-such as milk, eggs, fish, stuffings, poultry and pork-should not be allowed to sit for more than 1 hour before or after cooking. Room temperature promotes the growth of harmful bacteria. Be sure that the oven light is off because heat from the bulb will speed harmful bacteria growth.
Using the probe. (on some models) GEAppliances.com If your model has a door latch, do not lock the oven door with the latch while cooking with the probe. The latch is used for self-cleaning only. For many foods, especially roasts and poultry, internal food temperature is the best test for doneness. The temperature probe takes the guesswork out of cooking foods to the exact doneness you want. Use of probes other than the one provided with this product may result in damage to the probe.
Usingthe convectionoven. some mode sJ If gour model has a door latch, do not lock the oven door with the latch during convection cooking. The latch is used for self-cleaning onlg. The convection oven fan shuts off when the oven door is opened. DO NOT leave the door open for long periods of time while using convection cooking. To help Uou understand the difference between convection bake and roast and traditional bake and roast, here are some general guidelines. Convection Bake Preheat the oven.
GEAppliances.com Cookwore for Convection Cooking Before using your convection oven, check to see if your cookware leaves room for air circulation in the oven. If you are baking with several pans, leave space between them. Also, be sure the pans do not touch each other or the walls of the oven. Paper and Plastic Heat-resistant paper and plastic containers that are recommended for use in regular ovens can be used in convection ovens.
Usingthe convectionoven. some mode/sj If £our model has a door latch, do not lock the oven door with the latch during convection cooking. The latch is used for self-cleaning only. How to Set the Upper Oven for Convection Roasting When Using the Probe (on some models) Forbest resultswhenroastinglarge turkeysandroasts,we recommendusing the probeincludedinthe convectionoven.
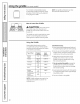
GEAppliances.com B" I"t- Heats Beef Pork Rib(3 to S Ibs.) Rarer Medium Well Minutes/Lb. 20-24 24-28 28-32 Oven Temp. 325°F 325°F 325°F Internal Temp. 140°F 160°F 170°F BonelessRib,Top Sirloin Rarer Medium Well 20-24 24-28 28-32 325°F 325°F 325°F 140°F 160°F 170°F BeefTenderloin RarelMedium 10-14 14-18 325°F 325°F 140°F 160°F 35-45 23-27 23-27 300°F 325°F 325°F 170°F 170°F 170°F 30-35 total 35-40 total 40-45 total 325°F 325°F 325°F 170°F 170°F 170°F Canned(3 Ibs.
Usingthe timed convectionbaking features, ransome =ode/sj You will hear a fan while cooking with this feature. The fan will stop when the door is opened but the heat will not turn off. NOTE: Foods that spoil easily--such as milk, eggs, fish, stuffings, poultrg and porkishould not be allowed to sit for more than J hour before or after cooking. Room temperature promotes the growth of harmful bacteria. Be sure that the oven light is off because heat from the bulb will speed harmful bacteria growth.
Special features of your upper oven control. GEAppliances.com I-'t- Your new touch pad control has additional features that gou mag choose to use. The following are the features and how you may activate them. The special feature modes can only be activated control's memory until the steps are repeated. while the display is showing ,,1.,., the time of day. Theg remain in the t_ When the display shows gour choice, touch the Start pad. The special features a power failure.
Special features of your upper oven control. Gas/Control Lockout (on some models) GAs/CONTROL Your control will allow you to lock out the surface burners, oven burners and control panel so they cannot be activated. When this feature is on and the touch pads are touched, the control will beep and the display will show LOCON. To lock/unlock the controls: [] Turn all surface burners off. [_ Touch and hold the Gas/Control Lockout pad for 3 seconds until the display shows LOCON.
Using the Sabbath feature. (Designed for use on the Jewish Sabbath and Holidays) GEAppliances.com The Sabbath feature can be used for baking/roasting in the upper oven only. It cannot be used for convection, broiling, self-cleaning or delay start cooking. NOTE: The oven light comes on automatically (on some models) when the door is opened and goes off when the door is closed. The bulb may be removed. See the Oven Light Replacement section.
Using the Sabbath feature. How to Exit the Sabbath Feature I CLEAR I [_ Touch the Clear/Offpad. [_ If the oven is cooking, wait for a random delau period of approximatelu 30 seconds to I minute, until only D is in the displau. [_] Pressand hold both the Bake and Broil Hi/Lo pads, at the same time, until the display shows SF. H_/Lo I DELAYI [] Tap the Delay Start pad until 12shdn or no shdn appears in the display.
Adjust the upper oven thermostat--Do it yourselfl. GEAppliances.com You may find that your new oven cooks differently than the one it replaced. Use your new oven for a few weeks to become more familiar with it. If you still think your new oven is too hot or too cold, you can adjust the thermostat yourself Do not use thermometers, such as those found in grocerg stores, to check the temperature These thermometers mag varg 20140 degrees.
Using the electric warming drawer, ransomemode/sj The warming drawer will keep hot, cooked foods at serving temperature. use to heat cold food other than crisping crackers, chips or dry cereal. To Use the WARM_NG SET WARMING l Drawer [_ Touch the Warming Drawer pad. "Warm" and "1" are liton the displag and "Set" begins to blink. [_ On the number pad, press 1 for Low, 2for Medium or 3 for High. The display "1" changes corresponding to the number pad selected.
GEAppliances.com Temperature Selection Chart To keep severol different foods hot, set the control to the food needing the highest setting. The temperoture, type ond omount of food, ond the time held will offect the quolity of the food. Food in heot-sofe gloss ond gloss-ceromic utensils moy need o higher control setting os compored to food in metol utensils. Repeotedopening of the drower allows the hot oir to escope ond the food to cool.
Using the lower oven drawer, ionsomer ode/sJ The lower oven drawer may be used to bake foods using the same times and temperatures as a standard oven. Foods ideal for baking in the lower oven drawer include pizza, frozen foods, casseroles, biscuits, rolls and many desserts. To Use the Lower Oven Drawer OFF WEFIOVEN • []_] Pushin ond turn the lower oven drower knob to ong desiredsetting, [_ 300 * 350 • 400 Allow the lower oven drawer to preheat.
Usingthe self-cleaning upper oven. GEAppliances.com If blour model has a door latch, never force the latch handle. Forcing the handle will damage the door lock mechanism. The oven door must be closed and all controls set correctly for the cycle to work properly. Before a Clean Cycle Forthe first self-clean cycle, we recommend venting your kitchen with an open window or using a ventilation fan or hood. Wipe up heavy soil on the oven bottom.
Using the self-cleaning oven. The oven door must be closed and all controls set correctly for the cycle to work properly. How to Delay the Start of Cleaning I SELF I Make suretheclockshows thecorrect time of day. %FFlE]EEEE C_L L_out DELAY START E_] on models with Gas/Control Lockout, touch and hold the GaslControl Lockout pad for 3 seconds to turn it off. NOTE: The surface burners must be turned off prior to the self-clean start time. [_ Ifyour model has a latch, latch the door.
Care and cleaning of the range. GEAppliances.com Be sure electrical power is off and all surfaces are cool before cleaning ang part of the range. -AWARNING: _fyour rangeisremoved forcleaning, servicing oranyreason, be sure the anti-tip device is reengaged properly when the range is replaced. Failure to take this precaution could result in tipping of the range and cause injury. Burner Assemblies (on some models) Side grate Turn all controls OFF before removing the burner parts.
Care and cleaning of the range. Burner Caps, Bases and Heads Before removing the burnercaps and heads (on some models),remember their size and location. Replace them in the same locationoffer cleaning. NOTE:Donotusesteelwoolor scouringpowders to cleonthe burnerports. Replacement Burner Heads (onsomemodels) Replaceburnerheadsoverthe electrodeson the cooktop,in thecorrectlocationsaccordingto theirsize.Thereis onesmall,one medium,one largeand one extra largeburnerhead.
GEAppliances.com Griddle NOTES: The griddle is to be used over the center burner onlg. Do not clean the griddle in a dishwasher Wash with hot, soapg water after each use while using a sponge or dishcloth. If oil or food residue is left on the griddle, further cooking will harden the residue and cause sticking over time. In this case, use a nonabrasive cleanser such as Ban Ami ® or one of the soft scrub cleansers. Applg with a sponge, Scrunge® or other cleaning pad labeled safe for nonstick pans.
Care and cleaning of the range. Oven Air Vents Never block the vents (air openings) of the range. They provide the air inlet and outlet that are necessary for the range to operate properly with correct combustion. Air openings are located at the rear of the cooktop, at the top and bottom of the oven door, and at the bottom of the range, under the warming drawer or lower oven drawer. Vent appearance and location vary. Upper Control Panel On models so equipped,/ock out the touch pads before cleaning.
GEAppliances.com Lift-Off Oven Door Theoven door is removable, but it is heovg. You mog need help removing and replodng the door. To remove the door, open it a few inches to the special stop position that will hold the door open. Grasp firmlg on each side and lift the door straight up and offthe hinges. The area outside the gasket can be cleaned with a soap-filled plastic scouring pad. To clean the outside of the door: Use soap and water to thoroughly clean the top, sides and front of the oven door.
Care and cleaning of the range. Oven Racks and Drawer Racks If your oven is equipped with nickel oven racks, they should be removed from the oven before beginning the self-clean cycle. To clean the nickel racks, use an abrasive cleanser.After cleaning, rinse the racks with clean water and dry with a clean cloth. If the racks ever become hard to slide,wipe the rack edges or oven rack supports with vegetable oil. They may also be cleaned by using an abrasive cleanser.
GEAppliances.com Removable Drawer (Warming Drawer Models onlg) NOTE:For models with an electric warming drawer, before performing any adjustments, cleaning or service, disconnect the range electrical power supply at the household distribution panel by removing the fuse or switching off the circuit breaker. Make sure the warming drawer heating element is cool. Most cleaning con be done with the drawer in place. However,the drawer mog be removed if further cleaning is needed.
Installation Instructions Range In the Commonwealth of Massachusetts FOR YOUR SAFETY Do not store or use combustible materials, gasoline or other flammable vapors and liquids in the vicinity of this or any other appliance. • This product must be installed by a licensed plumber or gas fitter. If you smell gas: • When using ball type gas shut-off valves, they shall be the T-handle type. O Open windows. • A flexible gas connector, when used, must not exceed 3 feet. Don't touch electrical switches.
Installation Instructions • Avoid plocing cobinets obove the ronge. To reduce the hozord coused by reoching over the open flomes of operoting burners, instoll o ventilotion hood over the ronge thot projects forword ot leost 5" beyond the front of the cobinets. -AWARNING! INSTALLATION SAFETY INSTRUCTIONS Read these instructions • The ventiloting hood must be constructed of sheet metol not less thon 0.0122" thick.
Installation DIMENSIONS Instructions AND CLEARANCES Provide adequate clearances between the range and adjacent combustible surfaces. These dimensions must be met for safe use of your range. The location of the electrical outlet and pipe opening (see Gas Pipe and Electric Outlet Locations) may be adjusted to meet specific requirements. The range may be placed with O" clearance Minimum to cabinets on either side of the range (flush) at the back wall.
Installation Instructions - WARNING! LOCATION ANTI-TIP DEVICE Do not locate the range where it mag be subject to strong drafts. Ang openings in the floor or wall behind the range should be sealed. Hake sure the openings around the base of the range that supplg fresh air for combustion and ventilation are not obstructed bg carpeting or woodwork. • All ranges can tip. Your range, like mang other household items, is heavg and can settle into soft floor coverings such as cushioned vingl or carpeting.
Installation Instructions CONNECT PROVIDE ADEQUATE GAS SUPPLY THE RANGE TO GAS Shut off the main gas supply valve before disconnecting the old range and leave it off until the new hookup has been completed. Don't forget to relight the pilot on other gas appliances when gou turn the gas back on. Your range is designed to operate at a pressure of 5" of water column on natural gas or, if designed for LP gas (propane or butane), 20" of water column.
Installation Instructions GAS PIPE AND ELECTRICAL OUTLET LOCATIONS For models JGB500, PGB900, PGB908 and PGB910 onlg. (See the below section for models JGB605, PGB916, PGB918 and PGB975.) /,7 3F' Recommendedarea for 120Voutlet on rear wall and area for throughthe-wall connection of pipe stub and shut-off valve. \ Recommendedarea for through-the-floor connection of pipe stub and shut-off valve. GAS PIPE AND ELECTRICAL OUTLET LOCATIONS For models JGB605, PGB916, PGB918 and PGB975 only.
Installation Instructions FLEXIBLE CONNECTOR HOOKUP Installer: Inform the consumer of the location of the gas shut-off valve. 1/2" or 3/4" Gaspipe _ _-_ L_- Gas shut-off valve RIGID PIPE HOOKUP OPTIONS Alternate Hookup _,- Adapter 45° Elbow .,,_._[]_ _ ,, ow 90° Elbow ,, ow J I Nipple--_qtI _ !Opres :! ,e U "\ regulator n -_ @ _t_l°anckpipe _-_ Union [jl _€-_ Nipple Installer: Inform the consumer of _ I the location gas shut-off _._/ L,.g_ of the valve. I_'i!.
Installation Instructions 131ELECTRICAL CONNECTIONS (CONT.) [] ELECTRICAL CONNECTIONS Electrical Requirements A. Usage Situations Where Appliance Power Cord Will Be Disconnected Infrequently. 120-volt, 60 Hertz, properly grounded dedicated circuit protected by a iS-amp or 20-amp circuit breaker or time-delay fuse. An adapter may be used only on a iS-amp circuit. Do not use an adapter on a 20-amp circuit.
Installation Instructions [] ELECTRICAL CONNECTIONS (CONT.) [] B. Usage Situations Where Appliance Power Cord Will Be Disconnected Frequently. Make surethe slot in the burnerhead is positioned overthe electrode. Do not use an adapter plug in these situations because disconnecting of the power cord places undue strain on the adapter and leads to eventual failure of the adapter ground terminal.
Installation [] Instructions [] CHECK IGNITION OF SURFACE BURNERS CHECK IGNITION OF OVEN BURNER The oven is designedto operate quietly and automatically. To operatethe oven, pressthe Bakepad and then press the number pads until 350° appears in the display.Touch the Start pad.After BO-90seconds,the oven burner will ignite and burn until the set temperature is reached.Theoven burner will continue to cycle on and off as necessaryto maintain the oven at the temperature indicated by the display.
Installation [] Instructions ADJUST BROIL AND OVEN BURNER AIR ADJUSTMENT NECESSARY I-8-1ADJUST BROIL AND OVEN BURNER SHUTTERS IF Air adjustment shutters for the top and bottom regulate the flow of air to the flames. AIR ADJUSTMENT SHUTTERS IF NECESSARY (CONT.} burners Oven bottor To remove the oven bottom: A. Remove the screws holding down the rear of the oven bottom. B. Grasp the oven bottom at finger slots on each side.
Installation [] INSTALLING THE ANTI-TIP Instructions DEVICE INSTALLING THE ANTI-TIP (CONT.) WARNING! Wallboard DEVICE Backof range • Range must be secured with an approved Anti-Tip device. • Unless properlg installed, the range could be tipped by you or o child standing, sitting or leaning on an open door. , Wood screw • After installing the Anti-Tip device, verifg that it is in place bg carefullg attempting to tilt the range fo rwa rd.
Lt} .£ 13 Before you call for service... Troubleshooting Tips Save time and money! Review the charts on the following pages first and you may not need to call for service. Lt} m Lt} O £J Possible Causes What To Do Topburnersdo not light or do not burn evenly, Plugon range is not completelg inserted in the electrical outlet, * Hake sure electrical plug is plugged into a live, properly grounded outlet.
GEAppliances.com r3 Possible Burners do not light (contJ O" What To Do Causes A fuse in gour home mag be blown or the circuit breaker tripped. • Replacethe fuse or reset the circuit breaker. Burner parts not replaced correctlg. • See the Care and cleaning of the range section. Lt} O r_ • If LOC ON appears in the displag, the range control is locked.Turn this feature off to use the range. See the Gas/Control Lockout or Control Lockout section.
Lt} .o 13 Before you call for service... Troubleshooting Tips Lt} Possible Causes Excessivesmoking Excessivesoil. Oven door will not open after a clean cycle Oven too hot. • Allow the oven to cool below locking temperature. Do not lock the door with the door latch except when using the self-clean feature. Ovennot clean after a Oven controlsnot properly set. • Seethe Using the self-cleaning upper oven section. clean cycle Oven was heavily soiled.
GEAppliances.com t_ O" Possible Causes What To Do A fuse in gour home mug be blown or the circuit breaker breaker tripped. • Replace the fuse or reset the circuit breaker. The clock is in the blackout mode. ° See the Special features of your oven control section. Displag flashes Power failure. ° Reset the clock. Unable to get the display to show "SF" Oven control pads were not pressed properlg, • The Bake and Broil Hi/Lo pads must be touched the same time and held for 3 seconds.
Notes. m 0 a_a v w_ A u vl r_ a_a 0 0 v a_a L.
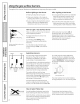
Grates SurfaceBurnerHeadsandCaps i(fl ¸ : Knobs SurfaceElementsand DripPans iOiii;ii! i;iLi! ii_:i: Griddle OvenRacks OvenElements Light Bulbs Experience these other great products to keep your kitchen looking great! z_A_,_#_T&" CeramicCo@top CeramicCooktop StainlessSteet Includescleaner, scraperand pad __E Wipes Appliance Cleaner CleaningKit: CleaningWipes AppliancePolish StainlessSteel WXlOX117GCS WXlOX305 WXlOXIO001 PM10X311 Get the most out of your Broiler Pan! (Not for use with
GE Gas Range Warranty.iFor customers the united states) All warranty service provided by our Factory Service Centers, or an authorized Customer Care ®technician. To schedule service, visit us on-line at GEAppliances.com, or call 800.GE.CARES (800./432.2737). Please have serial number and model number available when calling for service. Staple Four receipt here. Proof of the original purchase dote is needed to obtain service under the warrant F.
Damage to the product caused bg accident, fire, floods or acts of God. Service trips to gour home to teach gou how to use the product. Incidental or consequential damage caused bg possible defects with th is a pplia nce. installation, deliverg or maintenance. Failure of the product if it is abused, misused, or used for other than the intended purpose or used commerciallg. Damage caused after deliverg. Product not accessible to provide required service.
Consumer Support. GEAppliances Website In the U.S.:GEApplionces.com Have a question or need assistance with your appliance? Try the GEAppliances Website 24 hours a day, any day of the year! For greater convenience and faster service, you can now download Owner's Manuals, order parts or even schedule service on-line. In Cenede: www, GEAppliences,ce Schedule Service In the U.S.:GEApplionces.com Expert GErepair service is only one step away from your door.