
Use and Care Manual

49-80679-1
9
Double Wall Oven
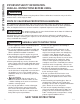
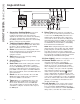
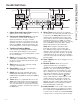
1. Upper Oven and Lower Oven: Designates
which oven the controls will operate.
2. Convection Cooking Modes: Convection
cook modes use increased air circulation to
improve performance. The type of benefit
depends on the mode. Your upper oven has the
following convection cooking modes: Convection
Bake (1 Rack/Multi), and Convection Roast. See
the Cooking Modes section for more information.
3. Traditional Cooking Modes
Your oven has the following traditional cooking
modes: Bake, Broil Hi, Broil Lo, Proof (Lower
Oven) and Warm. See the Cooking Modes section
for more information.
4. Clean: Your oven has two cleaning modes:
Self Clean and Steam Clean. See the Cleaning
the Oven section for important information about
using these modes.
5. Start: Must be pressed to start any cooking,
cleaning, or timed function.
6. Cancel/Off: Cancels ALL oven operations
except the clock and timer.
7. Clock: Sets the oven clock time. Press the
9 and 0 pads and hold for 3 seconds. Use the
number pads to program the clock. Press Start to
save the time.
8. Timer: Works as a countdown timer. Press the
Timer pad and the number pads to program the
time in hours and minutes. Press the Start pad.
The oven will continue to operate when the timer
countdown is complete. To turn the timer off press
the Timer pad.
9. Delay Time: Delays when the oven will turn
on. Use this to set a time when you want the oven
to start. Press the Delay Time pad and use the
number pads to program the time of day for the
oven to turn on. Press the desired cooking mode
and temperature then press Start. A cook time
may also be programmed if desired. This can only
be used with Bake, Convection Bake (1 Rack/
Multi), Convection Roast and Self-Clean.
NOTE: When using the delay time feature,
foods that spoil easily—such as milk, eggs,
fish, stuffings, poultry and pork—should not be
allowed to sit for more than 1 hour before or after
cooking. Room temperature promotes the growth
of harmful bacteria. Be sure that the oven light is
off because heat from the bulb will speed harmful
bacteria growth.
10. Oven Light(s): Turns the oven light(s) on or off
in both ovens.
11. Remote Enable: Allows the oven to be
operated remotely. Once connectivity is
established, pressing the Remote Enable pad
allows the oven to be operated from a mobile
device. Opening the oven door while the oven is
idle, or ending a cook cycle ends this capability
and requires the button to be pressed again to
enable remote operation. Both the and the
remote enable light in the display must be solid
and lit to allow remote operation. If either the
icon or the remote enable light are not lit or are
blinking, the remote enable feature will not work.
Additional guidance is provided in the included
insert and through the mobile app.
12. Lock Controls: Locks out the control so that
pressing the pads does not activate the controls.
Press and hold the Lock Controls pad for three
seconds to lock or unlock the control. Cancel/Off
is always active, even when the control is locked.
USING THE OVEN: Oven Controls
123
56 65
10
1
3
4
7
9
1112
4
8