
Installation Guide


3
Design Information
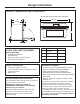
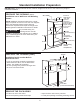
PRODUCT DIMENSIONS AND CLEARANCES
TOOLS AND PARTS REQUIRED
(NOT SUPPLIED)
• #2 Phillips screwdriver
•
Hand-held drill
•
High speed drill bit, 3/32Ǝ diameter
•
3/8Ǝ slot-head screwdriver
PARTS SUPPLIED
• 6 screws (3 required, 3 extra)
• 5 color-matched screws (4 required, 1 extra)
• 2 side trim pieces
•
Bottom trim
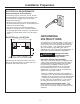
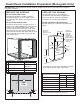
FLUSH MOUNT INSTALLATION
This installation method allows for the unit face to
be inline with the cabinet face.
IMPORTANT: HIGH SKILL LEVEL IN
CARPENTRY IS REQUIRED. Non-standard
cabinetry may be required.
Flush installation of the oven will lead to the
exposure of the cabinet face frame edges.
Side cleats may be visible and should be a
finished surface.
C
13”
B
21-1/2”
D
1”
29-3/4” With Optional Side Trim (ZSC1001)
A
26-3/4”
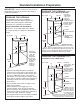
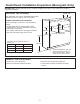
ADVANCE PLANNING
•7KHVHRYHQVPD\EHLQVWDOOHGGLUHFWO\LQWRDƎ
wide oven cabinet with standard installation.
•
Cutout height dimensions are different for
installations with an accessory storage drawer.
Make sure to use the correct cutout when preparing
the opening.
• Allow for clearance to adjacent corners, walls,
drawers, etc.
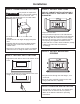
The oven must be securely installed in a cabinet
that is firmly attached to the house structure.
Weight on the oven door could cause the oven
to tip and result in injury. Never allow anyone to
climb, sit, stand or hang on the oven door.
If installing the drawer accessory, the drawer must
be assembled to the oven prior to installation into
the cabinet. See the Accessory Storage Drawer
Assembly Instructions.
ZSC1001 PSB9100
A 18–5/8” 19”
B 3/4“ 1”
C 22–3/4” 22–11/16”
D 1–1/4” 1–3/16”