
Installation Guide


6
Standard Installation Preparation
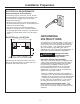
PREPARE THE OPENING (CONT.)
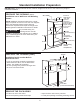
Installation over a Wall Oven and Warming
Drawer:
NOTE: Additional clearances between the cutouts
may be required. Check to be sure the oven supports
above the Warming Drawer location does not
obstruct the required interior depth and height. See
Warming Drawer installation instructions for details.
For personal safety, the
mounting surface must be
capable of supporting the cabinet load, in addition
to the added weight of the oven and drawer, plus
additional oven loads.
REMOVE THE PACKAGING
• Lift the oven out of the carton.
• Remove all packing material and tape.
• Open the door and remove parts box.
• Locate parts package containing mounting screws.
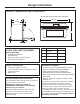
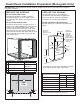
Construct
solid bottom
- Min. 3/8”
plywood
supported
on all four sides.
Must be able to
support weight
of oven and
contents.
27” or 30”
23-1/2”
25-1/4”
17-1/2”
2Ǝ Min.
(3Ǝ Recommended)
Per Oven
Requirement
45-1/4”
2Ǝ Min.
(3Ǝ Recommended)
Per Warming
Drawer
Requirement
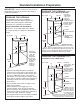
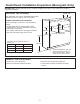
PREPARE THE OPENING (cont.)
Installation beside another Built-in
Speedcook Oven:
• If you are mounting one Built-In Speedcook
Oven beside the other, use the dimensions
shown. The middle rail separating
the two openings may need to be larger than
the 4-1/2Ǝ minimum shown.
25-1/4Ǝ
17-1/2Ǝ
23-1/2Ǝ
17-1/2Ǝ
4-1/2Ǝ Min.
(5-1/2Ǝ Recommended)
25-1/4Ǝ
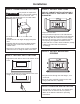
CAUTION
IMPORTANT: Always maintain 36-3/4” minimum height from the floor to the cutout in any single or
combined installation.