
Installation Guide


9
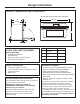
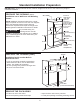
• Align bottom trim tabs to slots in the bottom of the
oven.
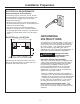
SLIDE OVEN INTO CUTOUT
Two people are required to
lift the oven into the opening.
Grasp the bottom at the front and rear. DO
NOT USE THE HANDLE TO LIFT THE OVEN.
DAMAGE WILL OCCUR!
• Lift and hold the oven at the front of the
opening.
Hold the oven at a 45º angle and plug in the power
cord.
•
Carefully, slide the oven into the cabinet part way.
Leave the oven a few inches forward of the
cabinet frame.
• Check to be sure the power cord is not trapped
under the oven or along the sides of the oven.
STEP 1
INSTALL BOTTOM TRIM
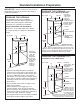
STEP 2
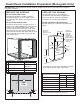
Installation
INSTALL SIDE TRIM
FOR 30” CABINET INSTALLATION ONLY.
SKIP THIS STEP IF YOU HAVE 27” WIDE
CABINETRY.
• Open the oven door.
• Hang the side trim pieces on the tabs behind
the oven flange.The screw holes in the side trim
should align with the holes in the oven flange.
• Check to be sure the oven is pushed back into
the opening and against the cabinet frame.
• If the side trim is used in flush installation, modify
cabinet cutout and side cleat thickness
accordingly.
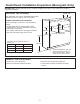
STEP 3
INSTALL MOUNTING
SCREWS
• Drill pilot holes through the side flanges, 2 on
each side.
• Drive the color matched screws into the side
flange (and side trim, if applied).
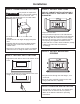
STEP 4
• Turn power on at the source. The interior light
should come on when the door is opened.
• Refer to the Owner’s Manual for operating
instructions.
STEP 5 FINALIZE INSTALLATION
• Secure the bottom trim to the bottom of the oven
using 3 brass screws provided.
CAUTION