Installation I structi n Advantium Built-In Ovens ® 120V SpeedCook PSB9120DF PSB9120SF ZSC1201 ZSC1202 Espaflol For a Spanish version of this manual, visit our Website at GEAppliances.com. 49-40688-1 HFL59060909 i 08-13 GE Para consultar una version en espa_ol de este manual de instrucciones, visite nuestro sitio de internet GEAppliances.com.
Safety Information BEFORE YOU BEGIN CONTENTS Read these instructions Design Information Models Available ...................................................................... 2 Product Dimensions and Clearances ............................ 4 Tools and Parts Required .................................................... 4 Parts Supplied ........................................................................... 4 Advance Planning ...................................................................
Informaci6n de seguridad ANTES DE COHENZAR Lea estas instrucdones detenimiento. par completo y con IH PORTANTE - Guarde estas instrucciones para el usa de inspectores locales. IM PORTANTE -Cumpla contodos los c6digos y ordenanzas vigentes. • Nota al instalador- AsegGrese de dejar estas instrucciones con el Consumidor. ,, Nota al consumidorMantenga estas instrucciones con el Manual del Propietario para referencia futura.
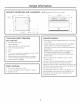
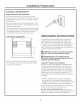
Design Information PRODUCT DIMENSIONS AND CLEARANCES NOTE: Appearance _21-1/2" i-3/5" will vary by model. _, 29-3/4" _- ooooooB oo 0Boo} oo f J \ \ irt i-i/io" TOOLS AND PARTS ADVANCE REOUIRED (NOT SUPPLIED} These ovens may be installed directly into a 30" wide oven cabinet. • #2 Phillips screwdriver • Hand-held drill Cutout dimensions are NOTthe same for installation with or without an accessory storage drawer. Make sure to use the correct cutout when preparing the opening.
Installation Preparation ELECTRICAL REQUIREMENTS Single Advantium 120 Installation: This product requires a i20-volt, 60 Hz, 1S-amp circuit and draws 1.8 kilowatts. This product must be connected to a supply circuit of the proper voltage and frequency. • Wire size must conform to the requirements of the National Electrical Code or the prevailing local code for this kilowatt rating. The power supply cord and plug should be brought to a separate 15 or 20 ampere branch circuit single grounded receptacle.
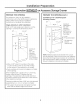
Installation Preparation PreparationWITHOUTan AccessoryStorage Drawer PREPARE THE OPENING The Advantium PREPARE THE OPENING {cont.) 120V can be installed in combination with other GE/Monogram appliances. Always follow each product's Installation Instructions to complete the installation. Single Advantium Installation Warming over a GE/Honogram Drawer: 23-1/2" 120V Installation: Order a 30" wide single oven cabinet or cut the opening in a wall to the dimensions shown.
Installation Preparation PreparationWITHOUTan AccessoryStorageDrawer PREPARE THE OPENING (cont.) PREPARE THE OPENING (cont.) Installationover a GE/Monogram Installation over a GE/Honogram Warming Drawer: oven: 2]-i/2" Oven and 23-1/2" Construct Solid Bottom Nin. 3/8" Plywood _Supported by 2x4or2x2 Runners all Four Sides 17-i/2" Construct Solid Bottom Hin. 3/8" Plywood Supported by _2x4or2x2 Runners all Four Sides 2" Min. Recommended) .... 2" Min.
Installation Preparation Preparation WITHOUT an AccessoryStorage Drawer PREPARE THE OPENING (cont.) Installation over another GE/Monogram Under-the-Counter IUTC) oven: _ PREPARE THE OPENING Installation Microwave Drawer: under a GE/Monogram Oven and over a Warming Construct Solid Bottom Min. ]/8" Plywood Supported by 2x4or2x2 Runners oil Four Sides 2" Min. (3" Recommended) (cont.) Construct Solid Bottom Min. ]/8" Plywood Supported by /2x4or2x2 Runners all Four Sides Per Oven Rec uirement Min. 4.
Installation Preparation PreparationWITHOUTan AccessoryStorageDrawer PREPARE THE OPENING (cont.) Installation beside Built-in Speedcook GE/Plonogram another Oven: 23-1/2" • If you ore mounting one Under-the-Counter GE/Honogram oven beside the other, use the dimensions shown. The middle rail separating the two openings may need to be larger than the 4-1/2" minimum shown. 17-1/2" 17-1/2" J4-i/2" Hin. (5-i/2" Recommended) PREPARE THE OPENING Installation icont.
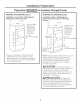
Installation Preparation PreparationWIT____HH an Accessory Storage Drawer NOTE:MODELZSCI201 CAN ONLYBE INSTALLEDWITH AN ACCESSORY STORAGEDRAWERIF INSTALLEDABOVE36-3/4". MODELZSC1202CANNOT BE INSTALLEDWITH AN ACCESSORY STORAGEDRAWER.SEEINSTALLATIONPREPARATION WITHOUT AN ACCESSORY STORAGEDRAWERFORTHIS MODEL. PREPARE THE OPENING (cont.} PREPARE THE OPENING (cont.} The Advantium Installation over a GE/Monogram Warming Drawer: &20V can be installed in combination with other GE/Monogram appliances.
Installation Preparation PreparationWIT____HH an Accessory Storage Drawer NOTE:MODELZSC1201CAN ONLYBE INSTALLEDWITH AN ACCESSORY STORAGEDRAWERIF INSTALLEDABOVE36-3/4". MODELZSC1202CANNOT BE INSTALLEDWITH AN ACCESSORY STORAGEDRAWER.SEEINSTALLATIONPREPARATION WITHOUT AN ACCESSORY STORAGEDRAWERFORTHIS MODEL. PREPARE THE OPENING (cont.) Installation over a GE/Monogram PREPARE Oven: Installation over a GE/Monogram Warming Drawer: Construct Solid Bottom Hin.
Installation Preparation PreparationWIT______H_H an Accessory Storage Drawer NOTE:MODELZSC1201CAN ONLYBE INSTALLEDWITH AN ACCESSORY STORAGEDRAWERIF INSTALLEDABOVE36-3/4% MODELZSC1202CANNOT BEINSTALLEDWITH AN ACCESSORY STORAGEDRAWER.SEEINSTALLATIONPREPARATION WITHOUT AN ACCESSORY STORAGEDRAWERFORTHIS MODEL. PREPARE THE OPENING Icont.} PREPARE THE OPENING Icont.
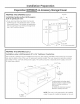
Installation Preparation PreparationWIT_____HH an Accessory Storage Drawer NOTE:MODELZSC1201CAN ONLYBE INSTALLEDWITH AN ACCESSORY STORAGEDRAWERIF INSTALLEDABOVE36-3/4% MODELZSC1202CANNOT BEINSTALLEDWITH AN ACCESSORY STORAGEDRAWER.SEEINSTALLATIONPREPARATION WITHOUT AN ACCESSORY STORAGEDRAWERFORTHIS MODEL. 23-1/2" PREPARE THE OPENING Icont.
Installation REMOVE THE PACKAGING AND Instructions PARTS • Remove oil packing material and tope. Locate ports package containing mounting screws. • Remove the oven from the carton. Do not lift unit by handle or conduit. Two people are required to lift this oven. • Open the door and remove any packaging Owner's Manual in oven. Rack ACAUTION: theAdvantium installing 120V Oven below 36% you must use the plastic bottom trim due to burn risk to children.
Installation Instructions [_] DOOR TRIM REMOVAL FOR ABOVE 36" INSTALLATION ONLY i-_ SLIDE THE OVEN INTO THE CUTOUT If installing the Advantium 120V Oven above 36" from the floor, you may remove the plastic trim from the bottom of the door for esthetic purposes if desi red. lift the oven into the opening. Grasp the bottom at front and rear. DO NOT USE THE HANDLE TO LIFT THE OVEN. DAMAGE WILL OCCUR.
Installation Instructions INSTALL BOTTOM TRIM [_] INSTALL MOUNTING ACAUTION: Ifinstalling theAdvantium SCREWS [ oooo8c oooo ] 120V Oven below 36", you must use the plastic bottom trim due to burn risk to children. The plastic trim acts as insulation and will help prevent burns to children from hot surfaces. OC] []C] C] C]E] J PRE:CAU ClaN: siveeinstolor elhomo Adventium de !20V debejo de 36", usted debe utilizer el reborde inferior pl6stico debido el riesgo de quemodures pore los nihos.
GE Consumer & Industrial Appliances As e bly In tr ct ® Advantium ® Built-In AccessoryStorage Drawer JX2200, JX2201, ZX2201 MODELS AVAILABLE BEFORE YOU BEGIN Profile Models: Read these instructions completely and carefully. Read the Installation Instructions for the Advantium JX2200BB-Black JX2201SS-Stainless Steel 120V or 240V oven completely and carefully for cutout dimensions and step-by-step instructions.
ASSEMBLY TO ADVANTIUM | BUILT-IN SPEEDCOOK OVEN ASSEMBLING THE OVEN TO DRAWER REMOVE PACKAGING AND PARTS [] • Remove the drewer from the certon. • Remove ell pecking materiel end tope. • Open the drewer end remove eny ports inside. • Locete ports. B] Assemblg Instructions Side Supports (2) Place storage drawer on a surface with the front of drawer hanging over the edge of the surface.
ASSEMBLY TO ADVANTIUM BUILT-IN SPEEDCOOK OVEN ASSEMBLING THE OVEN TO DRAWER Icont.) r_ Remove the front two bottom screws on each side of the oven and the top center screw on each side of the storage drawer. El H H H H H H H D Place the side supports into the tabs on the drawer and secure using the screws supplied and the screws removed in Step C. Side Support 120v only f B] The oven and storage drawer assembly is now ready to be installed.
NOTE: While performing instollotions described in this book, sofety glosses or goggles should be worn. NOTE: Product improvement is o continuing endeovor ot GeneroJ Electric. Therefore, moteriols, oppeoronce ond specificotions ore subject to chonge without notice. Printed in Korea GE Appliances & Lighting Appliances General Electric Company Louisville, KY 40225 GEAppliances.
Instr ¢¢ e de instalaci6n ® Hornos de cocci6n r6pida empotrados de 120V Advantium PSB9120DF PSB9120SF ZSC1201 ZSC1202 49-40688-! iVIFL59060909 08-13 GE l ®
Informaci6n de seguridad ANTES DE COHENZAR CONTENIDOS Lea estas instrucdones detenimiento. Informaci6n de dise_o Modelos disponibles .............................................................. 2 Dimensiones y distancias del producto ....................... 3 Herramientas y piezas requeridas .................................. 3 Piezas provistas ....................................................................... 3 Planificaci6n previa ...............................................................
Informaci6n DIMENSIONES Y DISTANCIAS DEL PRODUCTO _21-1/2" 1-3/5" de dise o NOTA: La apariencia varfa segOn el modelo. -_ { 29-314" _ ( _oooo m0 ,- 8 o_ / 19" \ in i-l/lo"_ HERRAMIENTAS Y PIEZAS REQUERIDAS (NO PROVlSTAS} • Destornillador de estrella #2 • Perforadora de mano • Broca para perforadora de alto velocidad de 5/52" de di6metro • Destornillador para cabeza ranurada de S/8" • Nivel • Sierra • Madera de 2 x 4 o 2 x 2para instalar guias o madera terciada de 5/8" para el piso (si se r
Preparaci6n para la instalaci6n REQUISlTOS ELI_CTRICOS Instalaci6n de Advantium de 12OV 6nico: Este producto requiere un circuito de 120 voltios, 60 hercios, 15 amperios y consume 1.8 kilovatios. Este producto debe conectarse a un circuito de suministro del voltaje y frecuencia adecuados. • El tamaBo del cable debe cumplir con los requisitos del C6digo EI6ctrico Nacional o con el c6digo local vigente para esta clasificaci6n de kilovatios.
Preparaci6n para la instalaci6n Preparaa6nSJ Nun caj6n de almacenamientode accesorios C6MO PREPARAR LA ABERTURA El Advantium de 120V puede instalarse en combinaci6n con arras aparatos GE/Monogram. Siempre siga los Instrucciones de instalaci6n de coda producto para completar la instalaci6n. Instalad6n de Advantium C6MO PREPARAR LA ABERTURA (cont.
Preparaci6n para la instalaci6n "" .__ SIN un caj6nde almacenamientode accesorios Preparaaon C6MO PREPARAR LA ABERTURA {cont.) Instalaci6n sabre un homo GE/Monogram: Construya una base s61ida de un minimo de 3/8" de madera terciada sostenida por uias de 2 x 4 o 2 x 2 en los cuatrolados 17-1/2" 2" minima (se recomienda 3") C6MOPREPARAR Instalaci6n calentador LA ABERTURA {cont.) sabre un horno y caj6n GE/Monogram: 30' .................
Preparaa6n para la instalaci6n Preparaa6nSJ Nun caj6n de almacenamientode accesorios C6MO PREPARAR LA ABERTURA (cont.) Instalaci6n sobre otro homo bajo el mostrador (BEM) GE/Monogram: 30" 1............... _ 23-i/2" _25-i/4 ''_ C6MO LA ABERTURA (cont.) Instalaci6n bajo un homo de microondas sabre un caj6n calentador GE/Monogram: Construya una base s61ida de un minima de 3/8" de madera terciada jsostenida par guias de 2 x 4 o 2 x 2 en los cuatro lados minima :(se recomienda 3") PREPARAR 30" .......
Preparaci6n para la instalaci6n Preparaci6nSN un caj6n de almacenamientode accesorios COMO PREPARAR LA ABERTURA (cont.) 23-1/2" / Instalaci6n al lado de otro horno de cocci6n r6pida empotrado GE/Monogram: • Si usted est6 montando un homo para debojo del mostrador GE/Monogram al lado de otro, utilice las dimensiones indicadas. El riel media que separa las dos aberturas puede tenet que ser mayor al minima de 4-1/2" indicado. 4-!/2" minima recomienda 5-!/2") COMO PREPARAR LA ABERTURA (cont.
Preparaci6n para la instalaci6n Preparaci6nCO___NN un caj6n de almacenamientode accesorios NOTA:EL MODELOZSC1201SOLOPUEDESERINSTALADOCON UN CAJONDEALMACENAMIENTODEACCESORIOS SISELO INSTALA PORENCIMADE,36-3/4'I ELMODELOZS,C1202 NO PUEDENINSTALARSECON UN CAJONDEALMACENAMIENTODEACCESORJOS. VERPREPARACION PARALA INSTALACIONSIN UN CAJONDEALMACENAMIENTODEACCESORJOS PARAESTEMODELO. C6MO C6MO PREPARAR LA ABERTURA (cont.) PREPARAR LA ABERTURA (cont.
Preparaci6n para la instalaci6n Preparaci6nCO___NN un caj6n de almacenamientode accesorios NOTA:EL MODELOZSC1201S6LO PUEDESERINSTALADOCON UN CAJON DEALMACENAMIENTODE ACCESORIOS SI SELO INSTALAPORENCIMADE 36-3/4". EL MODELOZSC1202NO PUEDEN[NSTALARSECON UN CAJ6N DEALMACENAMIENTODE ACCESORIOS. VERPREPARACION PARALA INSTALACIONSIN UN CAJON DEALMACENAMIENTODEACCESORIOSPARAESTE MODELO. C6MO C6MO PREPARAR LA ABERTURA (cont.) PREPARAR LA ABERTURA (cont.
Preparaci6n para la instalaci6n Preparaa6nCO___NN un caj6n de almacenamientode accesorios NOTA:EL MODELOZSC1201SOLOPUEDESERJNSTALADOCON UN CAJONDEALMACENAMJENTO DE ACCESORJOS SISE LO INSTALAPORENaMA DE36-3/4': EL F1ODELOZSC120,2NO PUEDEN!NSTALARSECON UN CAJON DEALMACENAMIENTODE ACCESORJOS. VERPREPARAaONPARALA JNSTALAaONSiN UN CAJON DEALMACENAMJENTO DEACCESORJOS PARAESTE MODELO. C6MO C6MO PREPARAR LA ABERTURA (cont.) Instalaci6n mostrador PREPARAR LA ABERTURA (cont.
Preparaci6n para la instalaci6n Preparaci6nCO___NN un caj6n de almacenamientode accesorios NOTA:EL F1ODELOZSC1201SOLOPUEDESERINSTALADOCON UN CAJONDEALMAC,ENAMIENTO DEACCESORIOS SISE LO INSTALA PORENCIM,ADE 36-3/4". EL MODEL, O ZSC1202NO,PUEDENINSTALARSE CON UN CAJONDEALMACENAMIENTODEACCESORIOS. VER PREPARACION PARALA INSTALACIONSIN UN CAJONDEALMACENAMIENTODEACCESORIOS PARAESTEMODELO. 23-1/2" COMO PREPARAR LA ABERTURA (cont.
Instrucciones de instalaci6n rTJ QUITE EL EMPAQUE Y LAS PIEZAS • Quite todo el material de empaquey la cinta. • Ubique el paquete de piezas que contiene tornillos de montaje. • Quite el homo de la caja de cart6n. No levante la unidad de la manija o conducto. Se necesitan dos personas para levantar este homo. Abra la puerta y quite los elementos del interior del homo. Owner's Manual Manual del Propietario Bandeja de empaque _IL I" KI:I_,h_UI,.
Instrucciones de instalaci6n DESLICE EL HORNO DENTRO DE LA ABERTURA REMOCI6N DEL REBORDE DE LA PUERTA SOLO PARA INSTALACIONES SOBRE 36" Si va a instalar el homo Advantium APRECAUCI6N: de 120V a una distancia de 36" del piso, usted puede quitar el reborde pl6stico de la parte inferior de la puerta )ara fines est6ticos. AIL l_Kl_h_U _IUI_I: Senecesitan dos personas para levantar el homo hasta la abertura. T6melo de la parte inferior desde el frente y la parte trasera.
Instrucciones de instalaci6n F4-] INSTALE EL REBORDE INFERIOR _-J INSTALE LOS TORNILLOS DE MONTAJE J sivaainstalar elhomo APRI:CAUCION: Advantium de 120V debojo de 36", usted debe utilizar el reborde inferior pl6stico debido al riesgo de quemaduras para los nihos. El reborde pl6stico actQa como aislante y evitar6 que los nihos sufran quemaduras provocadas por los superficies calientes.
GE Consumer & Industrial Appliances Instrucciones de montaj Caj6n de almacenamiento de accesorios empotrado Advantium ® J×2200, J×2201, Z×2201 ANTES DE COMENZAR MODELOS DISPONIBLES Modelos Profile: Lea estas instrucciones per complete y con detenimiento. Lea las Instrucciones de instalaci6n del homo Advantium JX2200BB-Negro JX2201SS-Acero inoxidmble de 120V o 240V per complete y con detenimiento sobre las dimensiones del recorte y las instrucciones paso a Modelos Monogram: paso.
J J MONTAJEEN UN HORNODECOCCiONRAPIDAEMPOTRADOADVANTIUM C6MO MONTAR EL HORNO AL CAJ6N QUITE EL EMPAQUE Y LAS PIEZAS [] • Quite el caj6n de la caja de cart6n. • Quite todo el material de empaque y la cinta. • Abra el caj6n y quite las piezas del interior. • Ubique las piezas.
# J HONTAJEEN UN HORNODECOCCiONRAPIDAEivIPOTRADOADVANTIUIVl COHO HONTAR (cont.) D EL HORNO AL CAJON Quite los dos tornillos inferiores frontales de cada lado del homo y el tornillo central superior sabre cada lado del caj6n de almacenamiento. r61Coloque los soportes laterales dentro de las leng@etas del caj6n y fijelos utilizando los tornillos provistos y los tornillos quitados en el Paso C Soporte lateral \ J $61o para 120v B] El homo y el montaje del caj6n de almacenamiento ya se encuentran li
Notas 19
NOTA: Mientras efectOa las instalaciones descriptas en este libro, deben utilizarse galas o lentes de segufidad. NOTA: Lc]mejor(] de los productos es un esfuerzo continuo poro General Electric. Por Io tonto, los matedales, Io apariencia y las especificaciones pueden sufrir cambios sin previo aviso. Impreso en Corea GE Appliances & Lighting Appliances General Electric Company Louisville, KY40225 GEApplic]nces.