Safety Information BEFORE YOU BEGIN CONTENTS Design Information Models Available ......................................................................2 Product Dimensions and Clearances ............................4 Tools and Parts Required ....................................................4 Parts Supplied ...........................................................................4 Electrical Tools and Parts Required ................................4 Advance Planning ....................................
Información de seguridad ANTES DE COMENZAR Lea estas instrucciones por completo y con detenimiento. IMPORTANTE ³ Guarde estas instrucciones para el uso de inspectores locales. IMPORTANTE ³ Cumpla con todos los códigos y ordenanzas vigentes. Nota al instalador ³ Asegúrese de dejar estas instrucciones con el Consumidor. Nota al consumidor ³ Mantenga estas instrucciones con el Manual del Propietario para referencia futura.
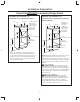
Design Information PRODUCT DIMENSIONS AND CLEARANCES 21-1/2” NOTE: Appearance will vary by model. 29-3/4” 1-3/5s 19” 1” 1-1/10s 13” ADVANCE PLANNING TOOLS AND PARTS REQUIRED (NOT SUPPLIED) These ovens may be installed directly into a 30” wide oven cabinet. Cutout dimensions are NOT the same for installation with or without an accessory storage drawer. Make sure to use the correct cutout when preparing the opening. NOTE: Model ZSC2202 CANNOT be installed with an accessory storage drawer.
Installation Preparation ADVERTENCIA ELECTRICAL REQUIREMENTS El encendido eléctrico al circuito paralelo deberá estar apagado mientras se realizan las conexiones de línea. Use conductores de cobre únicamente. Este electrodoméstico requiere que se realice una conexión a tierra. El extremo libre del cable verde (cable a tierra) debe estar conectado a una conexión a tierra adecuada. Este cable debe permanecer conectado a la conexión a tierra del horno.
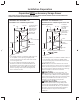
Installation Preparation Preparation WITHOUT an Accessory Storage Drawer PREPARE THE OPENING PREPARE THE OPENING (CONT.) The Advantium 240V can be installed in combination with other GE/Monogram appliances. Always follow each product’s Installation Instructions to complete the installation. Installation over a GE/Monogram Warming Drawer: 30” 23-1/2” Single Advantium 240V Installation: Order a 30” wide single oven cabinet or cut the opening in a wall to the dimensions shown.
Installation Preparation Preparation WITHOUT an Accessory Storage Drawer PREPARE THE OPENING (CONT.) PREPARE THE OPENING (CONT.) Installation over a GE/Monogram Oven: Installation over a GE/Monogram Oven and Warming Drawer: 30” 23-1/2” 25-1/4” 17-1/2” Construct Solid Bottom Min. 3/8” Plywood Supported by 2x4 or 2x2 Runners all Four Sides 30” 23-1/2” 25-1/4” 2” Min. (3” recommended) 17-1/2” Per Oven Requirement Construct Solid Bottom Min.
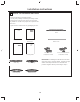
Installation Preparation Preparation WITH an Accessory Storage Drawer NOTE: MODEL ZSC2202 CANNOT BE INSTALLED WITH AN ACCESSORY STORAGE DRAWER. SEE INSTALLATION PREPARATION WITHOUT AN ACCESSORY STORAGE DRAWER FOR THIS MODEL. PREPARE THE OPENING PREPARE THE OPENING (CONT.) The Advantium 240V can be installed in combination with other GE/Monogram appliances. Always follow each product’s Installation Instructions to complete the installation. Single Advantium 240V Installation (cont.
Installation Preparation Preparation WITH an Accessory Storage Drawer NOTE: MODEL ZSC2202 CANNOT BE INSTALLED WITH AN ACCESSORY STORAGE DRAWER. SEE INSTALLATION PREPARATION WITHOUT AN ACCESSORY STORAGE DRAWER FOR THIS MODEL. PREPARE THE OPENING (CONT.) PREPARE THE OPENING (CONT.) Installation over a GE/Monogram Oven: Installation over a GE/Monogram Oven and Warming Drawer: 23-1/2” 30” 25-1/4” Min.* 21” Construct Solid Bottom Min.
Installation Instructions 1 REMOVE THE PACKAGING AND PARTS 5HPRYH DOO SDFNLQJ PDWHULDO DQG WDSH /RFDWH SDUWV SDFNDJH FRQWDLQLQJ PRXQWLQJ VFUHZV 5HPRYH WKH RYHQ IURP WKH FDUWRQ 'R QRW OLIW XQLW by handle or conduit. Two people are required to lift this oven. 2SHQ WKH GRRU DQG UHPRYH DQ\ SDFNDJLQJ LQ RYHQ Owner’s Manual Rack Owner’s Manual Installation Instructions Bottom Trim Cooking Guide Cook Book Glass Tray Metal Trays (2) 6 Brass Screws (3 required, 3 extra) Cooking Guide 5 Color
Installation Instructions GROUNDING INSTRUCTIONS 2 ROUTE CONDUIT THROUGH CUTOUT This appliance must be connected to a grounded, metallic, permanent wiring system, or an equipment grounding connector should be run with the circuit conductors and connected to the equipment grounding terminal or lead on the appliance. Failure to follow these instructions could result in fire, personal injury or electrical shock. CAUTION: Two people are required to lift the oven into the opening.
Installation Instructions 4 INSTALL MOUNTING SCREWS 3 INSTALL BOTTOM TRIM NOTE: If installing the Advantium 240 Oven with an accessory storage drawer, the bottom trim is not required. Proceed to Step 4. Align bottom trim tabs to slots in the bottom of the oven. Slide the oven the remaining way into the opening so that the side flanges and control panel are against the cabinet frame. Make sure that the oven is centered in the opening.
Assembly Instructions Advantium® 240V Built-In Accessory Storage Drawer JX2200, JX2201, ZX2201 BEFORE YOU BEGIN MODELS AVAILABLE Models: JX2200BB–Black JX2201SS–Stainless Steel Read these instructions completely and carefully. Read the Installation Instructions for the Advantium 240V oven completely and carefully for cutout dimensions and step-by-step instructions. Monogram Models: ZX2201SS–Stainless Steel IMPORTANT ³ Save these instructions for local inspector’s use.
ASSEMBLY TO ADVANTIUM 240V BUILT-IN SPEEDCOOK OVEN ASSEMBLING THE OVEN TO DRAWER (CONT.) 1 REMOVE PACKAGING AND PARTS 5HPRYH WKH GUDZHU IURP WKH FDUWRQ 5HPRYH DOO SDFNLQJ PDWHULDO DQG WDSH 2SHQ WKH GUDZHU DQG UHPRYH DQ\ SDUWV LQVLGH /RFDWH SDUWV C Remove the front two bottom screws on each side of the oven and the top center screw on each side of the storage drawer.
Notes 15
NOTE: While performing installations described in this book, safety glasses or goggles should be worn. NOTE: Product improvement is a continuing endeavor at General Electric. Therefore, materials, appearance and specifications are subject to change without notice. Printed in Korea GE Appliances & Lighting Appliances General Electric Company Louisville, KY 40225 GEAppliances.