WALL OVEN Direct Air Convection Built-In Electric SAFETY INFORMATION . . . . . . . . .3 USING THE OVEN Oven Controls . . . . . . . . . . . . . . . . . . . . . . . . .6 Double Oven . . . . . . . . . . . . . . . . . . . . . . . . . .7 Settings . . . . . . . . . . . . . . . . . . . . . . . . . . . . . .7 Sabbath . . . . . . . . . . . . . . . . . . . . . . . . . . . . . .9 Oven Racks . . . . . . . . . . . . . . . . . . . . . . . . . . 10 Aluminum Foil and Oven Liners. . . . . . . . . 11 Cookware. . . . . .
THANK YOU FOR MAKING GE APPLIANCES A PART OF YOUR HOME. Whether you grew up with GE Appliances, or this is your first, we’re happy to have you in the family. We take pride in the craftsmanship, innovation and design that goes into every GE Appliances product, and we think you will too. Among other things, registration of your appliance ensures that we can deliver important product information and warranty details when you need them. Register your GE appliance now online.
READ ALL INSTRUCTIONS BEFORE USING THE APPLIANCE WARNING Read all safety instructions before using the product. Failure to follow these instructions may result in fire, electrical shock, serious injury or death. WARNING GENERAL SAFETY INSTRUCTIONS Ŷ 8 VH WKLV DSSOLDQFH RQO\ IRU LWV LQWHQGHG SXUSRVH DV described in this Owner’s Manual. Ŷ 'R QRW DWWHPSW WR UHSDLU RU UHSODFH DQ\ SDUW RI \RXU oven unless it is specifically recommended in this manual.
SAFETY INFORMATION IMPORTANT SAFETY INFORMATION READ ALL INSTRUCTIONS BEFORE USING THE APPLIANCE WARNING IN THE EVENT OF A FIRE, TAKE THE FOLLOWING STEPS TO PREVENT INJURY AND FIRE SPREADING Ŷ ' R QRW XVH ZDWHU RQ JUHDVH ILUHV 1HYHU SLFN XS D flaming pan. Ŷ , I WKHUH LV D ILUH LQ WKH RYHQ GXULQJ EDNLQJ VPRWKHU the fire by closing the oven door and turning the oven off or by using a multi-purpose dry chemical or foam-type fire extinguisher.
READ ALL INSTRUCTIONS BEFORE USING THE APPLIANCE WARNING SELF-CLEANING OVEN SAFETY INSTRUCTIONS (Cont.) Ŷ % HIRUH RSHUDWLQJ WKH VHOI FOHDQ F\FOH ZLSH JUHDVH and food soils from the oven. Excessive amount of grease may ignite, leading to smoke damage to your home. Ŷ , I WKH VHOI FOHDQLQJ PRGH PDOIXQFWLRQV WXUQ WKH oven off and disconnect the power supply. Have it serviced by a qualified technician. Ŷ ' R QRW FOHDQ WKH GRRU JDVNHW 7KH GRRU JDVNHW LV essential for a good seal.
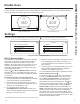
USING THE OVEN: Oven Controls Oven Controls 12:30 PM UPPER OVEN 12:30 PM LOWER OVEN GET CONNECTED GET CONNECTED Bake Broil 12:30 PM 12:30 PM UPPER OVEN LOWER OVEN Convect Precision Cooking More Recipes Bake Broil Convect More Bake Precision Cooking Convect More Precision Cooking Recipes Recipes Single Wall Oven Main Menu 'RXEOH :DOO 2YHQ 0DLQ 0HQXV Upper Oven and Lower Oven Settings When using a double oven you can set separate modes in each oven.
When using both cavities to cook, the control will allow you to switch back and forth between the upper and lower oven to review the cycle selection for each. When viewing the cooking mode screen you can access the alternate cavity by pressing on the banner at the top or bottom of the screen. 12:30 PM 12:30 PM TO UPPER OVEN BAKE BAKE PREHEATED PREHEATED 350 BAKE 350°F 400 °F °F CANCEL CANCEL BAKE 400°F TO LOWER OVEN 8SSHU 2YHQ %DNH &\FOH /RZHU 2YHQ %DNH &\FOH Settings There are numerous set
USING THE OVEN: Settings Settings (Cont.) There are numerous settings that are accessed by pressing in the top right corner of the main screen. 12:30 PM 12:30 PM SETTINGS SETTINGS Wi-Fi & REMOTE ENABLE SABBATH SET CLOCK SOUND LOCK CONTROL DISPLAY SABBATH COOKING SOUND SYSTEM Slide up and down to access all the settings Set Clock Display This feature allows you to set the clock and specifies how the time of day will be displayed.
Sabbath mode disables the oven lights (the oven light will not turn on when the door is opened), all sounds (the control ZLOO QRW EHHS ZKHQ WKH VFUHHQ LV SUHVVHG &RQYHFWLRQ PRGHV %URLO PRGHV :DUP 3URRI DQG DOO WLPH IXQFWLRQV 6DEEDWK PRGH FDQ RQO\ EH XVHG ZLWK WUDGLWLRQDO %DNH 7KLV IHDWXUH FRQIRUPV WR WKH 6WDU . -HZLVK 6DEEDWK UHTXLUHPHQWV NOTE: ,I D SRZHU RXWDJH RFFXUV GXULQJ ZKHQ WKH RYHQ LV LQ 6DEEDWK 0RGH WKH XQLW ZLOO UHWXUQ WR 6DEEDWK 0RGH when power is restored.
USING THE OVEN: Oven Racks Oven Racks Your oven has six rack positions. Recommended rack positions for various types of foods are provided in the Cooking Guide. Adjusting rack position is one way to impact cooking results. For example, if you would prefer darker tops on cakes, muffins, or cookies, try moving IRRG RQH UDFN SRVLWLRQ KLJKHU ,I \RX ILQG IRRGV DUH WRR brown on top try moving them down next time.
Traditional Flat Racks The racks have stops so that when placed correctly on the supports they will stop before coming completely out and will not tilt. When placing and removing cookware, pull the rack out until it stops. To Remove a Rack Pull it toward you, tilt the front end up and pull it out. To Replace a Rack Tilt the front of the rack up, hook the rear locating posts under the rack supports, push the rack back (past the stoppers) and lower it into position. Push the rack all the way in.
USING THE OVEN: Cooking Modes Cooking Modes Your new oven has a variety of cooking modes to help you get the best results. These modes are described below. Refer to the Cooking Guide section for recommendations for specific foods. Remember, your new oven may perform differently than the oven it is replacing. Temperature Setting Convection Modes When selecting a temperature, the traditional preset temperatures are shown and can be selected by VFUROOLQJ KRUL]RQWDOO\ DQG VHOHFWLQJ WKH GHVLUHG WHPSHUDWXUH
Convection Broil Precision Cooking &RQYHFWLRQ %URLO KDV WKUHH RSWLRQV /RZ +LJK DQG &ULVS /RZ DQG +LJK DUH VLPLODU WR WKH WUDGLWLRQDO EURLO modes with the addition of direct airflow to aid in searing DQG EURZQLQJ )RU EHVW UHVXOWV ZLWK WKH /RZ DQG +LJK settings, it is recommended to preheat the oven for PLQXWHV &RQYHFWLRQ %URLO &ULVS LV LQWHQGHG DV D finishing mode at the end of a cooking cycle to add surface browning to a dish such as a casserole or a roast.
USING THE OVEN: Probe Probe WARNING Consuming undercooked food can result in foodborne illness. Use probe according to the following instructions to ensure all portions of the food reach minimum safe cooking temperatures. Recommendations for minimum safe food temperatures can be found at www.foodsafety.gov or www.IsItDoneYet.gov. Internal food temperature is frequently used as an indicator of doneness, especially for roasts and poultry.
7KH WDEOH EHORZ SURYLGHV VRPH JXLGHOLQHV IRU W\SLFDO FRRNLQJ PRGHV ,I \RX ZRXOG OLNH WR XVH 3UHFLVLRQ &RRNLQJ modes they can be substituted for the modes shown below for applicable foods. FOOD TYPE RECOMMENDED RECOMMENDED MODE(S) RACK POSITION(S) ADDITIONAL SUGGESTIONS Baked Goods /D\HU FDNHV VKHHW FDNHV bundt cakes, muffins, quick breads on a Single Rack &RQYHFWLRQ %DNH 7UDGLWLRQDO %DNH 3 8VH VKLQ\ FRRNZDUH /D\HU FDNHV RQ 0XOWLSOH 5DFNV 7UDGLWLRQDO %DNH 2 and 4 Extension rack in higher pos
CARE AND CLEANING: Cleaning The Oven - Exterior 16 Cleaning The Oven - Exterior %H VXUH DOO FRQWUROV DUH RII DQG DOO VXUIDFHV DUH FRRO EHIRUH FOHDQLQJ DQ\ SDUW RI WKH UDQJH WARNING ,I \RXU UDQJH LV UHPRYHG IRU FOHDQLQJ VHUYLFLQJ RU DQ\ UHDVRQ EH VXUH WKH anti-tip device is reengaged properly when the range is replaced. Failure to take this precaution could result in tipping of the range and can result in death or serious burns to children or adults.
The interior of your new oven can be cleaned manually or by using Steam Clean or Self Clean modes. Spillage of marinades, fruit juices, tomato sauces and basting liquids containing acids may cause discoloration and VKRXOG EH ZLSHG XS LPPHGLDWHO\ /HW KRW VXUIDFHV FRRO WKHQ FOHDQ DQG ULQVH Manual Cleaning 'R QRW XVH RYHQ FOHDQHUV VWURQJ OLTXLG FOHDQVHUV steel wool, or scouring pads on the interior of the oven. Clean with a mild soap and water, or vinegar and water solution.
CARE AND CLEANING: Oven Racks / Probe Oven Racks The racks that were provided with your oven (dark enameled racks, not shiny) may remain in the oven during the self-cleaning cycle without being damaged. To manually clean racks, use warm, soapy water. Make sure not to wash the rack slides on an extension rack. ,I UDFNV EHFRPH PRUH GLIILFXOW WR UHPRYH IURP WKH RYHQ put some vegetable oil on a soft cloth or paper towel and UXE RQWR WKH RYHQ UDFN VXSSRUWV 'R QRW ZLSH WKH RLO RQ an extension rack slide.
WARNING SHOCK OR BURN HAZARD: %HIRUH UHSODFLQJ RYHQ OLJKW EXOE GLVFRQQHFW WKH HOHFWULFDO SRZHU WR WKH oven at the main fuse or circuit breaker panel. Failure to do so may result in electric shock or burn. CAUTION BURN HAZARD: The glass cover and bulb should be removed when cool. Touching hot glass with bare hands or a damp cloth can cause burns. 'LVFRQQHFW SRZHU DW WKH PDLQ IXVH RU FLUFXLW EUHDNHU panel. 2. Remove oven racks. 3.
TROUBLESHOOTING TIPS Troubleshooting tips ... %HIRUH \RX FDOO IRU VHUYLFH Save time and money! Review the charts on the following pages first and you may not need to call for service. Problem Possible Cause What To Do My new oven doesn't cook like my old one. Is something wrong with the temperature settings? Your new oven has a different cooking system from your old oven and therefore may cook differently than your old oven. For the first few uses, follow your recipe times DQG WHPSHUDWXUHV FDUHIXOO\
Problem Possible Cause What To Do Excessive smoking during clean cycle Excessive soil or grease. Press Cancel on the pad to the right of the screen to stop the cycle. Open the windows to rid the room of smoke. Wait until the door unlocks. Wipe up the excess soil and reset the clean cycle. Excessive smoking during broiling Food too close to burner element. /RZHU WKH UDFN SRVLWLRQ RI WKH IRRG Oven door will not open after a clean cycle Oven too hot.
WARRANTY GE Appliances Electric Range Warranty GEAppliances.com $OO ZDUUDQW\ VHUYLFH LV SURYLGHG E\ RXU )DFWRU\ 6HUYLFH &HQWHUV RU DQ DXWKRUL]HG &XVWRPHU &DUH® technician. To schedule service online, visit us at www.geappliances.com/service_and_support/, or call GE Appliances at 800.GE.CARES (800.432.2737). Please have your serial number and your model number available when calling for service. Servicing your appliance may require the use of the onboard data port for diagnostics.
Looking For Something More? GE Appliances offers a variety of accessories to improve your cooking and maintenance experiences! Refer to the Consumer Support page for phone numbers and website information.
CONSUMER SUPPORT Consumer Support GE Appliances Website Have a question or need assistance with your appliance? Try the GE Appliances Website 24 hours a day, any day of the year! You can also shop for more great GE Appliances products and take advantage of all our on-line support VHUYLFHV GHVLJQHG IRU \RXU FRQYHQLHQFH ,Q WKH 86 GEAppliances.
Eléctrico con Convección Directa de Aire Incorporada HORNO DE PARED INFORMACIÓN DE SEGURIDAD ... 3 USO DEL HORNO Controles del Horno . . . . . . . . . . . . . . . . . . . . . . . . 6 Horno Doble . . . . . . . . . . . . . . . . . . . . . . . . . . . . . . 7 Settings (Configuraciones) . . . . . . . . . . . . . . . . . . 7 Modo Sabático . . . . . . . . . . . . . . . . . . . . . . . . . . . . 9 Estantes del Horno . . . . . . . . . . . . . . . . . . . . . . . . .10 Papel de Aluminio y Cobertores del Horno .
GRACIAS POR HACER QUE GE APPLIANCES SEA PARTE DE SU HOGAR. Ya sea que haya crecido usando GE Appliances, o que ésta es su primera vez, nos complace tenerlo en la familia. Sentimos orgullo por el nivel de arte, innovación y diseño de cada uno de los electrodomésticos de GE Appliances, y creemos que usted también. Entre otras cosas, el registro de su electrodoméstico asegura que podamos entregarle información importante del producto y detalles de la garantía cuando los necesite.
ADVERTENCIA /HD WRGDV ODV LQVWUXFFLRQHV GH VHJXULGDG DQWHV GH XWLOL]DU HVWH SURGXFWR 1R VHJXLU HVWDV LQVWUXFFLRQHV puede generar un incendio, una descarga eléctrica, lesiones corporales o la muerte. ADVERTENCIA INSTRUCCIONES GENERALES DE SEGURIDAD Ŷ 8 8VH HVWH HOHFWURGRPpVWLFR VyOR SDUD VX SURSyVLWR original, como se describe en el Manual del Propietario.
INFORMACIÓN DE SEGURIDAD INFORMACIÓN IMPORTANTE DE SEGURIDAD LEA TODAS LAS INSTRUCCIONES ANTES DE USAR ADVERTENCIA EN CASO DE INCENDIO, SIGA LOS SIGUIENTES PASOS PARA EVITAR LESIONES O LA PROPAGACIÓN DEL FUEGO Ŷ 1 R XVH DJXD VREUH HO IXHJR GH OD JUDVD 1XQFD WRPH XQD olla que se esté incendiando. Ŷ 6 L KD\ XQ LQFHQGLR HQ HO KRUQR GXUDQWH HO KRUQHDGR ahogue el fuego cerrando la puerta del horno y apagando el mismo o usando un químico seco multipropósito o un extintor de incendio con espuma.
ADVERTENCIA INSTRUCCIONES DE SEGURIDAD DEL HORNO CON LIMPIEZA AUTOMÁTICA (Cont.) Ŷ $ QWHV GH XWLOL]DU HO FLFOR GH OLPSLH]D DXWRPiWLFD OLPSLH OD JUDVD \ UHVWRV GH FRPLGD TXH KD\D HQ HO KRUQR 8QD cantidad excesiva de grasa se puede incendiar, lo cual puede producir daños con humo en su hogar. Ŷ 6 L HO PRGR GH OLPSLH]D DXWRPiWLFD IXQFLRQD GH IRUPD incorrecta, apague el horno y desconecte el suministro de corriente. Solicite el servicio de un técnico calificado.
USO DEL HORNO: Controles del Horno Controles del Horno 12:30 PM UPPER OVEN 12:30 PM LOWER OVEN GET CONNECTED GET CONNECTED Bake Broil 12:30 PM 12:30 PM UPPER OVEN LOWER OVEN Convect More Precision Cooking Recipes Bake Broil Convect More Precision Cooking Broil Convect More Precision Cooking Recipes Recipes Menú Principal del Horno de Pared Simple Menús principales del Horno de Pared Doble Upper Oven and Lower Oven (Horno Superior y Horno Inferior) Al usar un horno doble, usted p
Al usar ambas cavidades para cocinar, el control le permitirá oscilar entre el horno superior e inferior, a fin de revisar la sección del ciclo de cada uno. Al revisar la pantalla del modo de cocción, usted puede acceder a la cavidad alterna presionando el titular de la pantalla.
USO DEL HORNO: Settings (Configuraciones) Settings (Configuraciones) (Cont.) Existen numerosas configuraciones que son accedidas presionando en la esquina superior derecha de la pantalla principal.
El modo sabático desactiva las luces del horno (la luz del horno no se encenderá cuando la puerta sea abierta), todos los sonidos (el control no emitirá un pitido cuando se presione la pantalla), los modos los modos de Convection (Convección), los modos de Broil (Asar), Warm (Calentar), Proof (Leudar), y todas las funciones de tiempo. El modo sabático sólo puede ser usado con la función tradicional de Bake (Hornear). Esta función se activa conforme con los requisitos Sabáticos Judíos de la Estrella K.
USO DEL HORNO: Estantes del Horno Estantes del Horno El horno cuenta con seis posiciones de estantes. En la Guía de Cocción, se brindan recomendaciones de posiciones de los estantes para diferentes tipos de comidas. Se ajusta un estante en una dirección para afectar los resultados de cocción. Por ejemplo, si se prefieren partes superiores más oscuras en tartas, panecillos o galletas, pruebe moviendo la comida a un estante que se encuentre una posición más arriba.
Estantes Planos Tradicionales Los estantes poseen bloqueadores, de modo que al colocarlos correctamente sobre los soportes se detendrán antes de salirse completamente y no se inclinarán. Al colocar y retirar utensilios de cocina, empuje la parrilla hasta que se detenga. Estante plano Para Retirar un Estante Empuje el mismo hacia usted, incline el frente hacia arriba y empuje hacia afuera.
USO DEL HORNO: Modos de Cocción Modos de Cocción Su nuevo horno posee una variedad de modos de cocción para que pueda obtener los mejores resultados. Estos modos se describen a continuación. Para acceder a recomendaciones para comidas específicas, consulte la sección de la Guía de Cocción. Recuerde que es posible que su nuevo horno funcione de manera diferente que aquel que está reemplazando.
Asar por Convección Cocción de Precisión Convection Broil (Asar por Convección) posee tres opciones: Low (Bajo), High (Alto), y Crisp (Crocante). Low (Bajo) y High (Alto) son similares a los modos de asado tradicional con la adición del flujo de aire directo para ayudar en el soasado y dorado. Para obtener mejores resultados con las configuraciones Low (Bajo) y High (Alto), se recomienda calentar previamente el horno durante 5 minutos.
USO DEL HORNO: Probe (Sonda) Probe (Sonda) ADVERTENCIA El consumo de comida semicruda puede hacer que se contraigan enfermedades producidas por la comida. Use la sonda de acuerdo con las siguientes instrucciones, a fin de asegurar que todas las partes de la comida alcancen temperaturas de cocción mínimamente seguras. Puede encontrar recomendaciones de temperaturas de cocción mínimamente seguras en www.foodsafety.gov o en www.IsItDoneYet.gov.
La siguiente tabla brinda algunas pautas para los modos de cocción típicos. Si desea usar los modos de Precision Cooking (Cocción de Precisión), los mismos pueden ser sustituidos por los modos mostrados a continuación para comidas pertinentes. POSICIÓN(ES) DE ESTANTES RECOMENDADA SUGERENCIAS ADICIONALES Horneado por Convección Horneado Tradicional 3 8VH XWHQVLOLRV EULOODQWHV Horneado Tradicional 2y4 Estante extensible en la posición más alta, si se usa.
CUIDADO Y LIMPIEZA: Limpieza de la Cocina - Exterior 16 Cuidado y limpieza - Exterior Asegúrese de que todos los controles estén apagados y que las superficies estén frías antes de limpiar cualquier parte de la cocina. ADVERTENCIA Si se quita la cocina para efectuar una limpieza, reparaciones o cualquier otra razón, verifique que el dispositivo anti-volcaduras se coloque de manera adecuada cuando vuelva a instalarse la cocina. Si no toma esta precaución, la cocina puede volcarse y provocar lesiones.
El interior de su nuevo horno puede ser limpiado de forma manual o utilizando los modos Steam Clean (Limpieza con Vapor) o Self Clean (Limpieza Automática). El derrame de adobo, jugos de fruta, salsas de tomate y líquidos para humedecer que contengan ácidos pueden ocasionar descoloración y se deberán limpiar de inmediato. Espere a que las superficies calientes se enfríen, y luego limpie y enjuague.
CUIDADO Y LIMPIEZA: Estantes del Horno / Probe (Sonda) Estantes del Horno Los estantes que fueron provistos con el horno (estantes oscuros esmaltados, no brillantes) pueden permanecer en el horno durante el ciclo de limpieza automática, ya que este ciclo no los dañará. Para limpiar los estantes de forma manual, use agua caliente y jabón. Asegúrese de no lavar el espacio de deslizamiento de un estante extensible.
Reemplazo de la Lámpara del Horno ADVERTENCIA PELIGRO DE DESCARGA O QUEMADURAS: Antes de reemplazar la lámpara de luz del horno, desconecte la conexión eléctrica del horno del fusible principal o del panel del disyuntor. Si esto no se cumple, se podrá producir una descarga eléctrica o un incendio. RIESGO DE INCENDIO: La tapa de vidrio y la lámpara de luz se deberán retirar cuando estén frías. Tocar el vidrio caliente sin protección en las manos o con un trapo húmedo puede ocasionar quemaduras.
CONSEJOS PARA LA SOLUCIÓN DE PROBLEMAS 20 Consejos para la Solución de Problemas... Antes de solicitar el servicio técnico ¡Ahorre tiempo y dinero! Primero revise los cuadros que aparecen en las siguientes páginas y es posible que no necesite solicitar reparaciones. Problema Causa Posible Qué Hacer Mi horno nuevo no cocina como el anterior.
Problema Causa Posible Qué Hacer Exceso de humo durante un ciclo de limpieza Suciedad o grasa excesiva. Presione Cancel (Cancelar) sobre la tecla que se encuentra sobre la parte derecha de la pantalla para detener el ciclo. Limpie el exceso de suciedad y reinicie el ciclo de limpieza. Humo excesivo al asar La comida está demasiado cerca del quemador. Baje la posición del estante con comida. La puerta del horno no se abrirá luego de un ciclo de limpieza El horno está demasiado caliente.
GARANTÍA Garantía de la Cocina Eléctrica de GE Appliances GEAppliances.com Todo el servicio de garantía es provisto por nuestros Centros de Servicio de Fabricación, o un técnico autorizado de Customer Care®. Para programar una visita del servicio técnico a través de Internet, visítenos en www.geappliances.com/service_and_support/, o llame al 800.GE.CARES (800.432.2737). Cuando llame para solicitar el servicio, tenga los números de serie y modelo disponibles.
Accesorios Looking For Something More? GE Appliances offers a variety of accessories to improve your cooking and maintenance experiences! Refer to the Consumer Support page for phone numbers and website information.
SOPORTE PARA EL CONSUMIDOR Soporte para el Consumidor Sitio Web de GE Appliances ¿Desea realizar una consulta o necesita ayuda con su electrodoméstico? ¡Intente a través del Sitio Web de GE Appliances las KRUDV GHO GtD FXDOTXLHU GtD GHO DxR 8VWHG WDPELpQ SXHGH FRPSUDU PiV HOHFWURGRPpVWLFRV PDUDYLOORVRV GH *( $SSOLDQFHV \ aprovechar todos nuestros servicios de soporte a través de Internet, diseñados para su conveniencia. (Q (( 88 GEAppliances.