GEAppliances.com GE Profile Microwave Oven Safety Instructions . . . . . . . . . . . . . . . 2–8 Operating Instructions Convenience Features. . . . . . . . . . . 15,16 Exhaust Features. . . . . . . . . . . . . . . 28-30 Microwave Terms. . . . . . . . . . . . . . . . . . 20 MyPlate.gov (MyPyramid) Feature. . . . . . . . . . . . . . . . . . . . . . . . . 16 Oven Features. . . . . . . . . . . . . . . . . . . 9-11 Other Features. . . . . . . . . . . . . . . . . 22-24 Power Levels. . . . . . . . . . . . . .
IMPORTANT SAFETY INSTRUCTIONS. READ ALL INSTRUCTIONS BEFORE USING. When using electrical appliances basic safety precautions should be followed, including the following: WARNING! To reduce the risk of burns, electric shock, fire, injury to persons or exposure to excessive microwave energy: PRECAUTIONS TO AVOID POSSIBLE EXPOSURE TO EXCESSIVE MICROWAVE ENERGY (a) Do Not Attempt to operate this oven with the door open since opendoor operation can result in harmful exposure to microwave energy.
GEAppliances.com Use this appliance only for its intended purpose as described in this Owner’s Manual. n To reduce the risk of fire in the oven cavity: — Do not overcook food. Carefully attend appliance when paper, plastic or other combustible materials are placed inside the oven while cooking. — Remove wire twist-ties and metal handles from paper or plastic containers before placing them in the oven. — Do not use the oven for storage purposes.
IMPORTANT SAFETY INSTRUCTIONS. READ ALL INSTRUCTIONS BEFORE USING. WARNING: Risk of explosion or exposure to toxic material, the battery should be replaced by service technician only. WARNING! ARCING If you see arcing, press the CANCEL/OFF button and correct the problem. Arcing is the microwave term for sparks in the oven. Arcing is caused by: n Metal, such as twist-ties, poultry pins, or gold-rimmed dishes, in the microwave. n The metal shelf not installed correctly so it touches the microwave wall.
GEAppliances.com WARNING! FOOD n Do not pop popcorn in your microwave oven unless in a special microwave popcorn accessory or unless you use popcorn labeled for use in microwave ovens. n Do not boil eggs in a microwave oven. Pressure will build up inside egg yolk and will cause it to burst, possibly resulting in injury. n Operating the microwave with no food inside for more than a minute or two may cause damage to the oven and could start a fire.
IMPORTANT SAFETY INSTRUCTIONS. READ ALL INSTRUCTIONS BEFORE USING. MICROWAVE-SAFE COOKWARE Do not operate the oven in the microwave mode without the turntable and the turntable support seated and in place. The turntable must be unrestricted so it can rotate. Make sure all cookware used in your microwave oven is suitable for microwaving.
GEAppliances.com MICROWAVE-SAFE COOKWARE (cont.) n Use foil only as directed in this manual. When using foil in the microwave oven, keep the foil at least 1” away from the sides of the oven. n Plastic cookware—Plastic cookware designed for microwave cooking is very useful, but should be used carefully. Even microwave-safe plastic may not be as tolerant of overcooking conditions as are glass or ceramic materials and may soften or char if subjected to short periods of overcooking.
IMPORTANT SAFETY INSTRUCTIONS. READ ALL INSTRUCTIONS BEFORE USING. THE VENT FAN The fan will operate automatically under certain conditions (see Automatic Fan feature). Take care to prevent the starting and spreading of accidental cooking fires while the vent fan is in use. n Clean the underside of the microwave often. Do not allow grease to build up on the microwave or the fan filters.
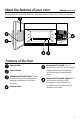
About the features of your oven. GEAppliances.com Throughout this manual, features and appearance may vary from your model. Express Cook TIME COOK DEFROST STEAM POPCORN BEVERAGE FAMILY SNACKS POTATO MELT REHEAT 1 2 4 5 7 8 9 POWER LEVEL 0 ADD 30 SEC 3 6 START PAUSE CANCEL OFF TIMER SETTINGS on/off Features of the Oven Door Handle. Door Latches. Window with Metal Shield. Screen allows cooking to be viewed while keeping microwaves confined in the oven. Control Panel.
About the features of your oven. Power Saver (Energy Saver) Feature (on some models) Your GE microwave has an Power Saver (Energy Saver) feature. Many electronic appliances, including Microwaves, consume electric power while they are switched off or in a standby mode. Eliminating standby power can reduce your operating costs. To ACTIVATE the Power Saver (Energy Saver) Feature— the Power Saver button on the unit, and the unit will turn off.
About the cooking features of your microwave oven. GEAppliances.com Throughout this manual, features and appearance may vary from your model. Express Cook TIME COOK DEFROST STEAM POPCORN BEVERAGE FAMILY SNACKS POTATO MELT REHEAT 1 2 3 4 5 6 7 8 9 POWER LEVEL 0 ADD 30 SEC START PAUSE CANCEL OFF TIMER SETTINGS on/off Cooking Controls Check the Convenience Guide before you begin.
About the time features. Time Cook TIME COOK Allows you to microwave for any time up to 99 minutes and 99 seconds. Express Cook 1 2 3 4 5 6 7 8 9 Power level 10 (HIGH) is automatically set, but you may change it for more flexibility. 1 2 3 4 0 Press TIME COOK. Enter cooking time. Press START or change power level. Press START if power setting is chosen. You may open the door during Time Cook to check the food. Close the door and press START to resume cooking.
About the time features. Time Defrost DEFROST Express Cook 1 2 3 4 5 6 7 8 9 0 START PAUSE Allows you to defrost for a selected length of time. See the Defrosting Guide for suggested times. (Time Defrost and 1 lb Quick Defrost explained in the About the convenience features section.) 1 2 3 4 Press DEFROST twice. Enter defrosting time. Press START. Turn the food over after half the time.
About the time features. Defrosting Guide FOOD TIME COMMENTS Bread, Cakes Bread, buns, or rolls (1 piece) Sweet rolls (approx. 12 oz) 1/4 min. 2 to 4 min. Rearrange after half the time Fish and Seafood Fillets, Frozen (1 lb) 6 to 9 min. Fruit Plastic Pouch - 1 or 2 (10-oz package) 1 to 5 min. Meat Bacon (1 lb) 2 to 5 min. Place unopened package in oven. Let stand 5 minutes after defrosting. Franks (1 lb) 2 to 5 min. Place unopened package in oven. Microwave just until franks can be separated.
About the convenience features. Defrosting Tips DEFROST n Remove meat from package and place on microwave-safe dish. Express Cook 1 2 3 4 5 6 7 8 9 0 n When the oven signals, turn the food over. Remove defrosted meat or shield warm areas with small pieces of foil. n After defrosting, most meats need to stand 5 minutes to complete defrosting. Large roasts should stand for about 30 minutes.
About the MyPlate.gov (MyPyramid) Feature. MyPlate.gov (MyPyramid) Feature Allows you to microwave healthy food choices by servings or with sensor. Express Cook 1 2 3 4 5 6 7 8 9 1 Press MyPlate.gov (MyPyramid) pad. 2 Enter the food type. See Cooking Guide for MyPlate.gov (MyPyramid) below for codes or check the display for food types. 3 Enter the amount as prompted for nonsensor food selections. NOTE FOR SENSOR COOKING: for best results do not open the door while cooking.
About the sensor microwave features. FAMILY SNACKS Family Snacks Use the Family Snacks feature to cook from a variety of pre-programmed family snack items. 1 2 3 4 1 to 3 2 - Chicken Nuggets 1 to 2 servings 3 - Oatmeal 1 to 4 packets 4 - Instant Macaroni and Cheese 1 to 2 servings 5 - Canned Pasta 1 to 2 cans Enter the number pad to select one of the eight snack options. Enter an amount for the snack selected.
About the sensor microwave feature. POPCORN Popcorn To use the Popcorn feature: 1 Follow package instructions, using Cook if the package is less than 1.0 ounces or larger than 3.5 ounces. Place the package of popcorn in the center of the turntable. 2 Press the POPCORN button once for 3.3 to 3.5 ounce bags or twice for 2.7 to 3.0 ounce bags or three times for 1.0 to 1.5 ounce bags. If food is undercooked after the countdown, use Time Cook for additional cooking time.
About the sensor microwave features. BEVERAGE Beverage Use the Beverage feature to cook 8 to 10 oz beverage. 1 2 Press the Beverage button. Starts immediately. POTATO Potato Use the Potato feature to cook 1-4 potatoes 1 2 Place the potato/potatoes in the oven. 3 The overn signals when steam is sensed and the time remaining begins to count down. Press the Potato button. The overn will start immediately. Do not open the door until time is done counting down.
About the sensor microwave feature. Humidity Sensor What happens when using the Sensor Features: The Sensor Features detect the increasing humidity released during cooking. The oven automatically adjusts the cooking time to various types and amounts of food. Covered Do not use the Sensor Features twice in succession on the same food portion—it may result in severely overcooked or burnt food. If food is undercooked after the countdown, use Time Cook for additional cooking time.
About the sensor microwave features. TIME COOK POWER LEVEL Express Cook 1 2 3 4 5 6 7 8 9 0 START PAUSE Changing the Power Level The power level may be entered or changed after entering the time for Time Cook. 1 Press TIME COOK button once. 2 Enter cooking time. 3 Enter POWER LEVEL when prompted. 4 Press START. Variable power levels add flexibility to microwave cooking. The power levels on the microwave oven can be compared to the surface units on a range.
About the other feature. Cooking Complete Reminder To remind you that you have food in the oven, the oven will display YOUR FOOD IS READY and beep once a minute until you either open the oven door or press the CANCEL/OFF button. Clock SETTINGS START PAUSE CANCEL OFF CANCEL OFF Press the Settings button to enter the time of day. 1 2 3 4 Press the Settings button two times. Enter the appropriate time of day. Press Settings to select AM or PM. Press Settings to accept the time.
TIMER on/off NOTE: The timer indicator will be lit while the timer is operating. Timer The Timer operates as a minute timer and can be used at any time, even when the oven is operating. 1 2 3 Press the TIMER on/off button. Enter a time. Press the TIMER on/off button to start. To cancel, press the TIMER on/off button. When time is up, the oven will signal. To turn off the timer signal, press TIMER on/ off. Turntable On/Off SETTINGS For best cooking results, leave the turntable on.
About the other feature. Vent Vent Fan The vent fan removes steam and other vapors from surface cooking. Press VENT FAN once for boost fan speed, twice for high fan speed, three times for medium fan speed, four times for low fan speed or five time to turn the fan off. NOTE: The FAN indicator will be lit while the fan is operating. Automatic Fan An automatic fan feature protects the microwave from too much heat rising from the cooktop below it. It automatically turns on if it senses too much heat.
Care and cleaning of the oven. Helpful Hints An occasional thorough wiping with a solution of baking soda and water keeps the inside fresh. Be sure the power is off before cleaning any part of this oven.
Care and cleaning of the oven.
Shelf (on some models). Shelf (on some models) Only use microwave shelf when reheating on more than one level. DO NOT store the oven shelf in the microwave. How to Use the Shelf When Microwaving: • Make sure the shelf is positioned properly inside the microwave to prevent damage to the oven from arcing. Use the upper shelf supports for two-level cooking.
Replacing the light bulb. Cooktop Light/Nite Light Express Cook TIME COOK DEFROST STEAM POPCORN BEVERAGE FAMILY SNACKS POTATO MELT REHEAT 1 2 4 5 7 8 POWER LEVEL 0 3 6 CANCEL OFF TIMER SETTINGS on/off Replace with a 120 volt, 25 or 50 watt (max.) halogen bulb. Order WB36X10213 from your GE supplier. 9 ADD 30 SEC START PAUSE Remove screw. 1 To replace the cooktop light/nite light, first disconnect the power at the main fuse or circuit breaker panel, or pull the plug.
Removing and Cleaning the Filters Express Cook TIME COOK DEFROST STEAM POPCORN BEVERAGE FAMILY SNACKS POTATO MELT REHEAT 1 2 4 5 7 8 POWER LEVEL 0 3 6 9 CANCEL OFF TIMER SETTINGS on/off To remove, slide them to the rear using the tabs. Pull down and out. ADD 30 SEC START PAUSE To clean the vent filters, soak them and then swish around in hot water and detergent. Don’t use ammonia or ammonia products because they will darken the metal.
About the exhaust feature. To Install the Charcoal Filter To install a new charcoal filter, remove plastic and other outer wrapping from the new filter. Insert the top of the filter up and into the grooves on the inside of the top opening. Push the bottom of the filter in until it rests in place behind the tabs. Before you call for service.... Things That Are Normal With Your Microwave Oven n Moisture on the oven door and walls while cooking. Wipe the moisture off with a paper towel or soft cloth.
Before you call for service.... Troubleshooting Tips Save time and money! Review the charts on the following pages first and you may not need to call for service. Problem Possible Cause What To Do Oven will not start A fuse in your home may be blown or the circuit breaker tripped. • Replace fuse or reset circuit breaker. Power surge. • Unplug the microwave oven, then plug it back in.
Before you call for service. Problem Possible Cause What To Do Vent fan comes on automatically The vent fan automatically turns on to protect the microwave if it senses too much heat rising from the cooktop below. • This is normal. SENSOR ERROR appears on the display When using a Sensor feature, the door was opened before steam could be detected. • Do not open door until steam is sensed and time is shown counting down on the display. Steam was not detected in a maxiumum amount of time.
GE Microwave Oven Warranty. All warranty service provided by our Factory Service Centers, or an authorized Customer Care® technician. To schedule service, online, contact us at GEAppliances.com, or call 800.GE.CARES (800.432.2737). Please have serial and model numbers available when calling for service. Staple your receipt here. Proof of the original purchase date is needed to obtain service under the warranty.
Consumer Support. GE Appliances Website GEAppliances.com Have a question or need assistance with your appliance? Try the GE Appliances Website 24 hours a day, any day of the year! For greater convenience and faster service, you can now download Owner’s Manuals, order parts, catalogs, or even schedule service on-line. You can also “Ask Our Team of Experts™” your questions, and so much more... Schedule Service GEAppliances.com Expert GE repair service is only one step away from your door.
GEAppliances.com GE Profile Horno microonda Instrucciones de seguridad. . . . . . . 2–8 Instrucciones de operación Funciones de su horno . . . . . . . . . . . 15,16 Tiempo de Cocción. . . . . . . . . . . . . 28-30 Funciones convenientes. . . . . . . . . . . . 20 Función MyPlate.gov (MyPyramid). . . 16 Funciones del microondas con sensor . . . . . . . . . . . . . . . . . . . . 9-11 Terminología de microondas . . . 22-24 Nivel de Potencia. . . . . . . . . . . . . . . . . . . 21 Resto de las funciones. .
INSTRUCCIONES IMPORTANTES DE SEGURIDAD. LEA PRIMERO TODA LAS INSTRUCCIONES. Cuando se usen aparatos eléctricos, siempre deben seguirse precauciones básicas de seguridad, incluyendo las siguientes: ¡PRECAUCIÓN! Por su seguridad, la información contenida en este manual debe seguirse para minimizar el riesgo de incendio, explosión, descarga eléctrica, exposición a energía microondas o para evitar daños a la propiedad, lesiones personales o pérdida de vida.
GEAppliances.com Use este electrodoméstico sólo para su propósito original, como se describe en el Manual del Propietario. n Para reducir el riesgo de incendio en la apertura del horno: — No cocine demasiado la comida. Preste atención cuidadosa al electrodoméstico cuando se coloca papel, plástico u otro material combustible en el horno mientras se cocina. — Quite las cintas de cierre con metal y las asas metálicas de los recipientes de papel o plástico antes de introducirlos en el horno.
INSTRUCCIONES IMPORTANTES DE SEGURIDAD. LEA PRIMERO TODA LAS INSTRUCCIONES. ¡PRECAUCIÓN! Riesgo de explosión o exposición a materiales tóxicos, la batería debe ser reemplazada solamente por el técnico de reparaciones. ¡PRECAUCIÓN! FORMACIÓN DE ARCO ELÉCTRICO Si ve que se forman arcos eléctricos, presione el botón CLEAR/OFF (borrar/ apagado) y resuelva el problema. Arco eléctrico es lo que, en la terminología de los microondas, describe las chispas en el horno.
GEAppliances.com ¡PRECAUCIÓN! COMIDAS n No haga rosetas o palomitas de maíz en el microondas a no ser que esté usando un accesorio especial para prepararlas o que esté empleando rosetas o palomitas de maíz que indiquen ser válidas para el uso de hornos microondas. n No hierva huevos dentro de un horno microondas. Se generará presión dentro de la yema del huevo que causará que explote pudiendo, posiblemente, dañar a alguien.
INSTRUCCIONES IMPORTANTES DE SEGURIDAD. LEA PRIMERO TODA LAS INSTRUCCIONES. UTENSILIOS DE COCINA PARA MICROONDAS n n n n n n 6 No ponga en marcha el horno en el modo microondas sin que el dispositivo giratorio y el soporte del dispositivo estén encajados en su lugar. El dispositivo giratorio debe estar suelto para que pueda girar. Asegúrese de que todos los utensilios de cocina que use en su horno sean aptos para microondas.
GEAppliances.com UTENSILIOS DE COCINA PARA MICROONDAS n Use papel de aluminio sólo de la forma detallada en este manual. Cuando use aluminio dentro de un horno microondas, mantenga el aluminio, al menos, a una pulgada de distancia de los laterales del horno. n Utensilios de plástico—Los utensilios de plástico diseñados para su uso en microondas son muy prácticos, pero deben usarse con cuidado.
INSTRUCCIONES IMPORTANTES DE SEGURIDAD. LEA PRIMERO TODA LAS INSTRUCCIONES. EL VENTILADOR EXTRACTOR El ventilador se pondrá en funcionamiento de forma automática bajo ciertas circunstancias (ver función de Ventilador Automático). Prevenga el que empiece algún fuego al cocinar y que se extienda mientras el ventilador del respiradero está en marcha. n Limpie a menudo la parte inferior del microondas. No permita que se acumule grasa en el microondas o en los filtros del ventilador.
Las funciones de su horno. GEAppliances.com Su modelo puede tener otras características y apariencia que las ilustradas en este manual. Express Cook TIME COOK DEFROST STEAM POPCORN BEVERAGE FAMILY SNACKS POTATO MELT REHEAT 1 2 4 5 7 8 9 POWER LEVEL 0 ADD 30 SEC 3 6 START PAUSE CANCEL OFF TIMER SETTINGS on/off Funciones del horno Tirador. Enganches de puerta. Ventana con escudo metálico. La ventana permite ver como se cocinan los alimentos y evita que salgan microondas del horno.
Las funciones de su horno. Función de Ahorrador de Potencia (Ahorro de Energía) (en algunos modelos) Su horno microondas GE cuenta con una función de Ahorrador de Potencia (Ahorro de Energía). Muchos electrodomésticos electrónicos, incluyendo los hornos microondas, consumen corriente eléctrica mientras están desconectados y en el modo de espera. Eliminar el consumo del modo de espera puede reducir los costos sobre el uso.
Acerca de las funciones de cocción de su horno microondas. GEAppliances.com Su modelo puede tener otras características y apariencia que las ilustradas en este manual. Express Cook TIME COOK DEFROST STEAM POPCORN BEVERAGE FAMILY SNACKS POTATO MELT REHEAT 1 2 3 4 5 6 7 8 9 POWER LEVEL 0 ADD 30 SEC START PAUSE CANCEL OFF TIMER SETTINGS on/off Controles de Cocción Consulte la Guía de Acciones Convenientes antes de comenzar.
Acerca de las funciones del temporizador. Cocción TIME COOK Le permite cocinar en el horno microondas por cualquier tiempo hasta 99 minutos y 99 segundos. Power level 10 (High) (Nivel de potencia 10 (High) ) se configura de forma automática, pero lo puede modificar para una mayor flexibilidad. 1 Presione COOK (Cocción). Express Cook 1 2 3 4 5 6 7 8 9 2 3 4 Ingrese el tiempo de cocción. Presione START (Iniciar) o cambie el nivel de potencia.
Acerca de las funciones del temporizador. Descongelación por Tiempo DEFROST Express Cook 1 2 3 4 5 6 7 8 9 0 START PAUSE Le permite descongelar durante un período de tiempo seleccionado. Consulte los tiempos sugeridos en la Guía de Descongelación. Time Defrost (Descongelación por Tiempo) y 1 lb Quick Defrost (Descongelación Rápida de 1 lb) se explican en la sección Acerca de las Funciones Convenientes.) 1 Presione DEFROST (Descongelar) dos veces. 2 Ingrese el tiempo de descongelación.
Acerca de las funciones del temporizador. Guía de Descongelación COMIDA TIEMPO COMENTARIOS Panes, Tortas Panes, buñuelos o panecillos (1 trozo) Pastelitos (12 onzas aprox) 1/4 de min. 2 a 4 min. Vuelva a ordenar luego de la mitad del tiempo. Pescado y Mariscos Lomos, congelados (1 lb) 6 a 9 min. Fruta Bolsa de plástico - 1 o 2 (Paquete de 10 onzas.) 1 a 5 min. Carne Tocino (1 lb) 2 a 5 min. Coloque el paquete cerrado en el horno. Deje reposar por 5 minutos luego de la descongelación.
Sobre las funciones convenientes. Consejos para la Descongelación DEFROST Express Cook 1 2 3 4 5 6 7 8 9 0 n Retire la carne del paquete y coloque la misma en el plato del microondas. n Cuando el horno dé la señal, dé vuelta la comida. Retire la carne descongelada o cubra las partes calientes con trozos pequeños de papel aluminio. n Luego de descongelar, la mayoría de las carnes necesitan reposar durante 5 minutos para completar la descongelación.
Sobre la función MyPlate.gov (MyPyramid). Función MyPlate.gov (MyPyramid) Le permite cocinar comidas saludables en el microondas por porciones o con sensor. Express Cook 1 2 3 4 5 6 7 8 9 0 START PAUSE 1 Presione la tecla MyPlate.gov (MyPyramid). el tipo de comida. Lea la Guía de 2 Ingrese Cocción para MyPlate.gov (MyPyramid) a continuación para conocer los códigos o consulte en la pantalla los tipos de comida. 3 Ingrese la cantidad como se indica para selecciones de comida sin sensor.
Acerca de las funciones del microondas con sensor. FAMILY SNACKS Family Snacks (Refrigerios Familiares) Use la función Family Snacks (Refrigerios Familiares) para cocinar entre una variedad de refrigerios familiares programados previamente. 1 Presione el botón Family Snacks (Refrigerios Familiares). la tecla numérica para seleccionar una 2 Ingrese de las ocho opciones de refrigerios. 3 Ingrese una cantidad para el refrigerio seleccionado.
Acerca de las funciones del microondas con sensor. POPCORN Popcorn (Palomitas de Maíz) Para usar la función de Popcorn (Palomitas de Maíz): 1 Siga las instrucciones del paquete, usando Auto Cook (Auto Cocción) si el paquete pesa menos de 1.0 onzas o supera las 3.5 onzas. Coloque el paquete de palomitas de maíz en el centro del plato giratorio. 2 Presione el botón POPCORN (Palomitas de Maíz) una vez para bolsas de 3.3 a 3.5 onzas o dos veces para bolsas de 2.7 a 3.0 onzas o tres veces para bolsas de 1.
BEVERAGE Beverage (Bebida) Use la función Beverage (Bebida) para cocinar entre 8 y 10 onzas de bebida. 1 2 Presione el botón Beverage (Bebida). Comienza de inmediato. POTATO Potato (Papa) Use la función Potato (Papa) para cocinar entre 1 y 4 papas. 1 2 Coloque la papa/ papas en el horno 3 El horno emite una señal cuando se produce vapor y el tiempo restante comienza la cuenta regresiva. Presione el botón Potato (Papa). El horno se iniciará de inmediato.
Características de microondas por sensor. Sensor de humedad Agujereado Cubierto Seque los platos para que no engañen al sensor. Qué sucede cuando usa las Funciones de Sensor: Las Funciones de Sensor detectan la mayor humedad liberada durante la cocción. El horno ajusta automáticamente el tiempo de cocción a los diferentes tipos y cantidades de comida. No utilice las Funciones de Sensor dos veces consecutivas en la misma porción de comida.
Acerca de cómo modificar el nivel de potencia. TIME COOK POWER LEVEL Express Cook 1 2 3 4 5 6 7 8 9 0 START PAUSE Cómo Modificar el Nivel de Potencia El nivel de potencia se puede ingresar o modificar luego de introducir el tiempo de Cocción. 1 Presione el botón COOK (Cocción) una vez. 2 Ingrese el tiempo de cocción. POWER LEVEL (Nivel de Potencia) 3 Ingrese cuando se indique. 4 Presione START (Iniciar). Los niveles de potencia variables suman flexibilidad a la cocción en el microondas.
Acerca del resto de las funciones. Recordatorio de Cocción Completa Para recordarle que colocó comida en el horno, este último mostrará YOUR FOOD IS READY (Su Comida Está Preparada) y emitirá un pitido una vez por minuto hasta que abra el horno o presione el botón CANCEL/OFF (Cancelar/ Apagar). Clock (Reloj) SETTINGS Presione el botón Settings (Configuraciones) para ingresar la hora del día. 1 Presione el botón Settings (Configuraciones) dos veces. Ingrese la hora del día correcta.
TIMER on/off NOTA: El indicador de tiempo se iluminará mientras el temporizador esté funcionando. Timer (Temporizador) El temporizador funciona como un temporizador por minutos y puede ser usado en cualquier momento, incluso cuando el horno está funcionando. 1 Presione el botón TIMER (Temporizador). 2 Ingrese un tiempo. 3 Presione el botón TIMER (Temporizador) para comenzar. Para cancelar, presione el botón TIMER (Temporizador). Cuando el tiempo concluya, el temporizador emitirá una señal.
About the other feature. Vent Ventilador de la Ventilación El ventilador de la ventilación elimina el vapor y otros vapores de la cocción superficial. Presione VENT FAN (Ventilador de la Ventilación) una vez para la velocidad más alta del ventilador, dos veces para una velocidad alta del ventilador, tres veces para una velocidad media del ventilador, cuatro veces para una velocidad baja del ventilador, o cinco veces para apagar el ventilador.
Cuidado y limpieza del horno. Consejos prácticos Para mantener el interior fresco pásele un paño con una solución de agua y bicarbonato sódico de cuando en cuando. Asegúrese de que esté apagado (en off) antes de limpiar cualquier parte de este horno.
Cuidado y limpieza del horno. Cómo Limpiar el Exterior No recomendamos el uso de limpiadores con amoniaco o alcohol, ya que pueden dañar el aspecto del horno microondas. Si opta por usar un limpiador casero, primero aplique el limpiador directamente en un paño limpio, luego limpie el área sucia.
Estante (en algunos modelos). Estante (en algunos modelos) Use solamente el estante de horno microondas cuando esté recalentando en más de un nivel. NO guarde el estante del horno dentro del horno microondas. Cómo Usar el Estante Cuando Esté Cocinando por Microondas: Use los soportes de enstante superiores para cocción de dos niveles.
Cambio de bombillas. Luz de encimera/luz nocturna Express Cook TIME COOK DEFROST STEAM POPCORN BEVERAGE FAMILY SNACKS POTATO MELT REHEAT 1 2 4 5 7 8 POWER LEVEL 0 3 6 9 ADD 30 SEC START PAUSE CANCEL OFF TIMER SETTINGS on/off Quite el tornillo.
Cómo Quitar y Limpiar los Filtros Express Cook TIME COOK DEFROST STEAM POPCORN BEVERAGE FAMILY SNACKS POTATO MELT REHEAT 1 2 4 5 7 8 POWER LEVEL 0 3 6 9 ADD 30 SEC START PAUSE CANCEL OFF TIMER SETTINGS on/off Para quitarlos, usando las lengüetas, deslícelos hacia atrás. Estire hacia abajo y afuera. Para limpiar los filtros del extractor, empápelos y páselos de un lado a otro en agua con detergente. No use amoniaco ni productos que lo contengan ya que oscurecerían el metal.
La función de extractor. Cómo instalar el filtro de carbón vegetal Para instalar un nuevo filtro de carbón vegetal, retire el plástico y cualquier otro envoltorio del nuevo filtro. Introduzca la parte superior del filtro hacia arriba y dentro de los huecos en la parte interior de la apertura superior. Apriete la parte inferior del filtro hacia dentro hasta que se coloque tras las pestañas.
Antes de llamar al servicio de reparaciones… Resolución de Problemas ¡Ahorre tiempo y dinero! Revise las tablas en las páginas siguientes y tal vez no necesite llamar al servicio de reparación. Problema Causas Posibles Qué Hacer El horno no se inicia Es posible que un fusible de su hogar se haya quemado o que el disyuntor se haya desconectado. • Reemplace el fusible o reinicie el disyuntor. Pico de tensión • Desenchufe el horno microondas; luego vuelva a enchufarlo.
Antes de llamar al servicio de reparaciones… Problem Possible Cause What To Do Bloqueo del Control aparece en la pantalla El control fue bloqueado. • Mantenga presionado CANCEL/OFF (Cancelar/Apagar) por unos tres segundos para desbloquear el control. El piso del horno está caliente incluso cuando el horno no fue usado. La luz de la cocina está ubicada debajo del piso del horno. Cuando la luz está encendida, el calor que produce puede hacer que el piso del horno esté caliente. • Esto es normal.
Garantía de su hornomicroondas de GE. Todo el servicio de garantía se suministra por medio de nuestrosCentros de Servicio de Fábrica o un técnico autorizado porCustomer Care® . Para programar un servicio, en-línea, visítenosen GEAppliances.com o llame a 800.GE.CARES (800.432.2737). Cuando so-licite servicio por favor tenga disponible el número de serie y modelo. Para el Período de: Engrape aquí su recibo. Para que la garantía cubra losservicios se necesita elcomprobante original de lafecha de compra.
Soporte al consumidor. Página Web de GE Appliances GEAppliances.com ¿Desea realizar una consulta o necesita ayuda con su electrodoméstico? ¡Intente a través del Sitio Web de Electrodomésticos de GE las 24 horas del día, cualquier día del año! Para mayor conveniencia y un servicio más rápido, ahora puede descargar el Manual del Propietario, ordenar piezas, catálogos o incluso un servicio programado a través de Internet.