
Installation Guide


5
MOUNT THE MICROWAVE OVEN
(cont.)
C5.
23
Installation Instructions
6
7
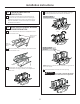
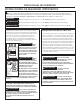
Tighten the outer three screws to the top of the
microwave oven. (While tightening screws, hold
the microwave oven in place against the wall and
the top cabinet.)
Install grease filter. See the Owner’s Manual
packed with the microwave.
Insert 3 self-aligning screws through outer top
cabinet holes. Turn two full turns on each screw.
Attach the microwave oven to the top cabinet.
Cabinet Front
Cabinet Bottom Shelf
Filler Block
Microwave Oven Top
Equivalent to Depth
of Cabinet Recess
3
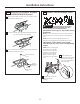
Insert a self-aligning screw through top center
cabinet hole. Temporarily secure the oven by
turning the screw at least two full turns after
the threads have engaged. (It will be completely
tightened later.) Be sure to keep power cord tight.
Be careful not to pinch the cord, especially when
mounting flush to bottom of cabinet.
Self-Aligning Screw
4
3
2
1
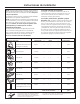
CHARCOAL FILTER
C6.
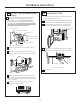
Install the charcoal filter. When properly installed,
the wire mesh of the filter should be visible from the
front.
Close the door.
Charcoal
Filter
Insert mesh-side up
Open the filter door by pushing down 2 buttons on
the top of the microwave just above the filter door.
Push the filter at the bottom until it comes free
of the locking tabs. Slide the filter down and out.
4
A charcoal filter is installed in all units. Follow the
steps below to check the filter.
T
u
r
n
t
o
S
e
l
e
c
t
P
r
e
s
s
t
o
E
n
t
e
r
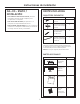
Reheat
Timer
On/Off
Defrost
Weight/Time
Start
Pause
Cancel
Off
Lock Controls
Hold 3 Sec
Cook
Time
Set
Clock
Options Help
Surface
Light
Vent Fan
Popcorn
B
everage
Microwave
Express
Warm
Power
Level
Auto
Cook
Combination
Fast Bake
Convection
Roast
Turntable
Convection
Bake