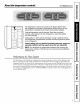
wwvv.GEAppliances.com Safety Instructions Operating Automatic ........... 2-4 Instructions Icemaker ........... 12 Care and Cleaning .......... Crispe_ and Pans ............. Ice and Water Dispenser ........ 14, 15 11 13 Relrigerator Doors ............ Replacing the Light Bulbs ....... Shelves, Bins and Racks ........ 10 16 8, 9 Temperature Controls ........... TurboCool _'_. .................. Water Filter ...................
IMPORTANTSAFETYINFORMATION. READALLINSTRUCTIONSBEFOREUSING. A WARNING! Use this appliance only for its intended purpose as described in this Owner's ManuaL SAFETY PRECAUTIONS When using electrical appliances, basic safety precautions should be followed, including the following: {This refrigerator must be properly installed and located in accordance with the Installation Instructions b@ore it is used.
ww_.GEAppliances.com A DANGER!RISK OF CHILDENTRAPMENT PROPER DISPOSAL OFTHEREFRIGERATOR Child enn'apment and suffocation are not problems of the past. ,Junked or abandoned refrigerators are still dangerous...even if they will sit for 'just a few days." @you are getting rid of your old refiigerato_; please follow the insmmtions below to help prevent accidents.
IMPORTANTSAFETYINFORMATION. READALLINSTRUCTIONSBEFOREUSING. A WARNING! HOWTOCONNECT ELECTRICITY Do not, under any circumstances, cut or remove the third (ground) prong from the power cord. For personal safe_ this appfiance must be properly grounded. The power cord of this appliance is equipped with a 3-prong (grounding) plug which mates with a standard 3-prong (grounding) wall outlet to minimize the possibility of electric shock hazard from this appliance.
About the temperaturecontrols, ww .GEAppliances.c The temperature controls are preset in the factory at 5 for both the refrigerator and freezer compartments. Allow 24 hours for the temperature to stabilize to the preset recommended settings. Several adjustments may be required. Each time you adjust controls, allow24 hours for the refrigerator to reach the setting you have selected.
AboutTurboCool TM. How it Works TurboCoolrapidly cools the refrigerator compartment in order to more quickly cool foods. Use TurboCoolwhen adding a large amount of food to the refrigerator ........................................................................... compartment, putting away foods after they ....................................... have been sitting out at room temperature or when putting away warm leftovers.
About the water filter. (onsomemodels) ww_.GEAppliances.com On some models Water Filter Cartridge Tile water filter cartridge is located in the back upper right corner of the refrigerator compartment. _ When to Replace the Filter Timre is a replacement indicator light for the water filter cartridge on tile dispenser. This light will turn orange to tell you that you need to replace tile filter soon.
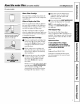
About the shelves, bins and racks. Not all features are on all models. Refrigerator Door Bins and Freezer Door flit-Out Bins LargeBins The larger refrigerator door bins and freezer tih-out door bins are adjustable. TOremove: Lift tile front of the bin straight up, then lift up and out. Refrigerator bin Thesnuggerhelps prevent tipping, spilling or sliding of small items stored on the door shelf. Place a finger on either side of the snugger near the rear and move it back and forth to fit your needs.
ww_.GEAppliances.com Not all features are on all models. Slide-Out Spillproof Sheff Tim slide-out spillproof shelf allows you to reach items stored behind others. Tile special edges are designed to help prevent spills from dripping to lower shelves. Press tab and pull shelf forward to remove TOremove: Slide tile shelf out until it reaches tile stop, then press down on tile tab and slide the shelf sn'aight out. Toreplaceor relocate: Line the shelf up with tile supports and slide it into place.
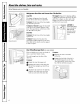
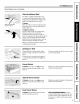
About the refrigerator doors. Refrigerator Doors The refrigerator doors than the ones you are door opening/closing tile doors close all tile sealed. may feel different used to. Tile special feature makes sure way and are securely The resistance you feel at the stop position will be reduced as tile door is loaded with food. When opening and closing the door you will notice a stop position.
About the crispers andpans. ww .GEAppliances.c Not all features are on all models. Fruit and Vegetable Crispers Excess water that may accumulate in the bottom of the drawers should be wiped di 7. Onsomemodels,the bottom drawer has full extension slides that allow full access to the draw,el: HJ_ LO L Adjustable Humidity Crispers Slide the control all the way to the HIsetting to provide high humidity recommended for most vegetables.
About the automaticicemaker. A newly installed refrigerator may take 12 to 24 hours to begin making ice. Ondispensermodels, to access ice or reach the power switch: o Lift the bin, then pullit forward until the bin stops, Automatic Icemaker The icemaker will produce seven cubes per cycle----approximately 100-130 cubes in a 24-hour period, depending on freezer compartment temperature, room temperature, number of"door openings and otber use conditions.
About the ice and water dispenser.(onsomemodels) ww_.GEAppliances.com On some models To Use the Dispenser Select CUBEDICE Iv_j, CRUSHEDICE I_gv_,I or WATERI_I. DispenserLight Tiffs pad turns tile night lightin the dispenser on Press the glass gently against the top of the dispenser cradle. andonTile light when the comes Tim spill shelf is not self:draining. To reduce water spotting, tile shelf and its grille should be cleaned regularly.
Careand cleaning of the refrigerator. Cleaning the Outside O[spensef drip are8, The dispenser drip area, (on some models) beneath the grille, should be wiped dry. Water left in this area may leave deposits. Remove the deposits by adding undiluted vinegar to the well. Soak until the deposits disappear or become loose enough to rinse away. The dispenser cradle (on some models). Before cleaning, lock the dispenser by pressing and holding the LOCK CONTROL pad for 3 seconds.
ww_.GEAppliances.com Behind the Refrigerator Be careful when moving tile refrigerator away from the wall. _-MItypes of floor coverings can be damaged, particularly cushioned coverings and those with embossed suri;aces. Whenpushingtherefrigeratorback,makesure youdon'troll over thepower cordor icemaker supplyline (onsomemodels). Pull the refiigerator straight out and return it to position by pushing it straight in.
Replacing the light bulbs. Setting either or both controls to 0 does not remove power to the light circuit. Refrigerator Compartment--Upper Light O Unplug the refrigeratol: After replacing the bulb witb an appliance bulb of tile same or lower wattage, replace tile light shield and screws (on some models). When replacing the light shield, make sure tbat tile tabs at the hack of tile shield fit into tile slots at the back of the light shield housing.
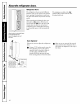
Trimkits and decoratorpanels. For CustomStyle" models Read these instructionscompletely and carefully. Before YouBegin Some models are equipped with trim kits that allow you to install door panels. You can order pre-cut black, white, bisque or stainless steel decorator panels from GE Parts and Accessories, 800.626.2002, or you can add wood panels to match your kitchen cabinets.
Trimkits. Dimensions for Custom Wood Panels FreezerPanel WithoutDispenser Cut 1/8" out -_I _-(3 ram} _z ''i i FreezerPanel WithDispenser Cut 1/8" out --_/I_-(3 ram) ,____', FreshFoodPanel 1/8" {3ram}--b ---} 5n6" ---{ (8mm) 5/lt6,, (8 ram) (8ram} 17W' (45Acm} 67YS {171cm) 67_2" (171cm) FRONT . 14_S" {38.8cm} FRONT {388 cm) ,q-- 19Y_" - --_ {49.5cm) 33_" (88.4cm) r The areas at the top of the panels need to be cut out of the panels.
Inserting the doorpanels. Read these instructions completely and carefully. O Insert the Freezer Panel and Fresh Food Panel Carefully push the freezer panel in until it slides into the slot behind the door handle. Push the filler If your model has a dispensm; this step only applies to the fresh food panel and top freezer panel. panel (required with rome door panels) in behind the decorator panel. Repeat for fresh food panel. Insert the Bottom Freezer Panel (on dispenser models).
Insertingthe doorpanels. O Install the Side Trim. These pieces are tucked inside the refrigerator handle. door Donot removetheprotective film on the outsideof the Side Trimuntil the Side Trimis installed. Fit the bottom of the Side Trim under the Bottom Trim as illustrated. 2O Hold tile Side Trim against the front face of tile decorator panels and fit the Side Trim under tile Top Trim.
Installation Instructions I Questions? Refrigerator Models 23, 25, 26, 27 & 29 In Canada, call 1.800.361.3400 or Visit our Website at: www.geappliances.ca Call 800.GE.CARES (800.432.2737) or Visit our Website at: www.GEAppliances.com BEFORE YOU BEGIN PREPARATION Read these instructions and carefully. WATER SUPPLY TO THE ICEMAKER completely If the refrigerator has an icemaker, it will have to be connected to a cold water line.
Installation Instructions MOVING THE REFRIGERATOR [] LOADING THE RERIGERATOR ONTO A HAND TRUCK If the refrigerator must go through any entrance that is less than 38" wide, the doors must be removed. Proceed to Step 3. Leave all tape and door pads on doors until the refrigerator is in its final location. DO NOT remove To move the refrigerator, use a padded hand truck. Center the refrigerator on the hand truck and secure the strap around the refrigerator. DO NOT OVERTIGHTEN THE STRAP.
Installation [] Instructions DISCONNECT THE POWER COUPLING (on some models) [] CLOSE THE FREEZER AND REFRIGERATOR DOORS If the refrigerator has a water dispenser, there is a power line (harness) from the cabinet into the bottom hinge on the freezer door that must be disconnected. To disconnect, freezer pull apart at the coupling.
Installation Instructions MOVING THE REFRIGERATOR (CONT.) [] [] REMOVE THE FREEZER DOOR (cont.) [] As one up and person line and bottom [] person slowly lifts the freezer door off the bottom hinge, the second should carefully guide the water power line (harness) through the hinge. Set the door on a non-scratching with the inside up. DOOR (cont.) Remove the two 5/16" hex head screws, then lift the hinge straight up to free the hinge pin.
Installation [] [] REMOVE THE REFRIGERATOR Lift the refrigerator bottom hinge. Instructions [] DOOR (cont.) door REPLACING THE DOORS To replace the doors, steps 3 through 8. up and off the However, If the refrigerator has a refreshment center, one person should slowly lift the door up and off the bottom hinge and the second person should carefully guide the electrical lines (harnesses) through the bottom hinge.
Installation Instructions INSTALLING THE REFRIGERATOR REFRIGERATOR DIMENSIONS AND SPECIFICATIONS (for CustomStyle models) LOCATION • Do not install the refrigerator where the temperature will go below 60°F (16°C) because it will not run often enough to maintain proper temperatures. TM • Do not install the refrigerator where the temperature will go above 100°F (37°C) because it will not perform properly. • Install it on a floor strong support it fully loaded.
Installation Instructions [] CONNECTING THE REFRIGERATOR TO THE HOUSE WATER LINE (icemaker and dispenser [] models) Fasten the tubing into the clamp provided to hold it in position. You may need to pry open the clamp. Tubing Clamp A cold water supply is required for automatic icemaker and dispenser operation. If there is not a cold water supply, you will need to provide one. See "Installing the Water Line" section.
Installation Instructions INSTALLING THE REFRIGERATOR (CONT.) [] PUT THE REFRIGERATOR IN PLACE Move the refrigerator [] to its final [] location. LEVEL THE REFRIGERATOR (cont.) To adjust the rollers on 23' models: Turn the front LEVEL THE REFRIGERATOR roller adjusting screws clockwise to raise the The refrigerator can be leveled by adjusting the rollers located near the bottom hinges. refrigerator, counterclockwise to lower it. Use a Roller adjusting 3/8" hex socket or wrench, wrench.
Installation [] Instructions REPLACE THE BASE GRILLE Replace the grille by installing Phillips head screws. [] START THE ICEMAKER the two Set the icemaker power switch to the I (on) position. The icemaker will not begin to operate until it reaches its operating temperature of 15°F (-9°C) or below. It will then begin operation automatically. It will take 2-3 days to fill the ice bin.
Installation Instructions INSTALLING THE WATER LINE (ICEMAKER & DISPENSER MODELS) WHAT YOU WILL NEED BEFORE YOU BEGIN Recommended copper water supply kits are WX8X2, WX8X3 or WX8X4, depending on the amount of tubing you need. Approved plastic water supply lines are GE SmartConnect Refrigerator Tubing (WX08X10002, WX08X10006, WX08X10015 and WX08X10025). TM • Copper or GE SmartConnect Refrigerator Tubing kit, 1/4" outer diameter to connect the refrigerator to the water supply.
Installation Instructions Install the shutoff valve on the nearest frequently used drinking water line. WHAT YOU WILL NEED (CONT.) NOTE: The only GE approved plastic tubing is that supplied in GE SmartConnect Refrigerator Tubing kits. Do not use any other plastic water supply line because the line is under pressure at all times. Certain types of plastic will crack or rupture with age and cause water damage to your home. [] TM Turn on the nearest faucet to clear the line of water.
Installation Instructions INSTALLING THE WATER LINE (CONT.) [] FASTEN THE SHUTOFF Fasten the shutoff valve VALVE [] CONNECT THE TUBING TO THE VALVE to the cold water pipe with the pipe clamp. Place the compression nut and ferrule (sleeve) for copper tubing onto the end of the tubing and connect it to the shutoff valve. Pipe Clamp _ Make sure the tubing is fully inserted into the valve. Tighten the compression nut securely.
Normal operatingsounds, ww .GEAppliances.co Newer refrigerators sound different from older refrigerators. Modem refrigerators have more features and use newer technology. Do you hear what I hear? These sounds are normal HUMMM... WHOOSH... • • W//IR! The new high efficiency compressor may run faster and longer than your old refrigerator and you may hear a high-pitched hum or pulsating sound while it is operating.
Before youcall for service... Troubleshooting tips Save time and money! Review the charts on the following pages first and you may not need to call for service. Possible Causes Refrigerator Either What To Do in defrost or both controls Refrigerator cycle. • Wait about set to 0. • Set the conn'ols is unplugged. 30 minutes re a temperature • Push the plug completely The fuse is blown/circuit breaker is tripped. • Replace fuse or reset Refrigerator mode.
ww_.GEAppliances.com Possible Causes What To Do Icemaker * Set tile power power switch is in the. switch to the 0 (Off) position. Keeping it °otSUpplyl'°'po theco.. terbeentO reftedthe erator in°°°but the ,O., position willdamage.le watervalve Ice storage bin needs Food transmitting to ice cubes. Small_hollo_cub_ cleaning. odor/taste • Empty and wash bin. Discard • Wrap foods well. Interior of refrigerator needs cleaning. • See Care and cleaning, Water Filter clogged.
Before youcall for service... Possible Causes What To Do Supply line or shutoff valve is clogged. • Call a plumben Water filter dogged. • Replace is LOCKED. Dispenser filter cartridge or remove filter and install plug. • Press and hold the LOCK CONTROLpad tot 3 seconds. Last setting was CRUSHEDICE. • A few cubes were left in the crusher setting. This is normal. Foods • Foods with strong odor transmitting to refrigerator.
GE Service Protection Phls TM GE, a name recognized worldwide for quality and Service Protection Plus T_'-comprehensive protection No Matter What Brand! Benefits Include: offers you appliances- We'll CoverAny Appliance. Anywhere. Anytime.
Consumer Product Ownership Registration Dear Customer: Thank you lbr purchasing We are proud Follow our product and thank you for placing your confidence in us. to have you _ a customer! these three steps to protect 2 Complete and mail your Consmer Product Ownership Registration today. Have the peace of mind of knowing we can contact you in the unlikely event of a s_ety your new appliance modification.
Notes. ww_.GEAppliances.com e. _h z_ e. e.
Performance Data Sheet SmartWater FiltrationSystem GWF/ HWF Cartridge Thissystemhas been tested accordingto NSF/ANS142,/53for reductionof the substanceslimed below. The concentrationof theindicated substancesin water entering the systemwas reduced to a concentration less than or equal to the permissiblelimit for water leaving the system,as specified in NSF/ANS142,/53.* (100%safety factors built in for unmetered usage) Standard Parameter USEPA MCL No.
State of California Department of Health Services Water Treatment Device Certificate Number 00-1434 Date Issued: May 30, 2//00 Date Revised: February 9, 2001 Trademark/Model Designation Replacement GE Smart Water Filtration Sysmms - GWFll6 GWF06 GE Smarl Water Filtrataon.S_ms GWF rGWF Elements ttWF # Turbidity Organic Contaminants Atu_zgne Lind_e 2A-D Rated Service Capacity: 30'0 gallons* Rated Service Flow: 0.
CONSUMER WARRANTY (for customers in Canada) Your refrigerator is warranted to be free of defects in material and workmanship.
Refrigerator Warranty.(For customers in the United States) All warranty service provided by our Factory Service Centers, or an authorized Customer Care® technician. Toschedule service, on-line, 24 hours a day, visit us at www.GEAppllances.com, or call 800.GE.CARES (800.432.2737). Staple your receipt here. Proof of the original purchase date is needed to obtain service under the warrant_ GE Will Replace: Anypart of the refrigerator which fails due to a defect in materials or workmanship.
ConsumerSupport. GEAppliancesWebsite %__ In the U.S.: www.GEAppliances.com Have a question or need assistance with your appliance? Try the GE Appliances Website 24 hom.-s a day, any day of the year! For greater convenience and faster service, you can now download Owner's Manuals, order parts, catalogs, or even schedule service on-line. You can also "Ask Our Team of Experts'"" your questions, and so much more...in Canada: www.geapplianees.ca ScheduleService Intheu.s.:www.GEAppliances.