
Installation Guide


Remove Existing Lighting Components
1
• For retrot only. If you are an OEM, please refer to the OEM
Installation Guide.
• Refer to manufacturing manual for refrigeration case
to identify lighting control circuits. Ensure that power is
switched off at the service panel for the lighting circuit. If
a lighting power switch is not provided in the refrigeration
case, power removal can be performed at the main
breaker panel.
• Locate existing lighting components including ballasts,
lampholders, lamps, and lampguards in the refrigeration
case for removal. Please refer to refrigeration manual for
any questions dealing with component locations.
• Remove lamps, lampholder and lamp guards. Cut the wiring,
making the cut as close to the lampholder as possible. Do
not remove wiring from case as it will be utilized to attach
the LED light. Dispose of components per federal and
local regulations.
• Locate ballast within system. The most common location is
in the canopy or on top of the case.
• Disconnect ballast input and output connectors. Cut the
ballast connector wires nearest to the connector and remove
connector. Unscrew the mounting screws that attach ballast
and remove ballast. Dispose of ballasts according to federal
and local regulations. LED driver installation will begin at
Step 5 and Step 6.
• To install the LED light, rst identify the wiring for connection
to the LED driver. After removing the connector from
ballast, leave the existing ballast input and output wires
for reconnection in a later step.
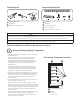
Fluorescent Component Location
WARNING/AVERTISSEMENT
Risk of re or electric shock. Luminaire wiring and electrical parts may be damaged when drilling for installation of LED retrot kit. Check for
enclosed wiring and components. / Risque de feu ou électrocution. Les pièces et câbles électriques risquent d’être endommagés lors du perçage
des trous pour l’installation du luminaire à DEL. Veuillez vérier si des câbles et composantes se trouvent derrière la paroi avant de percer.
To prevent wiring damage or abrasion, do not expose wiring to edges of sheet metal or other sharp objects. / Pour éviter l'endommagement de
câblage ou l'abrasion, ne pas exposer le câblage aux bords de feuilles de métal ou d'autres objets tranchants.
Retrot Installation (for OEM install, proceed to Step 2)
Wire Stripper/Cutter
Screwdriver
Cordless drill with driver bit
1 1
2 2
3 3
4
5
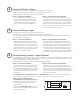
LED Light
LED Driver
L-clip with thumbscrew
6-32 x 1/2" screws
Twist-lock splice wire connectors.
Tools Required Components Required
3 5
1
2
4
1
2
3
A
B
Lamp and lamp holders
Ballast
1. Canopy
2. Top of case
A
B1B2