Use and Care & Cooking Guide Spacemaker@ Microwave Oven Contents Adapter Plugs Aluminum Foil 29 4 Appliance Registration Auto Defrost 2 10, 11 Heating or Reheating Guide 15, 16 8 Hold Time Light Bulb Replacement Microwave Cookware Guide 3 8 Auto Start Care and Cleaning 12 26 Microwaving Tips Minute/Second Timer Consumer Services Control Panel 31 6 Model and Serial Numbers Power Levels 6,8-9, Cooking Complete Cookin~ Guide Reminder 7 19-25 28 14 2 12,30 Precautions Problem Solver 2-5 30 2-
Help us help you... Before using your oven, read this book carefully. It is intended to help you operate and maintain your new microwave oven properly. Keep it handy for answers to your questions. If you don’t understand something or need more help, write (include your phone number): Consumer Affairs GE Appliances Appliance Park Louisville, KY 40225 Write down the model and serial numbers. You’ll find them on a label inside the oven.
Microwaving Tips IMPORTANT SAFETY INSTRUCTIONS Make sure all cookware used in your microwave oven is suitable for microwaving. Most glass casseroles, cooking dishes, measuring cups, custard cups, pottery or china dinnerware which does not have metallic trim or glaze with a metallic sheen can be used. Some cookware is labeled “suitable for microwaving.” ● Read all instructions before using this appliance.
IMPORTANT SAFETY INSTRUCTIONS (continued) Don’t defrost frozen beverages in narrow necked bottles (especially carbonated beverages). Even if the container is opened, pressure can build up. This can cause the container to burst, possibly resulting in injury. —Do not use your microwave oven to dry newspapers. —Do not pop popcorn in your microwave oven unless in a special microwave popcorn accessory or unless you use popcorn labeled for use in microwave ovens.
. ~~Boilable” cooking Pouches and tightly closed plastic bags should be slit, pierced or vented as directed by package. If they are not, plastic could burst during or immediately after cooking, possibly resulting in injury. Also, plastic storage containers should be at least partially uncovered because they form a tight seal. When cooking with containers tight Y covered with ~lastic wrap, remove covering careful~y and direct steam away from hands and face.
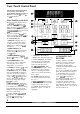
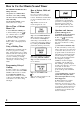
Your Touch Control Panel The Touch Control Panel allows you to set the oven controls electronically with the touch of a finger. It’s designed to be easy to use and understand. When You Plug in the Oven The displtiy panel displays five 8’s, 18 POWER and all of the oven functions. After 15 seconds, all lights disappear and “RESET” TIME COOK I&o ~1 4 A TIME OEFROST AUTO OEFROST ‘h’ A L appears in the upper portion. Touch the CLEAWOFF pad, set the Clock and oven is ready for use.
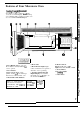
Features of Your Microwave Oven Coohg Completi Retider To remind you that you have food in the oven, the oven will display “End” and beep once a minute until you either open the oven door or touch the CLEAR/OFF pad. ‘r 7-,.. ,,.. ,,.. / 0 & I . 1. Door Handle. Pull to open door. Door must be securely latched for oven to operate. 2. Door Latches. 3. Door Screen. Metal screen permits viewing of foods and keeps microwaves confined inside oven. 4. Model and Serial Numbers.
How to Use the Minute/Second Timer The MIN/SEC TIMER has three timing functions: It operates as a minute timer. It can be set to delay cooking. It can be used as a hold setting after defrosting. The MI N/SEC TIMER operates without microwave energy. ● ● ● How to Defrost, Hold and Time Cook Let’s say you want to defrost a frozen casserole for 15 minutes, hold for 10 minutes and then Time Cook for 25 minutes. Here’s how to do it: Step 1: Take casserole from freezer and place in oven.
Defrosting by Time Time Defrost is designed for speedy thawing of frozen food and is one of the great advantages of a microwave oven. Use the Time Defrost setting to quickly thaw foods such as bread, rolls, vegetables, fruits, and frozen dinners. The Auto Defrost setting is preferred for meat and poultry because the oven sets the defrosting time and power levels for you. Power level 3 is automatically set for defrosting, but you may change this for more flexibility.
Auto Defrost With the Auto Defrost feature, the oven automatically sets the defrosting times and power levels for you. Use the Auto Defrost guide on the next page. Select the food type by touching the appropriate pad. Enter the food weight in pounds and tenths of a pound (see Conversion Guide at right). Then touch START pad. The oven calculates defrosting time and changes power levels during defrosting to give even defrosting results. How to Set Auto Defrost 1.
Auto Defrost Guide 1. Unwrap item being defrosted. 2. Place roasts and whole poultry on trivet in microwave-safe dish. Check food for warm spots halfway through defrosting, and shield these areas with small pieces of foil. RECOMMENDED FOODS MIN.-MAX. WEIGHT INSTRUCTIONS STAND TIME Chops 0.1 -5.0 lbs. Separate, turn over and shield where necessary. 1 5–30 minutes Frankfurters, Sausage 0.1 -5.0 lbs. Separate and remove defrosted pieces.
Cooking by Time Time Cook I & II allows you to microwave for a selected amount of time. Power level 10 (High) is recommended for most cooking, but you may change this for more flexibility. See the Cooking Guide. To become better acquainted with time cooking, make a cup of coffee by following the steps below. Step 1: Fill a cup 2/3 full of water, add- 1 teaspoon of instant coffee and stir to dissolve.
Glossary of Microwave Terms When adapting recipes for the microwave, it is best to start with a familiar recipe. Knowing how the food should look and taste will help when adapting recipes for microwaving. Foods that require browning or crisp, dry surfaces will cook better conventionally. Moist foods, such as vegetables, fruits, poultry and seafood, microwave well. Rich foods, such as bar cookies, moist cakes and candies, are suitable for microwaving because of their high fat and sugar content.
Microwave Cookware Guide & Microwave Adapting ~pe of Cookware Microwave Uses Foil-lined paper bags and boxes Foil baking trays Avoid using. You can use foil trays that are no higher than 3/4-in. (Foil or metal will reflect microwaves and cause uneven heating. ) Arcing can occur if foil is closer than 1 inch to oven walls, Aluminum foil Use for shielding. Metal or partially metal pots, pans, thermometers, skewers and twist ties Do not use. Microwave-safe thermometers and skewers are available.
Heating or Reheating Guide 1. Directions below ire for heating or reheating already-cooked foods stored in refrigerator or at room temperature. Use microwave-safe cookware. 2. Cover most foods for fastest heating. Exceptions are some sandwiches, Eriddle foods and baked items. 3. Bubbling around edges of dish is normal, since the center is the last to heat, Foods h;ated to 1600F. to 165°F, will provide safe, palatable results. Adjust temperatures to suit your personal taste.
Heating or Reheating Guide Item (continued) Amount Power Level Time 1 tu 2 pieces 3 to 4 pieces 1 to 2 servings 3 to 4 servings I to 2 3 to 4 I to 2 servings High ( 10) High ( 10) High ( 10) High ( 10) High ( lo) High ( 10) High ( 10) 2 tu 3 min. 3 I(} 4 min. 17 tn 2 min. 2Y, tu 3X min. 1 tu 1 Y, min. I X to 3 min. I to 3 min. I [() 2 servings 3 to 4 servings I cun ( 16 oz.) High ( 10) High ( lo) High ( 10) 4 to 7 min. 8 to 12 min. 6 to 8 min.
Defrosting Guide 1. Fond packuged in paper or plastic muy be defrosted without unwrapping. If food is foil wrapped, remove foil find place food in cooking dish for defrosting. Most food defrosts well using Defrost (3). For more even defrosting of larger foods, such as beet. lamb tind veal roasts, use Warm ( I). 2. Alter first half of defrosting time, unwrap package and check food. Turn food over. if necessary; break apart or separate food if possible, Shield any warm areas with small pieces of foil.
Defrosting Guide Food (continued) First Half Second Half Time, Min. Time, Min. Comments Fruit [Power Level: Defrost (3)] Fresh (10 to 16 oz.) 2 to 3 2 to 3 Plastic pouch—l to 2 ( 1 ()-oz. package) I to 3 3 to 4 Place package in oven. Remove foil or metal. After minimum time. break up with fork. Repeat if necessary. Place package in oven. Flex package once. Meat [Power Level: Defrost (3)] 2 to 3 per lb.
Cooking Guide Breads brown color on upside down breads, line dish before microwaving wi[h brown sugar-caramel mixture or sdvory topping, such as crushed, canned, French-fried onion rings. on breads will be soft and the outsides will not brown. If desired, sprinkle top ot’ batter with cinnamon-sugar mixture, chopped nuts or other topping for brown color. To increfise Crust Food Container Cover Power Level & Time Coffee cakes 8-in. round dish N() Meal-High (7) 9 to 1 I min.
Cooking Guide (continued) Candies 1. Always use microwave-safe cookware. For easy clean-up, melt chocolate in paper wrappers seam side up. or place chocolate in paper bowl to melt. Food Caramel apples 2. Candies which are boiled become very hot; handle cooking container carefully. Container Cover Power Level & Time Comments 2-cup No High ( 10) Unwrap half of a 1/4-02. package Of caramels into measuring cup. Add I measure 2 to 3 min. or 1 -qt. casserole tablespoon water.
Cheese and Eggs 1. Eggs maybe prepared many ways in the microwave oven. Always pierce whole yolks before microwaving to prevent bursting. 2. Never cook eggs in the shell, Do not reheat hard cooked eggs in the shell. They will explode. Food 3. Cook eggs just until set. They are delicate and will toughen if overcooked. Container Cover Power Level & Time 2-qt. casserole Cover or plastic wrap High ( 10) Comments Cheese Fondue Medium (5) To make sauce 5 to 7 min. 6 to 8 min.
Cooking Guide (continued) Gravies & Sauces 3. Vtiry basic white sauce by adding cheese, e&g yolks, cream, wine or herbs. 1. Cover thick, chunky sauces to prevent spattering. 2. Whisk sauces vigorously with wire whisk once or twice while microwaving, Food Container Cover Power Level & Time Gravies and sauces thickened with tlour or cornsttirch ( 1 cup) Melted butter sauces, cltirified butter ( 1/2 cup) Casserole N() Medium (5) 5 to 8 min. Microwave fat, flout and salt together to melt and blend.
Meats Container Cover Power Level & Time (or Internal Temp.) Roast, leg or shoulder Pie plate Cooking bag Medium (5) Chops & cutlets ( I in. thick) 4 chops Round dish No Meal-High (7) 8 to 10 min. Brush cbops lightly with oil. Turn meat over after half of cooking time. Bacon (per slice) Microwavesafe plate Paper towel High (10) 3/4 to 1 min. Arrange in single layer on paper towels. Cover with a paper towel.
Cooking Guide (continued) Poultry If you use a meat thermometer while cooking, make sure it is safe for use in microwave ovens. Container Cover Power Level & Time Comments Pieces Plate or round dish Wax paper High ( 10) 2 to 2X min. per piece Arrange in single layer in cooking dish so thickest meaty pieces are to outside edges of dish. Turn pieces over and rearrange after half of cooking time. Whole (unstuffed) Round dish Cooking bag Meal-High (7) 10 to 12 min. per lb.
Vegetables Amount Power Level Time Comments I medium head (about 2 Ibs.) High ( [0) f I to I 3 min. In a 2-qt. casserole, place 1/4 cup water. Carrots (fresh, sliced) (frozen) 1 lb. 1()-oz. package High ( 10) High ( 10) I 2 to 14 min. 8X to 1 Ofi min In I X-qt. casserole, place 1/4 cup water. In I -qt. casserole, place 2 tablespoons water. Cauliflower (flowerets) (fresh, whole) (frozen) I medium head 1 medium head I ()-oz. package High ( 10) High ( 10) High ( 10) 8 to I 2 min. 13 to 16 min.
Care and Cleaning Your new microwave oven is a valuable appliance. Protect it from misuse by following these rules: Keep your oven clean and sweet-smelling. Opening the oven door a few minutes after cooking helps air out the inside. An occasional thorough wiping with a solution of baking soda and water keeps the inside fresh. Don’t use sharp-edged utensils with your oven. The inside and outside oven walls can be scratched and the control panel can be damaged.
The Exhaust Feature Charcoal Filter CHARCOAL FILTER (on some models) ~Bh~wv-... ....,,g~~g REUSABLE GREASE FILTERS (on all models) The exhaust hood feature on your microwave oven is equipped with two metal filters which collect grease. When the fan is operated, air is drawn up through the filters. Depending on your model, it is either discharged through the provided venting to the outside or drawn through a charcoal filter and recirculated.
Light Bulb Replacement Oven Light Cooktop Light REMOVE SCREW To replace cooktop light, first disconnect power at main fuse or circuit breaker panel or pull plug. Remove screw on right side of light compartment cover and lower cover until it stops. To replace your oven light, first disconnect power at main fuse orr circuit breaker panel or pull plug. Remove the top grill by taking out the 2 screws that hold it in place. GROUNDING INSTRUCTIONS This appliance must be grounded.
—=— Questions? ~ Use This Problem Solver ~“ ~ PROBLEM OVEN WILL NOT COME ON CONTROL PANEL LIGHTED, YET OVEN WILL NOT START POSSIBLE CAUSE A fuse in your home may be blown or the circuit breaker tripped. Replace fuse or reset circuit breaker. ● ● Unplug your microwave oven, then plug it back in. ● Make sure 3-prong plug on oven is fully inserted into wall receptacle. ● Door not securely closed. ● START pad must be touched after entering cooking selection.
We’ll Be There With the purchase of your new GE appliance, receive the assurance that if you ever need information or assistance from GE, wdll be there. All you have to do is call–toll-free! GEAnswer Center In-Home Repair Service Service Contracts 8omExAREs YOU can have the secure feeling that (1E (lonsumer Service will still be (here after your warranty expires. PuI-chase a (;E contract while your warranty is still in effect and you’ll receive a substau~ial discount.
I YOUR GE MICROWAVE OVEN WARRANTY I Save proof of original purchase date such as your sales slip or cancelled check to establish warranty period. WHAT IS COVERED FULL ONE-YEAR WARRANTY For one year from date of original purchase, we will provide, free of charge, parts and service labor in your home to repair or replace any pad of the microwave oven that fails because of a manufacturing defect.